The Dark Mod Gameplay: Difference between revisions
Springheel (talk | contribs) |
Springheel (talk | contribs) |
||
| Line 220: | Line 220: | ||
You must hit an AI on the head to knock them out. Hitting an AI anywhere else will simply alert them. | You must hit an AI on the head to knock them out. Hitting an AI anywhere else will simply alert them. | ||
'''You can successfully knock out: | |||
1. Civilian AI from any direction, any time. | 1. Civilian AI from any direction, any time. | ||
| Line 226: | Line 226: | ||
2. Bare-head guards from any direction when relaxed, or from behind when alert. | 2. Bare-head guards from any direction when relaxed, or from behind when alert. | ||
3. Helmeted guards from behind when relaxed (helmeted guards cannot be knocked out when alert). | 3. Helmeted guards from behind when relaxed (helmeted guards cannot be knocked out when alert).''' | ||
Revision as of 18:22, 25 September 2009
author: Springheel
Since The Dark Mod is designed to simulate the stealth gameplay of Thief, many things will be very familiar to Thief players. There are some features that work differently, however, and some features are only partially working in the 1.0 Beta version. The following guide will explain how things work (for what doesn't work yet, see Known Bugs) in The Dark Mod.
If you have never played Stealth Games before, start with the Basics of Stealth Gaming.
Veteran stealth gamers can read the various sections below for more detail:
The Game Menus
Your experience with The Dark Mod will start with the Main Menu, where you may wish to adjust some settings before starting your first mission. If you already have saved games from a currently installed mission, you can load them from the Load/Save menu.
Starting a Mission
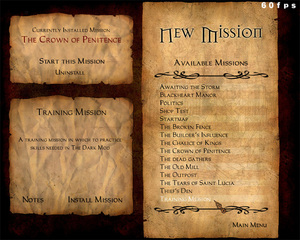
- Select New Mission from the Main Menu.
- Select a Mission from the list (start with the Training Mission if this is your first time) and click Install Mission.
- TDM will install the mission and restart. Select New Mission again, and click Start Mission
- You will see a briefing that introduces the mission. Click Objectives to proceed.
- Read your objectives, and choose your Difficulty Level. Then select Buy Equipment (or Start Mission in some missions).
- After purchasing desired equipment, hit Start Mission. (The option to Drop starting items is available, but use with caution...dropping some items may make a mission impossible to complete)
- The Mission Loading screen should appear. Be patient...loading a mission for the first time can take several minutes.
To call the Main Menu during the game, press ESC) .
Changing Settings
- Select Settings from the Main Menu
- Select the type of setting you wish to adjust: Audio, Video, Controls, or Gameplay
- The controls are set to defaults familiar to Thief players, however there are new keys/features that are worth reviewing.
Objectives
When you call the Main Menu during a mission (by hitting the ESC key), you will see an option for "Objectives". This is where you can check your progress.
Your objectives are also displayed after the Mission Briefing when you first start a mission.
When you complete an objective, a chime will sound and “Objective Completed” will be displayed at the top of the screen.
When you have completed all objectives, the map will close and a “Mission Succeeded” screen will appear. Likewise, if you fail an objective or are killed, a “Failed Mission” screen will appear. You can restart the map by selecting the "Restart" option or via the Main Menu.
HUD Display
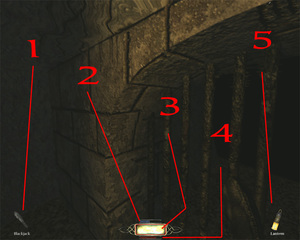
1. WEAPON ICON: An icon of your currently selected weapon is displayed in the bottom left corner of the screen.
2. BREATH INDICATOR: When you are underwater a small blue bar will appear above the lightgem. This bar measures how much air you have left. When the blue bar runs out, you start to take damage. Surfacing or using a Breath Potion will restore your air bar.
3. LIGHTGEM: The lightgem at the bottom of the screen indicates how easy you are to see. This is primarily due to how much light is hitting you, but also includes things like whether you are crouched, moving, or have a weapon drawn.
4. HEALTH INDICATOR: When you are injured, a small red healthbar appears below the lightgem. It will remain visible until you are returned to full health.
5. INVENTORY ICON: Your currently selected inventory object (or your loot total) is displayed as an icon in the bottom right.
Weapons
Weapon hotkeys are different than in Thief, since the key underneath ESC (~ on US, ^ on German keyboards) is reserved for use by the console:
- 1 Put away weapons
- 2 Blackjack
- 3 Short Sword
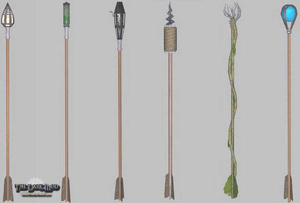
- 4 Broadheads
- 5 Water Arrows
- 6 Fire Arrows
- 7 Rope Arrows
- 8 Gas Arrows
- 9 Noise Arrows
- 0 Moss Arrows
Inventory Objects
Cycle through your inventory using the Inventory Prev/Next keys (default: [ or TAB for next item and ] for prev item). Inventory objects are stored in groups, so all keys will be stored together, all readables, etc. You can cycle through groups with the Prev/Next Group keys.
To ‘use’ an inventory object, select it and then hit the Use key (default: U). This will drink potions, throw mines, activate the spyglass, etc. To "use" objects on other objects (like using a key on a door), select the object in inventory, highlight the thing you want to use it on, and hit Use.
You can drop inventory items by hitting the Drop key (default: R) twice. See the section "Holding Junk Objects" for more information. Note that mappers may designate some important inventory items as undroppable.
You can clear the inventory selection by hitting the BACKSPACE key.
To set hotkeys for your inventory items, please see Custom Settings for Players.
Inventory Object: Flashbomb
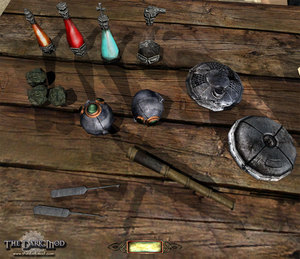
Activate a flashbomb by selecting it in inventory and hitting Use. Flashbombs detonate on impact. A short tap will cause it to fall and go off at your feet. Holding down the Use key will throw the flashbomb further away. If you use the Drop key to put the flashbomb down, it is not activated at all.
An AI must be looking at the flashbomb to be blinded. Don't look at the point of impact or you'll be blinded too.
AI are only blinded for a few seconds, and they are alerted by the flash, so this tool is most useful for getting away when you've been spotted.
Flashbombs have no affect on the undead.
Inventory Object: Holy Water
Select your holy water in inventory and hit the Use key. This puts holy water into your water arrows, making them lethal to undead. The effect is temporary (lasts 30 seconds) so use it wisely. (Note that there are no zombies in the beta version of TDM.)
Inventory Objects: Keys
Some doors or chests require keys to open. To open a locked door, select the appropriate key by scrolling to it in your inventory and hit the Use key (or the Frob key if you wish) while highlighting the door. Note that certain types of door locks (like padlocks) might have to be frobbed separately.
Inventory Objects: Lockpicks
See Lockpicking for more information on lockpicks.
Inventory Objects: Maps and Readables
In The Dark Mod, both maps and most readables (books, scrolls, etc) are inventory items. To read them, you scroll to the object in your inventory and then hit the Use key. The map or readable will be displayed on screen. Note that this does not pause the game. Unlike Thief, events continue to unfold around you, and you can be attacked while reading if not careful. You can see your environment around the edges of the map/readable, but the best suggestion is to find a safe place to read. With multi-page readables (distinguishable by folded corners on the page), use the next/prev inventory or next/prev weapon keys to scroll through pages. Hitting Use or Attack will put the readable away.
The Map key (default: M) will also automatically bring up your map, if you have one.
Inventory Object: Mines
Place a mine by selecting it in inventory and hitting Use. A short tap will drop the mine at your feet. Holding down Use will throw the mine further away. Once activated in this way, a mine is armed and will go off if stepped on. If you use the Drop key to put the mine down, it is not armed.
Mines are currently not very sensitive and AI can occasionally step right over them without setting them off. Note that you can set mines off by shooting them with an arrow.
Inventory Object: Player Lantern
Light is usually the bane of thieves everywhere, but there are times when you need just a little to make your way around. To this end, some thieves carry a covered lantern with a hood that can be closed to block out the light. To use the lantern, select it in inventory and hit Use. This will lift the cover if the lantern is currently off, or close the cover if it is currently lit. There is also a hotkey for using the lantern; by default this is L. This lantern is clipped to your belt so your hands are free, and it can even be used underwater for short periods.
Obviously using the lantern makes you clearly visible to any nearby opponents.
Inventory Object: Potions
Potions are used by selecting them in inventory and hitting Use. Healing potions will restore hit points (the effect is somewhat gradual). Breath potions increase the player's breath meter, allowing them to stay underwater longer.
Inventory Object: Spyglass
A good Thief likes to scout ahead. To use the spyglass, select it in inventory and hit Use. You can use the next/prev weapon keys to zoom in and out. You cannot use weapons or frob objects while using the spyglass.
Movement
Movement in The Dark Mod is not that different than Thief. You can run, walk, or creep, as well as do any of the three while crouching. The faster you move, the more noise you make.
Climbing
needs revising
Ladder/vine climbing:
Rope climbing:
Mantling
There are two different ways to mantle (pull yourself up onto ledges) in The Dark Mod. One is by holding down the Jump key, which Thief players will be familiar with. There is also a key specifically for mantling (default: C), so that failing to mantle will not result in jumping and making noise. Ideally there should be no difference in these methods, but occasionally one method will work when the other will not. Mantling is affected by where you are looking, so a successful mantle is more likely if you are looking directly at the edge of the object you wish to climb. To climb on a chair, look down at the seat then press the mantle control. By this means you can clamber over relatively low but awkward obstructions and even select one ledge above/below another.
You cannot mantle while carrying a junk object or body.
Interacting With Your Environment
The Dark Mod gives you far more flexibility than previous Thief games when it comes to interacting with things.
Manipulating Junk Objects
This is one area that works quite differently from the Thief series. “Junk” objects (anything that you can carry that doesn’t go into inventory, like chairs, candles, or bodies) are held out in front of you when frobbed. Unlike in Thief, they take up physical space, and can be used to push or manipulate other objects. They can also bump into other objects, making noise (or being knocked out of your hands), so be careful.
To grab a junk object, frob it as normal. The object will stop highlighting, and any weapons you have selected will lower. At this point, you can use the next/prev weapon keys (default: mousewheel up/down) to move the object closer/further away from you, and moving your mouse around will move the object (it stays basically in the center of your screen).
The heavier the object, the slower it moves, so you may notice a ‘lag’ if you turn quickly with heavy objects. It can take a while to get used to this.
To drop an object, hit the Drop key (default: R). By crouching and angling your view down gently, you'll find that you can easily set down objects without making noise. You can also throw a held object by hitting the Attack key. Tapping the Attack key throws the object a short distance; holding the Attack key down and releasing it will throw it further.
To rotate a held object, hold down the Z key or middle mouse button, and move your mouse. (By default, horizontal movement of the mouse yaws the object around the vertical axis, and vertical movement pitches the object up and down. Holding down the Run key makes horizontal mouse movement roll the object around the forward axis.) This can be useful for replacing objects that have been knocked over, or for placing moveable objects in creative ways (like putting a plank over a gap, or stacking chairs). It is possible to “drop” inventory items into your hands, where they can be manipulated as if they were junk objects. Select the object in your inventory, and hit the Drop key R. The object will appear in front of you like a junk object, and you can rotate it, set it down, etc. To put it back into your inventory, you must "use" the item again (U) or scroll to the next inventory item (TAB or [/]).
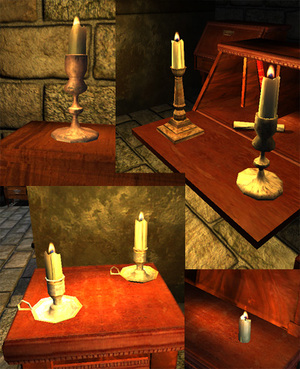
AI will hear junk objects that are dropped or banged around. It takes some skill to pick up objects on a crowded table without knocking them into each other. Remember than an object moves to the center of the screen when you pick it up. If you are looking slightly above the object, it will jump up to center screen (usually a good thing). If you're looking slightly below the object, it will jump down, banging whatever surface it rests on (a bad thing). A little practice may be required to smoothly and quietly sort through objects.
Some objects that are too heavy to lift may still be movable (like large crates). Walking or running into such objects may (mapper's choice) push them along the ground.
Junk Ojects: Candles
Lit candles can be frobbed and carried around to light your way (obviously you will be easily spotted while carrying a lit candle). They can also be used to light flammable objects like other candles or torches. Click the caption on the right for a demonstration.
Candles can be extinguished by water, or you can pinch them out by picking them up and clicking the Use key. (Note that this method can also be used on some movable lanterns).
Be aware that multiple light sources can cause a significant drain on your framerate. If you go around a room lighting six or seven new candles, don't be surprised if your framerate drops significantly.
Junk Objects: Bodies
Bodies work differently than most other objects. There are two ways to deal with dead or unconscious bodies in The Dark Mod. You can both drag them and carry them.
To drag a body, you must ‘frob’ it (which probably requires crouching), and then back away. The body will drag along with you until you frob it again or the body gets stuck on something.
This is not the most graceful way of moving bodies and is not recommended for long distances. Bodies can catch on things and get pulled out of your hands. It can be useful for quickly shifting a body into a shadow, however. You can even move individual limbs to put a flailing arm back into a shadow.
You can also carry a body over your shoulder. While a body is being dragged, hitting the Use button will lift it up over your shoulder. While carrying a body you move more slowly and cannot use weapons or inventory objects (though you can open doors). When you are ready to drop the body, hit Use again. If there is not enough room, you will hear a grunt and nothing will happen. Back up a bit and try again. When you drop a body, it will be the opposite orientation from the way you picked it up (if a body is face-up when you lift it, it will be face-down when you drop it). This allows you to easily search a body for keys or other objects.
Doors
You can interrupt a door opening or closing by frobbing it again. Frobbing a moving door stops it, allowing you to open a door just a crack to peer beyond.
You can lean into a door (use the lean left/right keys) to press your ear up against it and hear what's on the other side. Note that while you're concentrating on what's beyond the door you'll be less able to hear the sounds in the room you're currently in.
Lockpicking
You will definitely want to practice lockpicking in the Training Mission before trying a real map. Just reading the instructions is probably not enough to get the hang of it.
There are two types of lockpicks, 'triangle' and 'snake'. To begin, you must have the correct lockpick selected in inventory. If you do not, you will see a red flash behind the lockpick icon when you frob the locked door. To pick a lock, move close enough to highlight the door and hold the Use key. You will start to hear a sequence of clicks, and see the door handle (or lock pin) jiggle in sync.
The clicks are a random pattern. At the end of the pattern is a brief period of silence, then the pattern will begin again. To be successful you must hit the Attack key (or release the Use key if you prefer) at the start of that silence. If you hit the Attack key at the wrong time there is a dull 'fail' sound and the pattern begins again. Your goal is to learn the sequence of clicks so that you can anticipate when it will end. This requires concentration.
Some locks are more difficult than others and have multiple pins (which may require switching lockpicks). You can make lockpicking harder or easier in the Settings Menu, by adjusting how much silence there is between each pattern (the more silence, the easier it is to react in time). Setting Lockpicking to "Auto" will make locks open automatically after the pattern repeats 3 times.
Chests
It can sometimes be a little awkward frobbing items inside deep chests. Leaning forward (or even sideways) will usually help.
If you get too close to a chest, you can sometimes get in the way of the lid opening or closing. Back up a little if the lid is not moving as expected.
Combat
There are a number of ways that combat is different in The Dark Mod.
Blackjacking
Your blackjack is more effective if your opponent is relaxed and not expecting trouble.
You must hit an AI on the head to knock them out. Hitting an AI anywhere else will simply alert them.
You can successfully knock out:
1. Civilian AI from any direction, any time.
2. Bare-head guards from any direction when relaxed, or from behind when alert.
3. Helmeted guards from behind when relaxed (helmeted guards cannot be knocked out when alert).
The blackjack does a small amount of damage, so you could theoretically beat someone to death with it, if you have a lot of time on your hands.
Undead and some animals cannot be knocked out with the blackjack.
Melee Combat
You can use your shortsword to attack an enemy, as well as block enemy weapons. Attacking a relaxed enemy (ie, backstabbing) does extra damage. There is a combat arena in the Training Map for practicing combat.
To attack, hit the Attack key. This will make a left-to-right, slashing attack. If you move the mouse while clicking the Attack key, you can select other kinds of attacks. Moving the mouse down will cause an overhead swing. Moving the mouse up will cause a thrust attack. Moving the mouse left or right will cause a right-to-left or left-to-right slash, respectively.
AI can parry your swings, and they will do this more easily if you keep using the same kind of attack, so you will want to mix it up.
The amount of damage you do varies depending on where you hit. Hitting an AI in the head will do more damage than hitting their arm or leg. Armour also plays a factor. Your sword can't penetrate plate armour, and even chainmail or leather armour will provide the AI some protection.
To block an enemy strike, hold the Parry key. If you have the "Auto Parry" option selected in the Main Menu, you will automatically select the appropriate block (you must be facing the AI, obviously). You must hit the block key just as the AI is winding up for their attack--too late and you'll get hit before the block is ready. Too early and the AI will see the block and chose a different attack.
If you are using Manual Parry (select in the Settings menu), you need to select the appropriate block yourself by moving the mouse while holding the Parry button down.
If you successfully block an attack or damage your opponent an AI will be temporarily "flat-footed". They can still attack and defend, but they will not chase you if you turn to run. The effect lasts only a second or two, but that can sometimes be enough time to give you a head start.
The trick to a successful combat is timing. You need to try to anticipate your opponent's attacks, and then launch counter-attacks before he has a chance to parry.
AI will usually try to flee if they are badly wounded.
Missile Combat
Your broadhead arrows cannot penetrate plate armour, and will do less damage if they hit chain or leather armour. The best result is to hit unarmoured flesh. A single arrow to the head will kill a relaxed guard.
AI will switch to missile combat if they can see you but cannot reach you. If they don't have a missile weapon, they will become angry and start throwing whatever they can get their hands on (currently, that means wine bottles).
AI
The AI of TDM 1.0 still have some rough edges, but in general they are formidable opponents.
AI Senses
AI can see you if your lightgem is not totally black. The longer you're in their field of vision, the more likely they are to notice you and come and investigate.
AI can hear your footsteps, and noise that you make from banging into things or dropping objects.
AI can also feel you if you bump into them, or vice versa.
TDM AI are fairly intelligent about searching. They can identify good hiding spots and will check them out first.
When AI become alert, their acuity actually goes up. A shadow that is sufficient to hide you from a relaxed AI might not be enough for an AI that is alert and actively looking for trouble.
AI do not forget about you after giving up the search. They remain in an alert state, with higher senses and their weapons out.
AI Behaviour
AI need to see evidence in order to react to it. If a bloodstain or missing loot is in shadow, an AI won't notice it.
AI can react to missing objects or lights being put out, but only if mappers set the objects/lights as noteworthy. AI can potentially relight lights, if a mapper chooses.
AI become suspicious if they find a weapon lying around. Finding blood or a body will cause them to go fully alert.
AI currently do not react to doors, as the code for that is not fully finished (AI can't tell who opened the door, and get suspicious even of doors they open themselves).
AI do not yet notice moss patches, ropes from rope arrows, or mines.