DarkRadiant - Compilation Guide: Difference between revisions
| Line 43: | Line 43: | ||
= Compiling = | = Compiling = | ||
Once you've downloaded the sources, the steps for compiling DarkRadiant depend on your toolset/compiler. Choose one of the links below: | Once you've downloaded the sources, the steps for compiling DarkRadiant depend on your toolset/compiler. Choose one of the links below: | ||
* [[DarkRadiant - Compiling in Visual C++ 2012|Compiling in Visual C++ 2012]] | |||
* [[DarkRadiant - Compiling in Visual C++ 2010|Compiling in Visual C++ 2010]] | * [[DarkRadiant - Compiling in Visual C++ 2010|Compiling in Visual C++ 2010]] | ||
* [[DarkRadiant - Compiling in Visual C++ 2008|<del>Compiling in Visual C++ 2008</del>]] (Note: the VC++ 2008 project files have been removed in SVN revision 6785) | * [[DarkRadiant - Compiling in Visual C++ 2008|<del>Compiling in Visual C++ 2008</del>]] (Note: the VC++ 2008 project files have been removed in SVN revision 6785) | ||
Revision as of 14:21, 17 July 2012
Obtain the Sources
Even though the main codebase is stored and maintained on github, the win32 and win64 dependencies are available at SourceForge. To check out the sources, open up Explorer and create the folder you want to store them. To get DarkRadiant compiled from source in Windows you'll therefore need TortoiseSVN and TortoiseGit (or similar SVN and Git clients).
Download and install the clients, just install it into any folder of your preference. After installation it probably will ask to reboot your machine, as Tortoise integrates into the Explorer shell. (You can do that later, when all the other components have been installed).
To obtain the main application sources use your Git client to clone the repository from github (screenshot needed here for TortoiseGit):
git clone git://github.com/orbweaver/DarkRadiant.git
Check out the Dependencies (Win32)
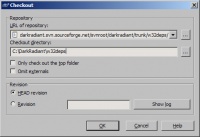
For Windows builds, the dependencies must be checked out along with the sources. To keep the github source repository small, the dependencies are stored in sourceforge's SVN repository: https://darkradiant.svn.sourceforge.net/svnroot/darkradiant/trunk/w32deps/ To check them out in the correct folder, proceed like this: Go to the parent folder of the one you checked out the sources to. Given you checked them out in C:\DarkRadiant, go to the C:\ folder. Right-click somewhere in the white area of the explorer window and choose SVN > Checkout. (Note: it is necessary to right-click a folder which is not under version control, otherwise Tortoise won't provide the "Checkout" option). Make sure that the w32deps/ folder is created under the C:\DarkRadiant folder, like this:
The resulting folder structure should look like this. The w32deps/ folder must be in the same folder as the radiant/ or include/ folder.
C:\
C:\DarkRadiant
C:\DarkRadiant\include\
C:\DarkRadiant\libs\
C:\DarkRadiant\plugins\
C:\DarkRadiant\radiant\
C:\DarkRadiant\w32deps\    <<----- w32deps/ is next to the radiant/ folder
[optional] Check out the Dependencies (Win64)
Users aiming to build for the Windows x64 target need to check out one additional folder to retrieve the binaries needed during the compilation process. Important: you need to check out both the w32deps as well as the w64deps folder.
https://darkradiant.svn.sourceforge.net/svnroot/darkradiant/trunk/w64deps/
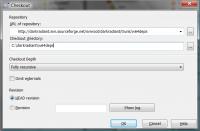
Go to the parent directory of the one you checked out the sources to, like described in the guide for checking out the w32deps. Given you checked them out in C:\DarkRadiant, go to the C:\ folder. Right-click somewhere in the white area of the explorer window and choose SVN > Checkout. (Note: it is necessary to right-click a folder which is not under version control, otherwise Tortoise won't provide the "Checkout" option). Make sure that the w64deps/ folder is created under the C:\DarkRadiant folder, like this:
The resulting folder structure should look like this. The w64deps/ folder must be in the same folder as the radiant/ or include/ folder, next to the w32deps/ one.
C:\DarkRadiant
C:\DarkRadiant\include\
C:\DarkRadiant\libs\
C:\DarkRadiant\..\
C:\DarkRadiant\radiant\
C:\DarkRadiant\w32deps\    <<----- w32deps/ is needed as well
C:\DarkRadiant\w64deps\    <<----- w64deps/ checked out at the same level as w32deps!
Compiling
Once you've downloaded the sources, the steps for compiling DarkRadiant depend on your toolset/compiler. Choose one of the links below:
- Compiling in Visual C++ 2012
- Compiling in Visual C++ 2010
Compiling in Visual C++ 2008(Note: the VC++ 2008 project files have been removed in SVN revision 6785)Compiling in Visual C++ 2005(Note: the VC++ 2005 project files have been removed in favour of the VS 2008 ones)Compiling in MinGW(Note: MinGW is not supported anymore, this page is outdated)- Compiling in Linux
Boost static libraries
Any VC++ compiler version other than the ones mentioned above will require a recompile of the boost static libraries which DarkRadiant links against. At the time of writing, DarkRadiant is using the following boost libraries:
- boost.regex
- boost.filesystem
- boost.system
- boost.python
To build these static libraries, boost provides the jam tool (bjam.exe), which can be used to build the statics for you. Go get the boost sources from their website (http://www.boost.org) and extract them into a new folder. Then get bjam (can also be downloaded from their website, but you can also build it from scratch)
Use DarkRadiant's build scripts
I prepared some batch files which do most of the dirty work for you. As prerequisite make sure that the path to bjam.exe is added to your PATH before invoking the scripts.
- Open a console (Win-R ==> "cmd")
- Change directories to the folder where you extracted the downloaded boost package to, e.g. c:\downloads\boost_1_42_0
- Run the build scripts from there, e.g. c:\games\darkradiant\tools\scripts\build_boost_libs, assuming that the DarkRadiant SVN trunk has been checked out to c:\games\darkradiant.
- Copy the files from the stage/ folder (which just popped up as a new Explorer window) to your w32deps/boost/libs folder.
- [64 Bit Build]: Use the build_boost_libs.x64 batch file to build the x64 libraries, but beware that this will overwrite the current contents of the stage/ folder.
Build a boost library manually
See main article: Compile the static Boost Libraries in Windows
The *.lib files from the stage/ folder should be copied into your w32deps/boost/lib folder (or the w64deps/boost/lib for Win64 targets) in your darkradiant directory and the linking should succeed.
How to compile the support libraries in Windows
DarkRadiant is using a lot of third-party libraries like GTK+, gtkmm, libxml2, libiconv, gtkglext, etc.
For Windows I set up custom VC++ solutions to compile most of the libraries directly from the source (as many of those third-party projects don't offer Windows x64 binaries), these projects can be found in the trunk/winbuild branch in SVN. The winbuild folder contains all the sources needed to build the Win32/Win64 dependency binaries, including gtkmm et al., gtkglextmm and gtksourceviewmm. Note that the headers are stored in w32deps, as the main DarkRadiant project needs them there, so w32deps is the place to look for most of the shared headers.
There are VC++ project files in each of the subdirectories (e.g. MSVC_Net2010), which work best when the winbuild folder is checked out as subfolder to the trunk/darkradiant working copy, next to your w32deps/w64deps directories, as indicated above. To check out the winbuild folder:
- Right-click your C:\Games folder >> SVN Checkout...
- Select https://darkradiant.svn.sourceforge.net/svnroot/darkradiant/trunk/winbuild to C:\Games\DarkRadiant\winbuild
The folder structure should then look like this:
C:\Games\DarkRadiant
C:\Games\DarkRadiant\w32deps
C:\Games\DarkRadiant\w64deps [optional for x64 builds]
C:\Games\DarkRadiant\winbuild
This way, the VC++ projects place their binaries in the correct location in the w32deps/w64deps folder and you can compile DarkRadiant right off the bat.
Compile Scripts (VC++ 2010)
For VC++ 2010 you can use the shell script in the winbuild folder. Open a VC++ 2010 Command Prompt and head to the winbuild directory, then call the batch file corresponding to your compiler version.
- build_all.x86.cmd => Compiles all 32 bit gtkmm libraries, including gtksourceviewmm and gtkglextmm (Debug & Release versions).
- build_all.x64.cmd => Compiles all 64 bit gtkmm libraries, including gtksourceviewmm and gtkglextmm (Debug & Release versions).
- build_c_libs.x86.cmd => Compiles all 32 bit C-libraries like win_iconv, libxml2, gtkglext and gtksourceview (Debug & Release versions).
- build_c_libs.x64.cmd => Compiles all 64 bit C-libraries like win_iconv, libxml2, gtkglext and gtksourceview (Debug & Release versions).
The 32 bit shell scripts will place the *.lib files directly into your w32deps folder, the 64 bit ones put their files into w64deps.
Compile order for gtkmm (VC++ 2008)
When using the older VC++ 2008, you'll need to build stuff manually (or tweak the scripts above). Use this build order as found on http://live.gnome.org/gtkmm/MSWindows/BuildingGtkmm.
- libsigc++
- glibmm
- cairomm
- pangomm
- gtkmm
- win_iconv
- libxml2
- gtksourceview
- gtksourceviewmm
- gtkglextmm

