Cutscenes Part 4: Extras: Difference between revisions
m adding category tag |
|||
| (9 intermediate revisions by 2 users not shown) | |||
| Line 1: | Line 1: | ||
==Embellish the Ending== | ==Embellish the Ending== | ||
Open ''snitch4.map'' in Dark Radiant. | Open ''snitch4.map'' in Dark Radiant. | ||
| Line 36: | Line 33: | ||
Next, add the command for the informant to return to his porch, and position it just below the guard's command to leave. Remember to uncheck the "Wait until finished" box. | Next, add the command for the informant to return to his porch, and position it just below the guard's command to leave. Remember to uncheck the "Wait until finished" box. | ||
===The Final Shots=== | ===The Final Shots=== | ||
Now we want to add the camera shot of the guard walking away and saying his final line. This will require | Now we want to add the camera shot of the guard walking away and saying his final line. This will require three new commands: | ||
* Trigger Camera8 | * Trigger Camera8 (new) | ||
* Wait 1 second | * Wait 1 second (new) | ||
* Guard says line '''snitch_guard_6''' | * Guard says line '''snitch_guard_6''' | ||
* Wait 1 second | * Wait 1 second (new) | ||
When run, this changes the screen to a shot of the guard approaching, then there's a slight pause, the guard says his line, and then there's another pause. | When run, this changes the screen to a shot of the guard approaching, then there's a slight pause, the guard says his line, and then there's another pause. | ||
| Line 61: | Line 58: | ||
The next command in the sequence should be "talk '''snitch_guard_6'''". | The next command in the sequence should be "talk '''snitch_guard_6'''". | ||
* Create a second "WaitSeconds" command and position it below the snitch_guard_6 command. | * Create a second "WaitSeconds" command and position it below the "talk '''snitch_guard_6'''" command. | ||
Repeat these instructions to | Repeat these instructions to create this sequence: | ||
* Trigger Camera9 | * Trigger Camera9 | ||
* Wait 1 second | * Wait 1 second | ||
| Line 84: | Line 81: | ||
==Animations== | ==Animations== | ||
To make the scene a | To make the scene a little less cut-and-dry, you can add animations to the actors. Look at the file ''darkmod/def/tdm_ai_guard_proguard_devel.def''. Search for the section that starts with: | ||
<pre> | <pre> | ||
//****************************************** | //****************************************** | ||
| Line 128: | Line 125: | ||
==A Final Camera Shot== | ==A Final Camera Shot== | ||
That's it for our conversation. Alongside ''snitch4.map'' and ''snitch4.script'', which we've been using above, you'll find ''snitch4a.map'' and ''snitch4a.script'', which include the conversation from this | That's it for our conversation. Alongside ''snitch4.map'' and ''snitch4.script'', which we've been using above, you'll find ''snitch4a.map'' and ''snitch4a.script'', which include the conversation from this tutorial. | ||
You can build and run ''snitch4a.map'' and compare it to your own work. You'll find there's one extra camera shot at the end, which adds a touch of mystery to the scene. | You can build and run ''snitch4a.map'' and compare it to your own work. You'll find there's one extra camera shot at the end, which adds a touch of mystery to the scene. | ||
| Line 140: | Line 137: | ||
{{Template: Cutscenes}} | {{Template: Cutscenes}} | ||
[[Category:Tutorial]] | |||
[[Category:Video and cutscenes]] | |||
Latest revision as of 04:35, 22 November 2018
Embellish the Ending
Open snitch4.map in Dark Radiant.
The bulk of the conversation is now in place. It's a bit strange that the actors stay by the bulletin board after they're done talking, so let's make them walk away to end the scene. What we want to see is both actors walk away, a shot of the guard walking toward the camera as he says his final line, then a shot of the informant walking toward the camera as he says his final line.
Create Destinations
The guard can walk back to the path_corner where he started. The informant, however, needs somewhere to go.
- Create a path_corner on the informant's porch. Give it the name "EndMarkInformant".
- Create a camera to give us a shot of the guard as he walks away. (Camera8 and target_null_8.)
- Create a camera to give us a shot of the informant as he walks away. (Camera9 and target_null_9.)
- Add the property "trigger" "1" to each camera.
The Guard Leaves
Now we're ready to add to the conversation, starting with having the guard walk away.
- Bring up the Conversation Editor.
- Select Snitch and click the Edit button.
- Click the Add button.
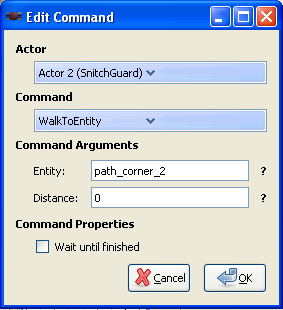
- In the Edit Command window, set these:
- Actor: SnitchGuard
- Command: WalkToEntity
- Entity: path_corner_2
- Distance: 0 (this is how far from path_corner_2 the guard needs to be before he stops walking)
- Uncheck "Wait until finished".
- Click OK.

This adds a new command at the bottom of the command list. But it's not where it needs to be in the sequence. We have to move it up.
- Select this new command.
- Click the Up button enough times to move the command to just below "talk snitch_guard_5".
Now the guard will say his final line to the informant, and turn to walk away.
Until now, we haven't bothered with the "Wait until finished" checkbox. We want it unchecked for this command, however, since we don't want to wait until the guard reaches his destination before running the next command. We need the informant to leave, both actors to say their final lines, and give control back to the player.
The Informant Leaves
Next, add the command for the informant to return to his porch, and position it just below the guard's command to leave. Remember to uncheck the "Wait until finished" box.
The Final Shots
Now we want to add the camera shot of the guard walking away and saying his final line. This will require three new commands:
- Trigger Camera8 (new)
- Wait 1 second (new)
- Guard says line snitch_guard_6
- Wait 1 second (new)
When run, this changes the screen to a shot of the guard approaching, then there's a slight pause, the guard says his line, and then there's another pause.
- Click the Add button on the Edit Conversation window.
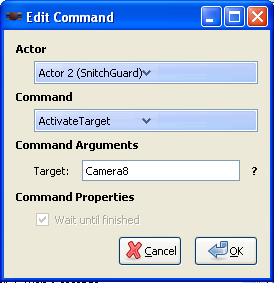
- In the Edit Command window, set these:
- Actor: SnitchGuard
- Command: ActivateTarget
- Target: Camera8
- Click OK.

- Move this new command up below the command for the informant to leave
- Click the Add button on the Edit Conversation window.
- In the Edit Command window, set these:
- Actor: SnitchGuard
- Command: WaitSeconds
- Seconds: 1
- Click OK.
- Move this new command up below the command that triggers Camera8.
The next command in the sequence should be "talk snitch_guard_6".
- Create a second "WaitSeconds" command and position it below the "talk snitch_guard_6" command.
Repeat these instructions to create this sequence:
- Trigger Camera9
- Wait 1 second
- Informant says line snitch_informant_8
- Wait 1 second
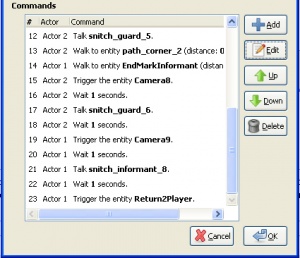
At this point, the new commands you added should look like this:

Taking another look at Return2Player(), we see that it's been changed to have Camera9 turn itself off and return control to the player:
void Return2Player()
{
   $Tport2.activate($player1);  // Put the player back on the porch
   $Camera9.activate($player1); // Return control to the player
}
- Click OK twice to leave the Edit Conversation and Conversation Editor windows.
- Save, build, run, and press button 2 on the porch.
Now, with the commands you added, the actors turn away, say their final lines in separate camera shots, and control returns to the player.
Animations
To make the scene a little less cut-and-dry, you can add animations to the actors. Look at the file darkmod/def/tdm_ai_guard_proguard_devel.def. Search for the section that starts with:
//******************************************
// randomly called idle animations:
// ******************************************
    anim idle_armwipe           models/md5/chars/guards/proguard/idle_armwipe.md5anim
    {
       frame 32 sound tdm_brush01
    }
Any of the idle animations in this section could be added as single animations at any point in the conversation. For our scene, let's have the informant spit after one of his lines.
- Bring up the Conversation Editor, and edit Snitch.
- Add this command:
- Actor: SnitchInformant
- Command: PlayAnimOnce
- Anim: idle_spit
- Blendframes: 4
- Uncheck "Wait until finished"
- Place this command just below the "talk snitch_informant_4" command. Since we turned off the "Wait until finished" flag, and the following command is "talk snitch_guard_3", the guard will say his line while the informant spits.
The Blendframes number is the number of frames it takes to blend in and out of the animation. The informant is already moving (swaying, looking around) so this makes the spit animation seamless. You can try other numbers for this, but 4 seems to work well.
- Leave the Conversation Editor via the OK buttons.
- Save, build, run, and press button 2.
You should see the informant spit right on cue, while the guard continues with his next line.
Sound Effects
Let's add a sound effect to the scene. We'll ring a church bell three times in the middle of the conversation, to suggest that this meeting is occurring at 3 in the morning.
Speakers for the bells are already in the map (in the air way above the barrel), along with a target_callscriptfunction (named RingBell) that calls RingBell() to fire the speakers in sequence. (Read the comment above the function to see why three speakers were used instead of one.)
- Bring up the Conversation Editor, and edit Snitch.
- Add this command:
- Actor: SnitchInformant
- Command: ActivateTarget
- Target: RingBell
- Place this command just below the "talk snitch_guard_2" command.
- Leave the Conversation Editor via the OK buttons.
- Save, build, run, and press button 2.
The church bell rings three times, adding to the atmosphere of the scene.
A Final Camera Shot
That's it for our conversation. Alongside snitch4.map and snitch4.script, which we've been using above, you'll find snitch4a.map and snitch4a.script, which include the conversation from this tutorial.
You can build and run snitch4a.map and compare it to your own work. You'll find there's one extra camera shot at the end, which adds a touch of mystery to the scene.
Wrapup
There are other conversation commands beyond what we've used here. Experiment with them and see what you can do to make your conversation interesting and unique.
In Part 4, we finished the conversation for our scene, learning how to add extra camera shots, animations, and sound effects.
In Part 5, we'll examine the cutscene from the ending of Somewhere Above the City.