Skybox Tutorial
Skybox Tutorial
This is the tutorial for skybox creation by Sotha.
Motivation
Why bother creating a custom skybox? The standard starry prefab is just fine!
It indeed is, but everyone has seen it so many times. Creating a specific sky just for your mission gives your mission personality. With the sky, you can relate atmosphere and information on the location where the mission takes place. In the plains just outside the City? In the top of a high mountain, in the eternal snow? With a some hours invested in sky creation you can make your mission seem real as it seems to be located somewhere. It does not exist alone in the world, you can see the world around it. You can see the tiny hamlets and the fields surrounding the wealthy merchants manor.
Introduction
In this tutorial you will learn
- how to create a sky texture using Terragen.
- how to build a skybox using the landscape texture you created.
- how to add details (buildings) to the skybox.
Preparing
- Get aquainted with the basic idea what we are going to do. https://modwiki.dhewm3.org/Cube_maps
- Download and install Terragen. [Geep comments in 2025: The original (16-bit?) version of free Terragen for which this tutorial was written is no longer available from vendor planetside.co.uk. Instead now offered is a free version of Terragen 4. Video tutorials about Terragen 4 are available. In particular, within the 12-part series by Vladimir Chopine [GeekatPlay], part 3 discusses skyboxes. If anyone tries Terragen 4 for TDM, please update our tutorial here as needed.]
Basic Scenery Building
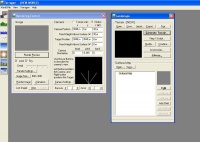
The program window is shown in the picture 1.

First create your first terrain. Click the Generate Terrain -button and click again the Generate Terrain button in the appearing window. You'll see a grey topology map appear. Close the Terrain Genesis window.
Since we are doing a skybox, we need the camera to be located near the middle of the map, so we are surrounded by the scene. Click left mouse button on the topology map on the Rendering Control -window to place camera in the middle of the scene. You can change the direction with the right mouse button. The grayscale topography image may not give much information on the resulting scene, so you can use the 3D preview button on the left. You can also use Rendering Preview and the actual Render Image -buttons to check what the camera sees.
Now that you know how to see what you've created, you need to try to select the parameters so that you'll get close the kind of scenery you want (plains with distant mountains or barren mountain range). Hold your mouse above the settings (Realism, Smoothing, etc) to see what each parameters does. Experiment until you get something close what you want. The closer you get with the parameters, the easier the sculpting phase is.
Sculpting the Scenery
When you're close with the scenery you want, save it so you can start from where you were is something goes wrong. Landscape Window -> Terrain -> Save. Now we will sculpt the map. Click the topology map on the Landscape window. Now you can sculpt the scene with the Basic Sculpting Tool. Raise a mountain, remove a mountain, smoothen the plains and add a pit with smooth edges for a lake, or make a river.
Water, Surface and Skies
Next we set the water level. Click the water-button on the left. Set the water level and press update maps. You'll see light blue colors in areas with water. Set the levels so that you've realistic looking sea. Sculpt shores to be gently sloping.
Then we set the surface. In the landscape window there is Surface Map -section. Select open and try to pick up the kind of terrain textures you need. For plains "grass and sand" is just fine. For others you probably need to create your own surface map. I cannot help with this at this time.
You can edit the sky's clouds by selecting the Clouds button on the left and set the ambience haze from the atmosphere button on the left.
Buildings?
Geep 2025 comments:
Terragen 4 and its predecessors have no native way to create distant buildings. One approach, before capturing the skybox cubemap:
- Acquire such open-source assets in one of the Terragen object import formats (.obj, .lwo, .tgo). To import, see TerraTuts' "Terragen 4 Basics" series, particularly "Importing a Single 3D Object" and "Positioning a Single 3D Object".
- Or use a tool like Blender to build your own model of building(s).
An advantage is that the building and landscape will share lighting, so match easily.
Alternatively, after cubemap texture capture, create miniatures in DR to add near the walls of your skybox, discussed under "Creating the Skybox" below.
Lighting
Finally we set the lighting conditions with the button on the left. Since TDM is a sneaking game you probably want to set the sun below the horizon. Maybe the mission occurs at midnight? Or just after sunset? Set the sun appropriately. Check the rendering preview. It probably looks too bright with the sun gone, so decrease Shadow Lightness (located in Lighting Conditions -> Background Light). If you end up in pitch black scenery, increase the Exposure time in Rendering Control -> Camera Settings.
Rendering the Scenery
When you have everything the way you want we can proceed to the image capture phase. DOUBLE CHECK your work with the Render Image -button in every direction with low detail settings so everything looks good. Once the images have been captured you need to capture everything again if you notice something unpleasing in the resulting work.
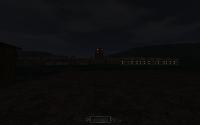
Set all detail knobs you can find to maximum (Rendering Control -> Render Settings, Rendering Control -> Detail). Set image size to 960x960. This is the maximum resolution you'll get from the free version. Double check your camera settings. Is the camera in the correct position? Does it capture the scenery details you want? Is the camera height from the surface correct? I used 6m for the plains skybox in picture 3. Check the camera ZOOM in Camera Settings: if this is any other than 1.0 your skybox will not align correctly (it defaults to 1.4 so change it!)
Terragen 2+ evidently would use "FOV 90" instead of Zoom, says post by someTaff.
Then capture the images.
- Set Camera orientation: head 0, pitch 0, bank 0
- Render image and save it as yoursky_forward.bmp
- Set Camera orientation: head 90, pitch 0, bank 0
- Render image and save it as yoursky_right.bmp
- Set Camera orientation: head 180, pitch 0, bank 0
- Render image and save it as yoursky_back.bmp
- Set Camera orientation: head 270, pitch 0, bank 0
- Render image and save it as yoursky_left.bmp
- Set Camera orientation: head 0, pitch 90, bank 0
- Render image and save it as yoursky_up.bmp
- Set Camera orientation: head 0, pitch -90, bank 0
- Render image and save it as yoursky_down.bmp
Open each of your image files with GIMP or whatever and save them as .tga in to folder darkmod\env\custom
Create Material
Create a material file for your sky in folder darkmod\materials. Create a text file called Customskies.mtr. Fill in the following
textures/skies/custom/yoursky
{
qer_editorimage   textures/custom/skies/yoursky.tga
noFragment
noshadows
nooverlays
forceOpaque            // so transparent windows can draw on top of it
{
blend      add      // so transparent windows can draw on top of it
cameraCubeMap   env/custom/yoursky
forceHighQuality
texgen      skybox
texgen         wobblesky .0 .0 .0
 }
}
Creating the Skybox
Fire up DR. You could just apply the sky texture you created (it should be in DR textures/skies/custom) on the ceilings on your map, but for distant buildings it is better to put smf/portal_sky where your sky should be.
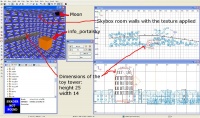
Create somewhere away from your main map a box shaped room with the texture you created. Place an entity info_portalsky exactly in the middle of the room. Now all the surfaces with the portal_sky textures show the contents of the info_portalsky room. Now you add details to your skybox by adding buildings in the small info_portalsky -room you created. You will notice that you have to make small toy-houses and place them just slightly below the info_portalsky and next to the wall in the skybox -room. See picture 3 to see a suggested setup. Notice the position and orientation of the moon slab, the size scale of the buildings and the position of the info_portalsky.

Add light source to make the buildings bathe in moonlight. Create the moon itself: add a simple square brush with nodraw on all sides. Rotate the brush so that it's wide face is pointed straight towards the info_portalsky. To this face add the moon texture and FIT it there with surface inspector. Add more buildings and details. You'll get a decent illusion of distant structures (see picture 3). You can also add particle effects which show in the sky portals as well. Important note: if you have a sunset in your skybox, go ingame and check the compass if the sunset is in an incorrect direction. You can remedy this by a) turn the sky texture or b) rotate the info_portalsky entity. Also check that your moon's light side is pointed towards the sunset.

I've tried scaling existing models down with the rotation parameter, but they do not light up correctly by light sources. Therefore you have to create all small detail objects from normal brushes as the ones seen in picture 2.
Geep comments, 2020: This finding predated DR's model rescaling tool, which now offers another way to downsize existing models... more compatible with light sources?
Rotating the Skybox
If your compass shows that north is not in the correct direction you can rotate the info_portalsky. This is not a good solution, since this changes the north of the map. Objects in the skybox north won't be in game world north. It might get really confusing to make changes in the skybox later if you take this path. To maintain consistency, you should rotate the skybox instead. It is done as follows:
- Check the cubemap picture here for reference: [1]. Basically we are going nudge each direction file one slot leftwise.
- Cut your skybox files to a temporary safe folder. Copy your _up.tga and _down.tga files back to the env/custom -folder. I'll talk only in shorthand form. "_up.tga" means "yoursky_up.tga"
- Copy _forward.tga back to your env/custom/ folder. Rename it to _left.
- Copy _right -> _forward
- Copy _back -> _right
- Copy _left -> _back
- Go ingame and check direction. If its still wrong, repeat these steps until you get it right.
- When you got the surrounding correctly, go ingame and check how badly the sky texture and ground texture are unaligned with the rest of the scenery. Pay attention how many 90 degree turns to what direction is needed to make it match with the surroundings.
- Open them with you favourite image manipulation software and rotate the files accordingly.
Geep comments, 2020: You might also need to do this procedure if, rather than creating your own skybox texture, you are using one acquired from a third-party sharing repository. This is because the skybox format is not universal across game platforms. Expect to both re-name and rotate some of the images individually.
This concludes the tutorial and you should now be able to create your very own scenery! Go forth and create!
See Also
- Skybox Basic Details has more about using the standard prefab tdm_sky_starry1.pfb. But of pertinence here, it touches on inside-skybox lighting considerations. There is also a quick backgrounder on using a skybox best in TDM.
- Besides the projected terrain of the sky box, there is world-scale terrain within TDM itself. Generally, this is not created with Terragen-like tools, but by hand-building DR patches. Some terrain may be inaccessible, outside city walls; this can present visportalling and performance challenges. Accessible terrain will need additional work for path finding. For more: Systematic Method for Adding Pathfinding to Uneven Terrain; Pathfinding; Roads.