Patch Splitting - Basic Tutorial
In this tutorial, we'll demonstrate how to manually split patches in your map.
Using DarkRadiant
To split a patch in DarkRadiant:
- Create a patch
- Select 2 or more pink vertices from the same row or column
- From the Menu, click Scripts -> Split Patch
See here for an old but still helpful video tutorial: https://www.youtube.com/watch?v=R1FdElYIjnk
It's not clear what the value of the below methods are, apart from legacy information.
Via Text Editor
Vertically
To start off, we need to create a new map file, so go to your darkmod/maps folder and right click and create a new text document. Call the file whatever you want (example: split.map)
Open up your new map file with your favorite text editor (I use Editplus 3 but notepad is fine), and copy these contents:
Version 2
// entity 0
{
"classname" "worldspawn"
"editor_drLastCameraPos" "-8 -1324 800"
"editor_drLastCameraAngle" "0 90 0"
//Start of Patch Definition=========================
// primitive 6
{
patchDef2
{
"textures/darkmod/metal/detailed/bars_rivets_steel"
( 5 5 0 0 0 )
(
( ( -344 0 320 0 0 ) ( -344 0 560 0 -0.9375 ) ( -344 0 800 0 -1.875 ) ( -344 0 1040 0 -2.8125 ) ( -344 0 1280 0 -3.75 ) )
( ( -144 0 320 0.78125 0 ) ( -144 0 560 0.78125 -0.9375 ) ( -144 0 800 0.78125 -1.875 ) ( -144 0 1040 0.78125 -2.8125 ) ( -144 0 1280 0.78125 -3.75 ) )
( ( 56 0 320 1.5625 0 ) ( 56 0 560 1.5625 -0.9375 ) ( 56 0 800 1.5625 -1.875 ) ( 56 0 1040 1.5625 -2.8125 ) ( 56 0 1280 1.5625 -3.75 ) )
( ( 256 0 320 2.34375 0 ) ( 256 0 560 2.34375 -0.9375 ) ( 256 0 800 2.34375 -1.875 ) ( 256 0 1040 2.34375 -2.8125 ) ( 256 0 1280 2.34375 -3.75 ) )
( ( 456 0 320 3.125 0 ) ( 456 0 560 3.125 -0.9375 ) ( 456 0 800 3.125 -1.875 ) ( 456 0 1040 3.125 -2.8125 ) ( 456 0 1280 3.125 -3.75 ) )
)
}
}
//END OF THE PATCH DEFINITION=========================
}
and paste them into your newly created map file and save the file.
Now open DarkRadiant and open your new map file.
You should have one 5x5 patch in the middle. That patch we will be splitting into two patches.
This is the entry that we will be cutting up.
	{
	patchDef2
	{
	"textures/darkmod/metal/detailed/bars_rivets_steel"
	( 5 5 0 0 0 )
	(
		Row			Row			Row			Row			Row
Column	( ( -344 0 320 0 0 ) ( -344 0 560 0 -0.9375 ) ( -344 0 800 0 -1.875 ) ( -344 0 1040 0 -2.8125 ) ( -344 0 1280 0 -3.75 ) )
Column	( ( -144 0 320 0.78125 0 ) ( -144 0 560 0.78125 -0.9375 ) ( -144 0 800 0.78125 -1.875 ) ( -144 0 1040 0.78125 -2.8125 ) ( -144 0 1280 0.78125 -3.75 ) )
Column	( ( 56 0 320 1.5625 0 ) ( 56 0 560 1.5625 -0.9375 ) ( 56 0 800 1.5625 -1.875 ) ( 56 0 1040 1.5625 -2.8125 ) ( 56 0 1280 1.5625 -3.75 ) )
Column	( ( 256 0 320 2.34375 0 ) ( 256 0 560 2.34375 -0.9375 ) ( 256 0 800 2.34375 -1.875 ) ( 256 0 1040 2.34375 -2.8125 ) ( 256 0 1280 2.34375 -3.75 ) )
Column	( ( 456 0 320 3.125 0 ) ( 456 0 560 3.125 -0.9375 ) ( 456 0 800 3.125 -1.875 ) ( 456 0 1040 3.125 -2.8125 ) ( 456 0 1280 3.125 -3.75 ) )
	)
	}
	}
As you can see I've marked the colums and rows of your patch mesh. The easiest way to split the patch is Horizontally because there is less cutting and pasting, and is easier to visualize.
So as of now we have 5 rows and 5 columns. We want the patch to only have 3 columns and 5 rows, and the second patch to have 3 columns and 5 rows. So first we have to copy and paste the entire patch entry, so do that now.
You want it to look like this:
// primitive 6
{
patchDef2
{
"textures/darkmod/metal/detailed/bars_rivets_steel"
( 5 5 0 0 0 )
(
( ( -344 0 320 0 0 ) ( -344 0 560 0 -0.9375 ) ( -344 0 800 0 -1.875 ) ( -344 0 1040 0 -2.8125 ) ( -344 0 1280 0 -3.75 ) )
( ( -144 0 320 0.78125 0 ) ( -144 0 560 0.78125 -0.9375 ) ( -144 0 800 0.78125 -1.875 ) ( -144 0 1040 0.78125 -2.8125 ) ( -144 0 1280 0.78125 -3.75 ) )
( ( 56 0 320 1.5625 0 ) ( 56 0 560 1.5625 -0.9375 ) ( 56 0 800 1.5625 -1.875 ) ( 56 0 1040 1.5625 -2.8125 ) ( 56 0 1280 1.5625 -3.75 ) )
( ( 256 0 320 2.34375 0 ) ( 256 0 560 2.34375 -0.9375 ) ( 256 0 800 2.34375 -1.875 ) ( 256 0 1040 2.34375 -2.8125 ) ( 256 0 1280 2.34375 -3.75 ) )
( ( 456 0 320 3.125 0 ) ( 456 0 560 3.125 -0.9375 ) ( 456 0 800 3.125 -1.875 ) ( 456 0 1040 3.125 -2.8125 ) ( 456 0 1280 3.125 -3.75 ) )
)
}
}// primitive 7
{
patchDef2
{
"textures/darkmod/metal/detailed/bars_rivets_steel"
( 5 5 0 0 0 )
(
( ( -344 0 320 0 0 ) ( -344 0 560 0 -0.9375 ) ( -344 0 800 0 -1.875 ) ( -344 0 1040 0 -2.8125 ) ( -344 0 1280 0 -3.75 ) )
( ( -144 0 320 0.78125 0 ) ( -144 0 560 0.78125 -0.9375 ) ( -144 0 800 0.78125 -1.875 ) ( -144 0 1040 0.78125 -2.8125 ) ( -144 0 1280 0.78125 -3.75 ) )
( ( 56 0 320 1.5625 0 ) ( 56 0 560 1.5625 -0.9375 ) ( 56 0 800 1.5625 -1.875 ) ( 56 0 1040 1.5625 -2.8125 ) ( 56 0 1280 1.5625 -3.75 ) )
( ( 256 0 320 2.34375 0 ) ( 256 0 560 2.34375 -0.9375 ) ( 256 0 800 2.34375 -1.875 ) ( 256 0 1040 2.34375 -2.8125 ) ( 256 0 1280 2.34375 -3.75 ) )
( ( 456 0 320 3.125 0 ) ( 456 0 560 3.125 -0.9375 ) ( 456 0 800 3.125 -1.875 ) ( 456 0 1040 3.125 -2.8125 ) ( 456 0 1280 3.125 -3.75 ) )
)
}
}
So select the last 2 Columns in the first patchDef2 and delete them, so it looks like this.
// primitive 6
{
patchDef2
{
"textures/darkmod/metal/detailed/bars_rivets_steel"
( 5 5 0 0 0 )
(
( ( -344 0 320 0 0 ) ( -344 0 560 0 -0.9375 ) ( -344 0 800 0 -1.875 ) ( -344 0 1040 0 -2.8125 ) ( -344 0 1280 0 -3.75 ) )
( ( -144 0 320 0.78125 0 ) ( -144 0 560 0.78125 -0.9375 ) ( -144 0 800 0.78125 -1.875 ) ( -144 0 1040 0.78125 -2.8125 ) ( -144 0 1280 0.78125 -3.75 ) )
( ( 56 0 320 1.5625 0 ) ( 56 0 560 1.5625 -0.9375 ) ( 56 0 800 1.5625 -1.875 ) ( 56 0 1040 1.5625 -2.8125 ) ( 56 0 1280 1.5625 -3.75 ) )
)
}
Now select the first 2 Columns of the second patchDef2 and delete them so it looks like this
}// primitive 7
{
patchDef2
{
"textures/darkmod/metal/detailed/bars_rivets_steel"
( 5 5 0 0 0 )
(
( ( 56 0 320 1.5625 0 ) ( 56 0 560 1.5625 -0.9375 ) ( 56 0 800 1.5625 -1.875 ) ( 56 0 1040 1.5625 -2.8125 ) ( 56 0 1280 1.5625 -3.75 ) )
( ( 256 0 320 2.34375 0 ) ( 256 0 560 2.34375 -0.9375 ) ( 256 0 800 2.34375 -1.875 ) ( 256 0 1040 2.34375 -2.8125 ) ( 256 0 1280 2.34375 -3.75 ) )
( ( 456 0 320 3.125 0 ) ( 456 0 560 3.125 -0.9375 ) ( 456 0 800 3.125 -1.875 ) ( 456 0 1040 3.125 -2.8125 ) ( 456 0 1280 3.125 -3.75 ) )
)
}
Now one last step that's very important or the map will fail to load. Right now we've reduced our 5x5 patch into 2 3x5's. We now have to change the patch's parameters to reflect this change.
So we have to change the Cols for both new patches from 5 to 3.
So for the first patch:
// primitive 6
{
patchDef2
{
"textures/darkmod/metal/detailed/bars_rivets_steel"
( 5 5 0 0 0 )	<----------------------------------------[this means 5x5 patch, change this to ( 3 5 0 0 0 ) ]
(
( ( -344 0 320 0 0 ) ( -344 0 560 0 -0.9375 ) ( -344 0 800 0 -1.875 ) ( -344 0 1040 0 -2.8125 ) ( -344 0 1280 0 -3.75 ) )
( ( -144 0 320 0.78125 0 ) ( -144 0 560 0.78125 -0.9375 ) ( -144 0 800 0.78125 -1.875 ) ( -144 0 1040 0.78125 -2.8125 ) ( -144 0 1280 0.78125 -3.75 ) )
( ( 56 0 320 1.5625 0 ) ( 56 0 560 1.5625 -0.9375 ) ( 56 0 800 1.5625 -1.875 ) ( 56 0 1040 1.5625 -2.8125 ) ( 56 0 1280 1.5625 -3.75 ) )
)
}
And do the same for the second patch. Now save your map file and re-open it in DarkRadiant, you will have your patch split down the middle.
Horizontally
Now to split it horizontally, you will just do the opposite; instead of removing columns, we will remove rows. Now copy the map file above one more time and paste it into your map file to undo our changes.
Now we are going to split the patch across the middle. Again, we are going to copy and paste the patch definition like so.
// primitive 6
{
patchDef2
{
"textures/darkmod/metal/detailed/bars_rivets_steel"
( 5 5 0 0 0 )
(
( ( -344 0 320 0 0 ) ( -344 0 560 0 -0.9375 ) ( -344 0 800 0 -1.875 ) ( -344 0 1040 0 -2.8125 ) ( -344 0 1280 0 -3.75 ) )
( ( -144 0 320 0.78125 0 ) ( -144 0 560 0.78125 -0.9375 ) ( -144 0 800 0.78125 -1.875 ) ( -144 0 1040 0.78125 -2.8125 ) ( -144 0 1280 0.78125 -3.75 ) )
( ( 56 0 320 1.5625 0 ) ( 56 0 560 1.5625 -0.9375 ) ( 56 0 800 1.5625 -1.875 ) ( 56 0 1040 1.5625 -2.8125 ) ( 56 0 1280 1.5625 -3.75 ) )
( ( 256 0 320 2.34375 0 ) ( 256 0 560 2.34375 -0.9375 ) ( 256 0 800 2.34375 -1.875 ) ( 256 0 1040 2.34375 -2.8125 ) ( 256 0 1280 2.34375 -3.75 ) )
( ( 456 0 320 3.125 0 ) ( 456 0 560 3.125 -0.9375 ) ( 456 0 800 3.125 -1.875 ) ( 456 0 1040 3.125 -2.8125 ) ( 456 0 1280 3.125 -3.75 ) )
)
}
}// primitive 7
{
patchDef2
{
"textures/darkmod/metal/detailed/bars_rivets_steel"
( 5 5 0 0 0 )
(
( ( -344 0 320 0 0 ) ( -344 0 560 0 -0.9375 ) ( -344 0 800 0 -1.875 ) ( -344 0 1040 0 -2.8125 ) ( -344 0 1280 0 -3.75 ) )
( ( -144 0 320 0.78125 0 ) ( -144 0 560 0.78125 -0.9375 ) ( -144 0 800 0.78125 -1.875 ) ( -144 0 1040 0.78125 -2.8125 ) ( -144 0 1280 0.78125 -3.75 ) )
( ( 56 0 320 1.5625 0 ) ( 56 0 560 1.5625 -0.9375 ) ( 56 0 800 1.5625 -1.875 ) ( 56 0 1040 1.5625 -2.8125 ) ( 56 0 1280 1.5625 -3.75 ) )
( ( 256 0 320 2.34375 0 ) ( 256 0 560 2.34375 -0.9375 ) ( 256 0 800 2.34375 -1.875 ) ( 256 0 1040 2.34375 -2.8125 ) ( 256 0 1280 2.34375 -3.75 ) )
( ( 456 0 320 3.125 0 ) ( 456 0 560 3.125 -0.9375 ) ( 456 0 800 3.125 -1.875 ) ( 456 0 1040 3.125 -2.8125 ) ( 456 0 1280 3.125 -3.75 ) )
)
}
}
But instead of reducing the columns we are reducing the rows. So for the first Patch, we want to remove the last two "rows", and also we want to change the patchParams so that it only has 3 rows instead of 5. So delete the points so that your first patch looks like this, and also change the rows to 3:
// primitive 6
{
patchDef2
{
"textures/darkmod/metal/detailed/bars_rivets_steel"
( 5 3 0 0 0 )	<----------------------------------------[Don't forget this part]
(
( ( -344 0 320 0 0 ) ( -344 0 560 0 -0.9375 ) ( -344 0 800 0 -1.875 ) )
( ( -144 0 320 0.78125 0 ) ( -144 0 560 0.78125 -0.9375 ) ( -144 0 800 0.78125 -1.875 ) )
( ( 56 0 320 1.5625 0 ) ( 56 0 560 1.5625 -0.9375 ) ( 56 0 800 1.5625 -1.875 ) )
( ( 256 0 320 2.34375 0 ) ( 256 0 560 2.34375 -0.9375 ) ( 256 0 800 2.34375 -1.875 ) )
( ( 456 0 320 3.125 0 ) ( 456 0 560 3.125 -0.9375 ) ( 456 0 800 3.125 -1.875 ) )
)
}
Now for the second patch we copied and pasted, delete the first two "rows" so it looks like this:
}// primitive 7
{
patchDef2
{
"textures/darkmod/metal/detailed/bars_rivets_steel"
( 5 3 0 0 0 )	<----------------------------------------[Don't forget this part]
(
( ( -344 0 800 0 -1.875 ) ( -344 0 1040 0 -2.8125 ) ( -344 0 1280 0 -3.75 ) )
( ( -144 0 800 0.78125 -1.875 ) ( -144 0 1040 0.78125 -2.8125 ) ( -144 0 1280 0.78125 -3.75 ) )
( ( 56 0 800 1.5625 -1.875 ) ( 56 0 1040 1.5625 -2.8125 ) ( 56 0 1280 1.5625 -3.75 ) )
( ( 256 0 800 2.34375 -1.875 ) ( 256 0 1040 2.34375 -2.8125 ) ( 256 0 1280 2.34375 -3.75 ) )
( ( 456 0 800 3.125 -1.875 ) ( 456 0 1040 3.125 -2.8125 ) ( 456 0 1280 3.125 -3.75 ) )
)
}
}
And you are done. You have now split your patch Horizontally. Now what if I want to split it both horizontally AND vertically so that I have 4 patches made from 1. Well that's simple and only involves one more step using DarkRadiant.
After you have split your patch either Horizontally or Vertically, open the map in the editor. Now for this example I'm going to assume that you have split your patch horizontally. Select the top half of the split patch, and go to Patch->Insert->Insert 2 Rows (pick either beginning or end it doesn't matter). You've now converted the patch back to a 5x5 patch which can now be split again.
Remember the minimum matrix for a patch is 3x3, anything less will cause DR to crash or fail to load a map. Now all you have to do is follow the steps for splitting the patch Vertically or Horizontally if you so wish.
Via Spreadsheet (either direction)
This method simplifies cutting patches either way, speeds the process as entire rows/columns can be selected at once, and may reduce errors as everything is lined up in rows/columns for less manual counting.
I've done it both via Google docs spreadsheet as well as OpenOffice Calc, but any spreadsheet should have the capability.
Understanding the text tutorial above will help. Critically, that each point coordinates are surrounded by parenthesis, "(" and ")" which must be included, seven columns when it's in a spreadsheet.
The first step is to select just the patch you wish to cut/reduce/divide/whatever in Dark Radiant and "Save selected as Map".
Now open that file in a text editor and highlight the entire rows of coordinates, but not the rows above or below. Cut that data, and paste into a new separate text file you save with a different name (.txt file extension), keeping the original handy for pasting the new data back into later.
In the spreadsheet program, open or import the data. In Google Docs choose "Import...", in Open Office Calc choose "Insert" menu -> "Sheet from file". In either case, select space as the delimiter, which is a selectable button in Calc, but needs to be typed as a custom one in Google Docs.
Now you should see your data in a grid akin to Dark Radiant, the first and second columns showing just a "(", then coordinates, followed by more of the same.
Example picture: 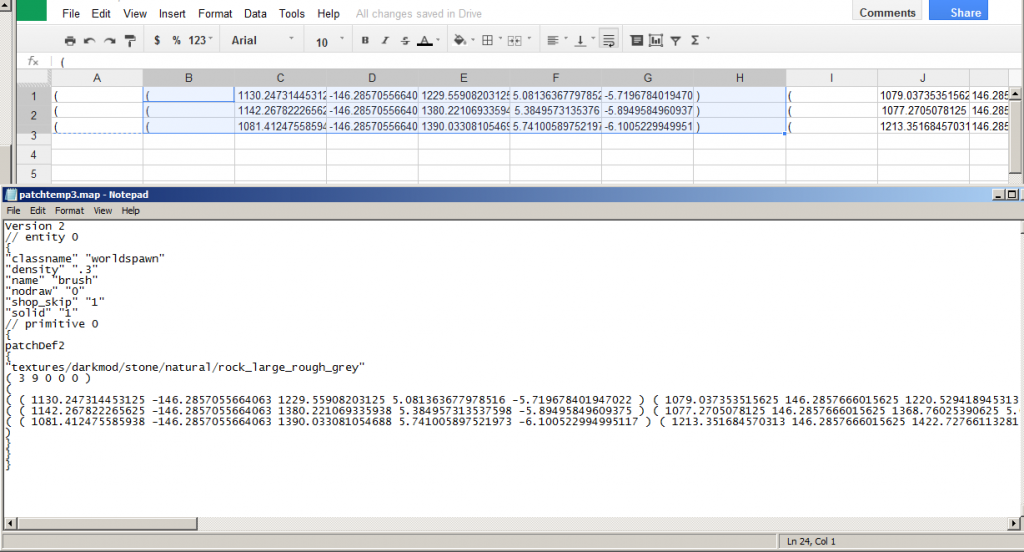
Simply drag to highlight the points you wish to remove as complete sets. You may delete rows to cut off those edges, or delete columns to cut off those edges (or both to cut an "L" shape away). Be sure to include the preceding "(" and following ")" as part of the coordinates (seven columns per point). Also be sure there's an odd number of resulting points three or greater (3, 5, 7, etc.) (In the picture, columns B-H are highlighted for deletion.)
Now highlight all the data/points in the spreadsheet (including leading "(" and trailing ")") and copy (ctrl-c). Switch back to the text editor that you originally cut the data from, position your cursor at that point if it's not already there and paste.
You will note the data has extra space from tabs between everything, no matter, Dark Radiant will ignore/strip them out on it's own.
Now you need to change the number of points specified in the line two above to how many you left remaining (an odd number, three or greater). See the text editor section for examples.
Save your new file as a different name, with the .map extension (in Notepad, this requires choosing "Save as type", "all files *.*" from the drop down in the Save As panel.
Switch back into Dark Radiant, and you may now "Import Map..."
If you want to divide patches, simply repeat the process for the other part, cutting away the first part, being sure there's one set of "overlapping" coordinates. Note there may be a seam visible in game depending on geometry, so plan accordingly (perhaps a thin 3-wide patch of matching texture just underneath/behind).
If you get an error, "Assertion failed: found "(", required ")"", your number of points is not matching the actual number of data points, or is an even number.
Cut a Hole
Step one is to move the odd points of the patch to align with where you want the hole to be. So the third row or column of points in the patch, or the fifth, or seventh, etc. You also must be sure there's at least three sets of rows and columns on the remaining sides.
Now you'll load the data into the spreadsheet four times, each time cutting away three quadrants around the hole. This is easiest to delete the rows/columns associated with half first, to leave two quadrants, then half again to leave one remaining. Copy/paste that into the text editor, save with an identifiable name (for instance, "UL" for upper-left), undo the paste in the text editor, return to the spreadsheet, load in the original data and repeat.
Remember you must maintain an "overlap" of coordinates that intersect, such that each patch has an odd number of points.
