Objectives Editor
Written by HappyCheeze and Fidcal. Small additions by Sotha and Springheel.
Introduction
The objectives editor is a very useful tool located inside Darkradiant (Version 0.9.7 or later) that allows the map author to set objectives or goals that the player must do in order to win the level. The opposite is also true, the author can set restrictions that the player must adhere to, or will fail the mission.
Adding Objectives Entities
IMPORTANT: The add objectives entity has been renamed to atdm:target_addobjectives so ignore any reference to the old name target_tdm_addobjectives in the images.
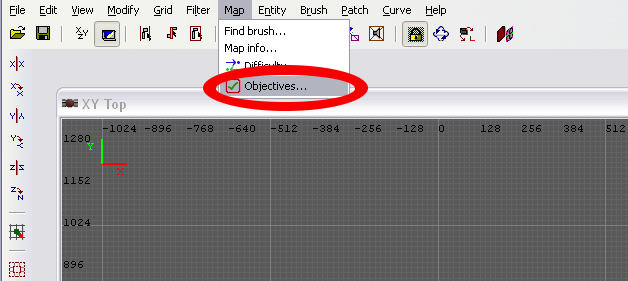
To access the objectives editor once inside Darkradiant, click the pull-down menu Map>Objectives...
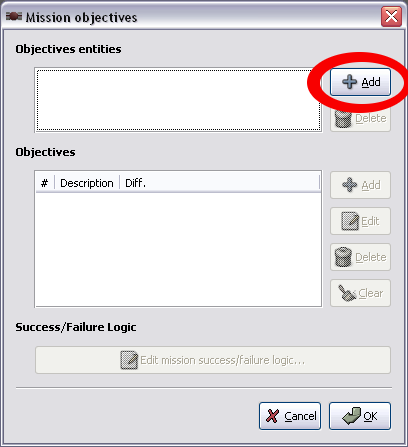
Upon clicking you will see a separate window that looks like this.
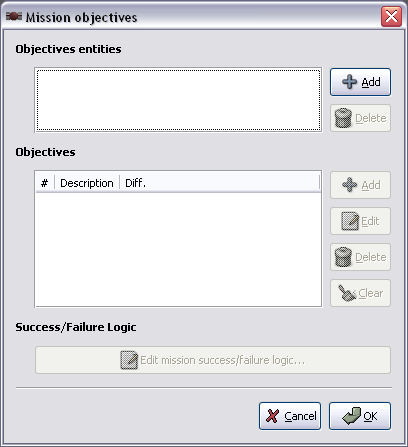
To start things off, click the
![]() Button
Button
This will create an Entity that stores all of the objectives information that will you be editing.
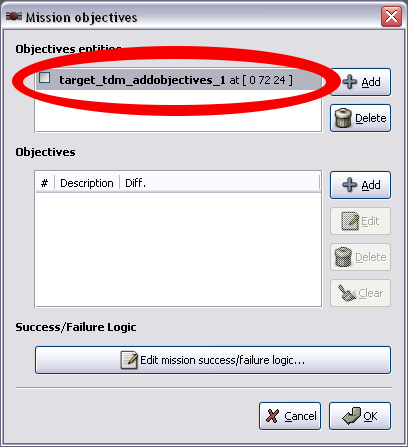
Now we've spawned our objectives entity,
Notice the numbers in the “[]”'s. Those are the entities' coordinates on the map. These numbers will most likely be different from yours. When the objectives entity spawns it is placed randomly around the origin (As of 0.9.7 this is how it is, it might change in future versions, but for now this is how it is).
*Note:Be mindful that sometimes this entity will spawn outside your map and into the void. This will cause a leak, so look around the origin.
**Alternatively you can right-click in an orthogonal view, create entity, Targets/atdm:target_addobjectives. This will create a small yellow box like placing any entity or object. Then when you open the objectives editor it will be in the list. Good to do this where the players starts, it will always be easy to find.
Adding Objectives
Now we're ready to start adding some objectives.
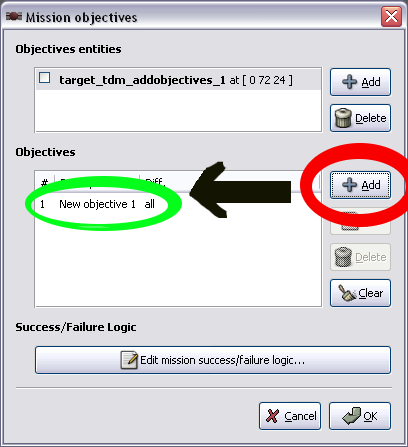
Under Objectives you'll notice there's a new Objective. You can add more as needed.
Editing Objectives
Click an objective in the list than click ![]()
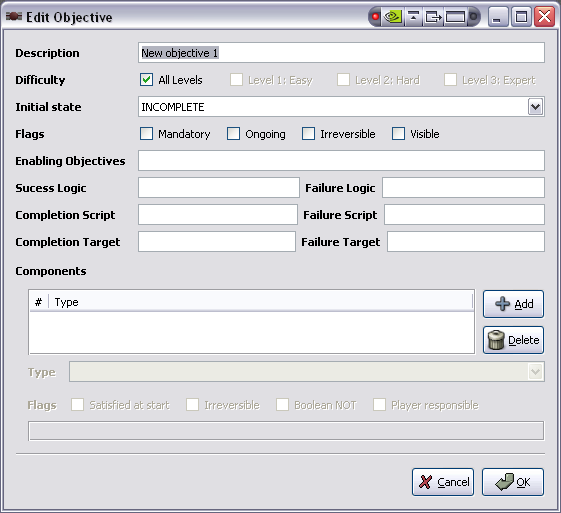
This will bring up this window.
Now we're editing our first objective. It may seem a little confusing at a first glance but a lot of it is self explanitory and a little practice will take you a long way.
So what do all these various lines and checkboxes do? They effect the objective components at the bottom.
What do they all mean?
Description: This what the player will read in the objectives menu. For example: “Steal the scepter”, “Don't kill any guards”, “Get back to where you entered the warehouse”. Its explaining what you want to player read so he/she knows what to do. A good rule to follow is to make them short and to the point.
Difficulty:These refer to Easy/Medium/Hard difficulty levels. If the author wishes, they can be different for each difficulty. For example: on Hard difficulty the player will have to avoid being seen. On Easy the player will only have to steal 200 gold at the minimum. All Levels means that the objectives that are checked under this will be there regardless of difficulty.
Initial State:This is the condition of the objective at mission start. There are four options. Complete, Incomplete, Invalid, Failed. Typically the objective will be incomplete and the player has to complete it in-game to fulfil the objective.
Flags:
Mandatory means the objective in question is necessary to complete the game. If it is unchecked than the objective will be optional.
Ongoing means that the objective won't show completion until the end of the mission. Use this with do NOT type objectives, eg, do NOT kill.
Irreversible means that once the objective is done it will not UNcheck even if logically in the game it becomes no longer true. Example: get a special object. If the player later drops it normally the objective will then UNcheck because the player no longer has got it. But sometimes you don't want it to reverse. Example: get magic skull. New objective: throw it in magic pool. Player no longer has 'got' the skull so normally it would then UNcheck the objective. Make it irreversible and it won't. Another example is to go to a location. If the player then leaves it would UNcheck so make it irreversible.
Visible means that objective will be visible in the objectives menu ingame. If unchecked than there will be no objective shown. (The objective will still work, it just won't show up in the menu).
Enabling Objectives:
These are other objectives that must be completed before this objective can be done. Example: "When you have completed your main objectives, escape from the castle." So, those main objectives would be the enabling objectives and if the player escapes the castle without doing them first then the escape objective does not check off either.
You can list them as "1 AND 2" if objectives 1&2 need to be completed first.
Or, if there are 3 different objectives for each difficulty (as in most loot objectives) the following will work: 1 AND (2 OR 3 OR 4). (where 2,3&4 are the loot objectives)
Logic Success:
These are only needed if you have more than one type component. For example, if you can escape the castle by either of two routes this would be an objective with two go to location components. These components would be numbered 1 and 2 so the logic success would be "1 or 2" since either would work. If however you wanted say the player to escape the castle via a special corridor then the player has to go to both corridor location and exit castle location so that would be logic success 1 AND 2. Those components need not necessarily be the same type - the player might be required to pull a lever AND escape for example (even though he could escape without pulling the lever but you don't want him to.)
Note: I needed to make the "or" lower-case for it to work for me in 2.01. -RJFerret
Scripts: Under Construction
Components
Components: These are the type of objective you want, eg, steal, kill - or rather 'types' because each objective can have more than one (eg, go to exit A or go to exit B or it could be go to exit A AND go to exit B! - see logic success) These type components are used by the editor to specify what objectives need to be done. The map author can choose from a variety of options under Type with varying degrees of specification. For example: Knocking out an AI named "Roy". Not being seen by the ANY enemy. (less examples, should cover this in the coming up tutorial.)
Components Flags: Components have their own special flags as well.
Satisfied at Start: For some objectives it makes sense to have them done at start. For example: Not killing anyone.
Irreversible: Once the objective has reached a certain state, it will stay that way and not change.
Boolean NOT: Adds "NOT" to your component so the player has to do the opposite of said objective. For example: Do NOT kill any AI on team 2.
Player Responsible: The player MUST follow through with the objective himself. For example:The player must kill the zombie to complete the objective, instead of letting something else take care of it.
Now it might seem a bit crazy trying to take all of this in at once, so lets start with something easy.
Tutorial
*Note:This tutorial is assuming you've learned the basics for using Darkradiant.
You should already be in Darkradiant. Start a new map if you're in an existing one.
We'll start with the basic cube room. Nothing fancy, just make a room, stick in a player start, a light and plaster on some textures.
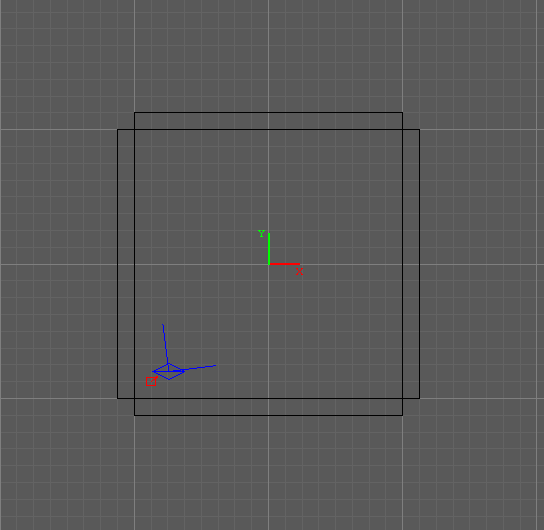
For this tutorial, our player is going to have to knock out a guard and steal a trophy.
So lets start with adding the AI, I chose atdm:ai_citywatch. Select him, go into the entity editor ("N") and change his NAME to "Roy" (without quotes).
Now its time to open up our objectives editor.

Now as you just learned, click add, click the atdm:target_addobjectives_1 and click add again.
The Edit Objective window should be open now. Clear the text under Description and type in "Knock out the guard". Set the initial state to 'Complete'. Check the Mandatory and Visible flags.
Time for a new step, click the ![]() button under Components and the word "Kill" should appear. Select it and you will see some more options. Under Type select "AI is knocked out".
button under Components and the word "Kill" should appear. Select it and you will see some more options. Under Type select "AI is knocked out".
under Knockout target: select "Name of single entity" and type in the box to the right of it, "roy" (without quotes). Set amount to 1.
Now compare your screen to this, it should be the same.
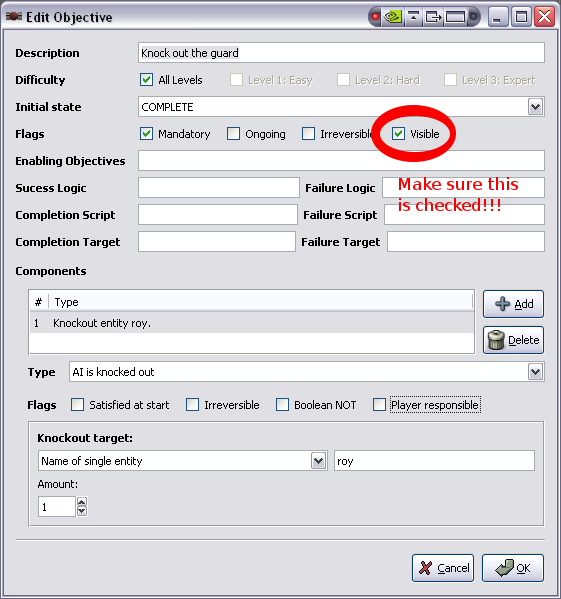
If all looks good than click OK.
Its always a good idea to test things to make sure everything is running right. So save your map, get into TDM and load your map.
First, hit ESC and click Objectives. You should see your objective onscreen.

*NOTE:If you don't see it on screen, you probably forgot to check the Visible box.
Now its time to test your objective. Exit out of the objectives menu and launch a gas arrow or use the blackjack on poor Roy. When he goes down you should see the words "Objective Complete" appear onscreen and since thats the only objective we've added so far you'll win the mission.
*NOTE:If you don't win nor see the on screen message, go back and try to figure what you did wrong.
If all is well than its time to move on. Exit TDM and go back into Darkradiant.
Now it is time to add the trophy. In your map add a trophy somewhere, I used the entity loot>atdm:loot_trophy_old change its name to "trophy" and go back into objectives editor.
Add another objective and edit it. 'Description should be Steal the Trophy. State is Complete, Flags should be Mandatory and Visible. Click ADD and select Player possesses item. Change Item: to Name of single entity and type in the box to right, "trophy". Change the amount to "1".
Your objective should look like this.

Since this is a tutorial this map is very small and very basic so we are tossing all pre-thought and planning for the objectives out the window. As maps get bigger, more elaborate, complex, so too will the objectives be to suit the level. You might want to the trophy in a vault. Maybe the guards will be patrolling.
Save your map and load it up in TDM. Look at the objectives menu to see if the fresh addition is there. And than take it and see if it completes the objective.
Congratulations!
You now have a basic understanding of how the objectives editor works. For more advanced work, look for more tutorials in the future or go on the forums.
FAQs & Examples
KO objective but AI already dead!
- If I kill the guard I don't fail the mission, but I can't complete it either.
- Answer: I'll quote Ishtvan for this one.
- "The system is not smart enough to know automatically that someone who's killed can't be KO'd later, so if you want it to fail when they're killed, you have to put that in specifically. Note that this doesn't have to be a whole 'nother objective, it can be a component of the KO objective, so you have two components, KO them, and don't kill them. We could potentially make this automatic later on, but that's the way it is right now."
- Until this is fixed, I'd recommend making a knockout objective optional, unless you want to put in the kill component.
Kill objective thwarted by another AI
- I put a monster in my map and he killed the guard, yet I still passed/failed the objective.
- Answer: Check the Player Responsible Flag, this means that the player MUST do it himself in order to get credit.
Leak caused by Objectives Entity
- Help! My objectives entity is outside the map and I have a leak! I can't find it! I even used the pointfile!! help!!!!
- Answer: The objectives entity is a very small, yellow cube that is spawned around the origin. It's about the size of a light entity.
How to directly trigger an objective or component to complete
If the actions that the player has to do in a mission are not directly covered by the normal objectives properties, for example, the player must open a door, then objectives can be triggered to complete by any target entity.
In the objectives editor, to your objective add a component type : custom script. (this might just say 'custom' or similar.) The objective now just awaits some external trigger or script in the game to set it complete. To do this with a trigger...
- Create a new entity : target_tdm_setobjectivestate
- Give it the properties/values...
obj_idN O
... where O is the objective number and N is simply the obj_id number if you want several on the same entity. Just use obj_id1 if you only want one.
obj_state 1
You must then target that from some triggering entity like a button, lever, door (see Doors) or you can trigger it from stims & responses or from a custom script.
In a similar way, you can trigger individual components using entity target_tdm_setobjective_component_state. In this give it the properties/values...
- Create a new entity : target_tdm_setobjective_component_state
- Give it the properties/values...
comp_idN C
... where N is just this ID number and C is the component number.
obj_state 1
Again, trigger that as above.
"obj_state" sets whether the target will mark the objectives or components complete ("1") or uncheck them, that is make them incomplete ("0"). A target can handle multiple objectives, but it can have only one "obj_state" spawnarg, so it will either check or uncheck all its objectives.
How to make my invisible objective become visible to the player later
There are two methods. One way adds a new objective at the end of the current list of objectives. The other way makes an existing objective visible. This is the one for general use because it appears in the position in the list where you first put it rather than on the end. It makes sense to have your objectives in some kind of order so for example, you might have right at the end of the list 'when all else is done, escape from Castle...'
To make an invisible objective visible later
- Create a new entity : atdm:target_setobjective_visibility
- Give it the properties/values...
obj_idN O
... where O is the objective number and N is simply the obj_id number if you want several on the same entity. Just use obj_id1 if you only want one.
You must then target that from some triggering entity like a button, lever, door (see Doors) or you can trigger it from stims & responses or from a custom script. Note that sometimes it helps to put in a delay (see below.) It will by default then become visible. You can do it the other way round and make an objective become invisible (remember it is still active by default) by changing the spawnarg value 1 to...
obj_visibility 0
note: if the only remaining objectives are invisible, the mission will end. You need at least one visible objective remaining.
To add a new objective on the end of the list
- In the objectives editor use the top Add button to create a new atdm:target_addobjectives entity.
- Add the new objective(s) just as described above
- Find the atdm:target_addobjectives entity in the map (you normally need to check it is not in the void anyway plus you might like to place it near where it makes sense the new objective shows.
- Add to the atdm:target_addobjectives entity the property wait_for_trigger and the value 1. Otherwise it will show right at the start of the game.
- You then need to target that atdm:target_addobjectives from some triggering entity like a button, lever, door (see Doors) or you can trigger it from stims & responses or from a custom script. Note that it may help to include a delay (see below.)
- The new objective(s) will show as added at the end of the list of objectives when triggered.
Inserting a delay before new objective shows
It often helps to include a delay from triggering before the New Objective message shows. To do this:
- Create a trigger_relay entity.
- Give it the properties:
- wait -1
- delay N (replace N with delay time in seconds)
- target <the name of the atdm:target_addobjectives>
- Make your original trigger target this relay instead of the atdm:target_addobjectives directly.
Completing Objective Components in a Certain Order
Suppose you want the player to complete two or more parts of an objective but in a certain order. Example : "Close the office door then open the safe." In that example you want the player to close the door first not just do both in any order. If you just make the two components they default to a Success Logic of 1 AND 2 which means the player must do both to complete the objective but it does not matter which order. So if the player opens the safe and then closes the office door then the objective will check off - perhaps not what you want. This is how to do it if you want to force the order in which the player does the components...
There are two possible outcomes :
If you want the mission to fail set the failure logic for that objective to
NOT(1) AND 2, i.e., door is open AND safe is open.
But if you just want the objective to not complete (so the player can try again)...
Make two objectives, both using the door and safe components - the first is invisible but still active:
- Objective 1: success logic: Door closed, safe not open = 1 AND NOT(2)
- Objective 2: success logic: Door closed, safe open = 1 AND 2
(Objective 2 enabling objectives = 1)
An Objective to place an object in a Certain Location
To make an objective where an object (body, junk object, readable, or even the player) has to be placed somewhere:
- Create a brush where you want the object to be put. This might be the size of a room, a street, or a chest or wherever you want the object. Better to make it too large than too small--the origin point of the object needs to be inside the brush to activate it.
- Texture it with common > clip
- With the brush selected, Create entity > info > info_tdm_objective_location
- Give this entity a name you can remember like BodyDrop. Write it down or in a text editor
- Give your object, eg, a ragdoll, a name, eg, JakesCorpse and note it down.
- If it is not the player, then give it the property "objective_ent" and set it to "1"
- Menu > Map > Objectives
- If you haven't yet got any objectives then click the + Add button at top right. This creates a atdm:target_addobjectives entity so later make sure it is not in the void or you get a leak. Put it somewhere convenient. It is not visible in game.
- Select the atdm:target_addobjectives in the Objectives entities list top left
- In the objectives list below click the +Add button on the right.
- This creates a new objective in the objectives list. Select it.
- Click the edit button on the right.
- Type a description near the top, eg, Carry Jake's body back to X and drop it in the soandso
- In the components list further down click the +Add button on the right.
- This creates a default Kill objective. Select it. Click the Edit button.
- Just below it click the Type bar and from the list that show select 'Item is in location' (NOT Item is in info_location!!)
- Further down click the bar below 'Entity' and select 'Name of single entity' (NOTE: If the entity is the player, use the entity setup described in standard exit objective instead of the below steps)
- On the right of that type or paste in the name of the object (eg ragdoll) entity eg, JakesCorpse
- Below, click the bar below Location and select 'Name of single entity'
- On the right of that type or paste in the location entity name you gave above, eg, BodyDrop
- Click the OK button and OK again and save your map.
TEMPORARY CAUTION: This "item is in location" objective doesn't always function properly; a 2020 bug report has been filed. You can try:
- also adding the "objective_ent 1" spawnarg to the info_tdm_objective_location.
- alternative techniques, using the objective components:
- "Two entities are within a radius of each other"
- "Item is in info_location"
Classic "Get X Loot" Objectives
Use the "overall (component specific)" option of "Player possesses item" for loot.
How do you find out how much loot is in your map? With your map open in DarkRadiant, select Scripts -> Count Loot from the menu.
Optional 'No alerts', KO's, and Kills
It is recommended that 'No alerts', KO's, and Kills be optional or at least provide a separate difficulty level that approximates another where these are enforced. Many players find these restrictions limiting and often very annoying. Some will abandon an FM in frustration if they find they can barely move without triggering an alert - mission failed.
To create a "NOT" objective (do NOT kill X, do NOT find more than 3 potions, etc), you need to select the "Boolean" checkbox. This will turn the objective into its opposite ("Kill 3 AI" turns into "Do NOT kill 3 AI").
Important: No kill objectives need be set as "Satisfied at Game Start" and "ongoing" or they will not work!
Avoiding Unintentional or Accidental Deaths Failing 'No-Kill' Objectives
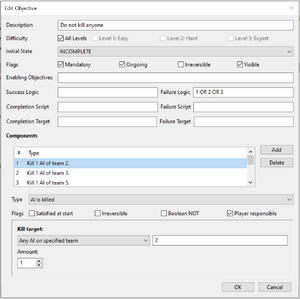
A common requirement is the player shouldn't intentionally kill any human AI (guards, commoners, etc). If that is your intention, the method described above will fail under other circumstances, such as:
- the player killing a rat, or a rat falling out of a window and dying
- AI from opposing teams getting into a fight and one of them dies
To prevent this, set up the objective to specify AI teams, don't use the boolean NOT, tick 'Player responsible' and use the failure logic. The following example will fail a mission if the player kills guards, commoners or neutrals:
Using Objectives to trigger things
You can use objectives like a trigger. Don't put the target spawnarg on the objective entity, however; you have to use the Objective Editor. The "Completion Target" and "Failure Target" fields can take any kind of entity that can normally be triggered, like a speaker or an atdm:teleport.
You can trigger more than one thing, but then you must create a trigger_relay entity. Put the name of that entity in the "Completion Target" field, and then target your other triggers from the relay.
The standard "exit here when you're done objective"
- Place a (large!) brush in the location you want to work as the exit.
- Give it texture textures/common/clip
- Make the thing into an entity info_tdm_objective_location
- Give it name player_exit
- Go to objectives editor and make an objective "After you're done, go to the exit" or something like that. Set it to be INCOMPLETE and mandatory.
- Set enabling objectives. Here you need to set which objectives need to be complete for the exit to work. If you have objective numbers 1 and 2 must be completed in order the player to exit, you need to put text "1 AND 2" in the enabling objectives box. If you need to have objectives 1,2 and 5 completed you need to put "1 AND 2 AND 5" If you have some objectives that only appear under certain difficulty levels (like loot objectives), you can do this: Enabling objectives: 1 AND (2 OR 3 OR 4)
You can check the objective numbers in the objective editor window under "#" mark.
- set the component to be:
- Type: item in location (NOT item in info_location!!)
- Entity: any entity with SDK-level spawnclass idPlayer (Note the capital "P"--won't work without!!)
- Location: name of single entity player_exit
NOTE: You must make the brush for the info_tdm_objective_location large! I have had this objective completely fail when using a vaguely player-sized brush. Expanding the brush to fill the entire room made the objective work.
Determining an Objective's Current State from a Script
Adapted by Geep from discussion here.
This is easy. Suppose you have already created an objective "Have at least 1000 in loot", which happens to be item #3 in your objectives list. You want to know, when a particular script function is called, if the objective was satisfied. Begin your script with, e.g.:
#define OBJECTIVE_TOTAL_LOOT 3
// WARNING: IF OBJECTIVE NUMBER OF "Have at least 1000 in loot " CHANGES, IT MUST BE CHANGED HERE TOO!
You could also #define the possible states: OBJ_INCOMPLETE = 0, OBJ_COMPLETE = 1, OBJ_INVALID = 2, OBJ_FAILED = 3
Using #defines is optional. You can just directly hardcode the numbers. But assuming the #defines, then add:
float objstate = $player1.getObjectiveState(OBJECTIVE_TOTAL_LOOT);

if(objstate == OBJ_COMPLETE) {
	...
}
Troubleshooting
My objective doesn't work, what's wrong? Can't count the number of times I had to ask that. Here are a list of helpful suggestions:
- Case sensitivity. I had an objective that didn't work because I had "idplayer" instead of "idPlayer".
- The most common error with the exit objective is using the 'in info_location' component rather than the 'in location' component.
- The info_tdm_objective_location entity uses the spawnarg interval with 1 second as default. This might not be long enough for a small volume if the player (or other entity) can pass through in less. It should be as high as possible for performance but not so high the player might pass through in less.
- No kill objectives need be set as "Satisfied at Game Start" or they will not work!
- Invisible objectives are not considered when determining mission complete, even if they're mandatory. If the only remaining objectives are invisible, the mission will end.
Technical info
- I have some other questions about objectives
- Answer:This article talks about more specific, more technical and advanced work. Objectives
