Modeling - Basic Tutorial
Originally written by SneaksieDave on http://forums.thedarkmod.com/topic/4455
There have been at least a couple requests for a tutorial that goes from modeling software to D3. Last time we had a lull, I wrote a simple Texture Tutorial, so this time it'll be a simple modeling one. It's done with Blender, is not all encompassing and doesn't cover much detail, but in the interest of helping people try other things, I'll offer up the small amount I have learned.
Modeling For The Rest Of Us
This will be a simple, bare bones tutorial for taking a model from Blender to The Dark Mod. It assumes you can find your own way around the modeling part; the only instructions for use of Blender I'll give will be bare minimum exact statements with no explanation behind the UI or usage. It's meant to help you get a model into TDM and then you take over from there.
Open Blender
Open the latest version of Blender, available from http://www.blender.org. You can branch here if you'd like, and either experiment with making something complex, or follow any of the mountain of tutorials that are out there, but I'm going to stick to a cube for the sake of simplicity. Plus, if you've launched Blender, there's already one there! (if there's not, click File->New and click the dialog that pops up. Now you should have a cube.)
Let's get a better look at it. Hold the middle mouse button ![]() in the isometric window, and drag it somewhere. You'll see how it changes the view. (Alternately, use the numpad keys to do so.)
in the isometric window, and drag it somewhere. You'll see how it changes the view. (Alternately, use the numpad keys to do so.)
It will be evident whenever your object is selected. If at any time it is not (surrounded by a pink outlink in object mode, or yellow highlights in edit mode) ![]() click it to select.
click it to select.
Assign a Material
The cube needs a material. Hit F5 to bring up the materials panels. If you don't see several open panels across the bottom of your screen already, click Add New in the 'Links and Pipeline' panel. Now hit F6, so we can give the new material a texture. Click Add New in the Texture panel. For the texture type, choose "Image". In the Image panel, load any image. It doesn't matter which, as we'll be changing it.
Now you have a cube, and a material. You need a UV map.
UV Mapping
Watch Greybeards UV tutorial. It's the best one I've seen and a lot of people agree. We need a simple UV map for this cube. For the sake of this tutorial and simplicity, we don't care what it looks like. You're probably in Object mode (shown in the button bar at the bottom of the viewport), so make sure your cube is selected (pink outline) and then hit tab. You're now in Edit mode. Key in CTRL+TAB, and select "Edges" (or, find the Edge select mode button to the right of the viewport button bar). ![]() an edge to select it. With the edge selected, hit CTRL+E, and choose "mark seam". Do this for three or four adjacent edges. Again, we don't care what it looks like, only that it unwraps.
an edge to select it. With the edge selected, hit CTRL+E, and choose "mark seam". Do this for three or four adjacent edges. Again, we don't care what it looks like, only that it unwraps.
Once you have some seams marked, hit TAB (back to "Object mode") and then F ("UV face select mode"). Hit A to select all the faces of the cube. If they're not all pink now, hit A again. They should go between pure white and pink with each hit. Pink is selected. With them selected, hit U and choose Unwrap.
You now have a (probably crappy) UV map. Once you know a bit more, you'll use that UV map to control the texture layout. For now, we don't care.
Export your Model to ASE
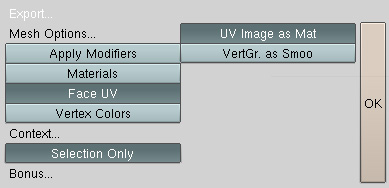
Export your model. In the File menu, choose Export and then ASE format. (If you don't have that option, get the script here, and drop it into Blender's scripts folder.) Make sure to select "UV Image as Material" on the dialog that pops up, and then confirm the export.
Your model is almost ready.
Edit the ASE File
Open the .ASE file in wordpad (or some safe text editor). Find the line similar to,
*BITMAP "D:\programs\Blender2.42a\.blender\models\sometexture.tga"
That's the texture you loaded into your material. That's not the real material we want to use in-game, so we change it by hand. Blender has a limitation on the length of the name, so you can't always use full D3 texture paths.
Change it to something appropriate for Doom3's use and save it. For example,
*BITMAP "//base/metal/rustymetal"
Drop the modified .ASE into an appropriate model folder, and it will open in DoomEd's model browser. If you typed in a valid material for it, it will be textured. If it is black, you need to go back and fix the *BITMAP entry to something valid.
In the browser and the game, the object will probably be very small. In Blender, you'll likely want to set the View Properties | Grid Spacing to 8.00, so that it coincides with Doom3's grid, and then scale your object up in size.
That's really all there is to it. Of course it gets much more complex with multiple materials, bumpmaps from high-poly versions, effective UV mapping, texture creation, animation, and all the nuances of skilled polygonal modeling, but this should get you started enough to learn what's next at your own pace.
