Editing Tips for Beginners: Difference between revisions
Springheel (talk | contribs) No edit summary |
Springheel (talk | contribs) No edit summary |
||
| Line 34: | Line 34: | ||
[[Image:vert1.jpg]] | [[Image:vert1.jpg]] | ||
{{tutorial-editing}} | |||
Revision as of 16:00, 11 December 2008
written by Springheel
I thought I would write down some of my findings as a new mapper, to help other people who are just getting into mapping for The Dark Mod. I'm just going to throw in everything that I've found out that I think might be useful, and worry about organizing it later.
First of all, you should definitely start with Fidcal's awesome A - Z Beginner Full Guide Start Here! tutorial. It is an excellent introduction. I followed it loosely for about three hours, and at that point felt I was ready to start on a map of my own.
Once you have a handle on the basics you should also check out Jdude's Creating Large Areas page; it has excellent information on designing maps with visportalling in mind.
Splitting Brushes
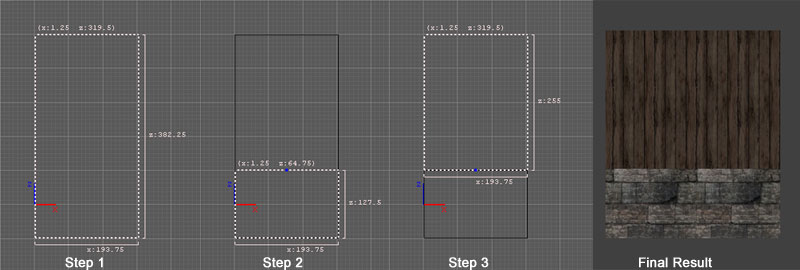
One of the most important tips I learned from Fidcal's tutorial was what he calls the 'curtain' method of making brushes. This is useful any time you want to split brushes in half (to texture the top and bottom differently, for example). I find myself using this all the time.
Essentially, you
- Step 1: select the brush
- hit "space" to clone it. There will now be two brushes occupying the same space, so don't deselect yet.
- Step 2: by dragging the mouse outside the brush, shrink it to the size you want (like pulling a curtain down).
- Step 3: select the original brush (which is still the original size) and shrink it so that its edge matches the edge of the other brush)
You now have two brushes instead of one, and can texture them both differently (like stone on the bottom and wooden beams on the top).
Disappearing Brushes
A few people have experienced a problem where brushes appear fine in the editor, but after dmapping and trying the map in D3, the brushes are gone. If this happens, try snapping the brushes to the grid in the editor (under the Grid menu). This solved the problem when it happened to me.
I also had a leak solved by snapping a brush to a grid. It actually didn't look like there could possibly be a leak where one was showing, as it was a brush that was simply sticking through another very large brush. Yet there must have been a microscopic gap created there when dmapping. Anyway, if you get an odd leak, snapping the nearby brushes to the grid is not a bad idea.
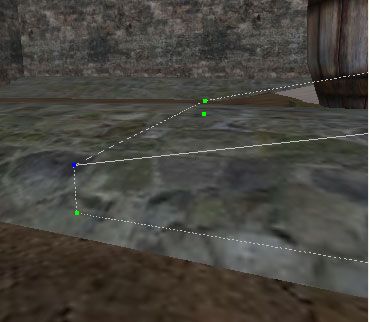
Selecting Vertices on Brushes
I come to mapping from a modelling background, so this was a great find for me. For a while I was unaware that you can actually select individual vertices (corners) of a brush and move them independently. This is very useful for creating slants (until learning about this I actually was rotating entire brushes to try and create uneven ground) as well as awkwardly-shaped brushes. To move individual verts, just select the brush and hit "v". Green dots will show at each vert. When you select a vert, it becomes blue (you can select and move more than one at a time). Hit "esc" to exit vert mode. You can do the same thing with patches to create complex uneven terrain (because patches can have lots of verts in the middle of the shape).

