Cutscenes Part 2: Splines and Camera Movement: Difference between revisions
No edit summary |
|||
| Line 15: | Line 15: | ||
* Change its name to "Spline5" ("name" "Spline5"). | * Change its name to "Spline5" ("name" "Spline5"). | ||
Notice that | Notice that Spline5 doesn't have any spline data in it. For that, we'll need to create a spline and copy its data to Spline5. | ||
===NURBS Spline=== | ===NURBS Spline=== | ||
Revision as of 18:10, 21 October 2010
Splines
Moving cameras can add a nice touch to a scene if not overused. Splines provide a path a camera can follow.
Open snitch2.map in Dark Radiant.
The first shot we want to create is to have the camera slowly rise from the porch to the south of the bulletin board while pointed in the direction of the bulletin board. To accomplish this, we'll need to add a func_splinemover, which holds a spline (NURBS curve), a func_mover, a func_cameraview, a target_null, and, of course, a script function to bring everything together.
func_splinemover
Create a func_splinemover to hold our spline data.
- Create a 16x16x16 brush sitting on the porch south of the bulletin board (in front of the tall door).
- Texture it with NODRAW.
- Select it and make it a func_splinemover (
 , Create entity, darkmod/func/func_splinemover).
 - Change its name to "Spline5" ("name" "Spline5").
Notice that Spline5 doesn't have any spline data in it. For that, we'll need to create a spline and copy its data to Spline5.
NURBS Spline
Create a NURBS spline:
- With Spline5 selected, hit the Change views button (the XYZ button on the main menu) three times. This centers all views on Spline5.
- From the main menu, select Curve->Create NURBS Curve. This creates a spline entity with the same origin as Spline5.
At this point, Spline5 and the spline entity should look like this:
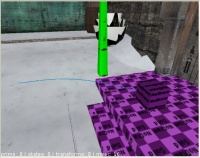
Now we have to move the spline's curve data into Spline5.
- Select the spline anywhere along its curve.
- In the Entity window, select the property curve_Nurbs. This property will appear on the line with the green checkmark on the right.
- Hit ESC and select Spline5.
- Click on the green arrow. This transfers the spline curve to Spline5, which is where we want it.
- Hide Spline5.
- Delete the spline entity.
- Unhide Spline5.
At this point, Spline5 looks like the previous picture, only now it's holding the spline data.
Movement along this spline will begin at its origin and follow its path. At the moment, the path curves away from the origin in the XY plane. Since we want the camera to rise straight up, we need to change the spline path so it goes straight up from the spline's origin.
- With Spline5 selected, press V to enter Vector mode. Two green dots will appear along the path. These are control points, and we're going to adjust them.
- In the YZ view, drag the leftmost control point so it's 16 units directly above the spline's origin. You might need to set the grid size to 1 to do this. Note how the dashed line of the path changes when you do this.
- Drag the rightmost control point so it's 48 units above the spline's origin.
In the camera view, the spline's path has changed, but it's still a curve, so we have to make two more adjustments.
- In the XY view, drag both control points so they're directly over the origin, and the spline path is finished.
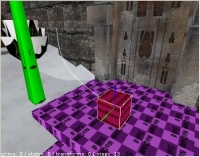
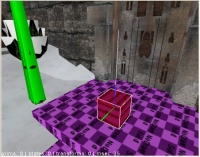
Camera Movement - Dolly
When a camera is moving horizontally or vertically, it's called a dolly shot, or tracking shot.
func_mover
Spline5 provides the path our camera will follow, but we need a func_mover to provide the movement.
- Create a 16x16x16 brush above Spline5 and texture it with NODRAW.
- Select it, make it a func_mover (
 , Create entity, darkmod/func/Movers/func_mover), and give it these Property/Value pairs:
- "name" "Mover5"
- "cinematic" "1"
We'll discuss the cinematic property below.
Camera5
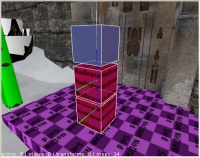
Create a func_cameraview above Mover5 and give it these Property/Value pairs:
- "name" "Camera5"
- "trigger" "1"
- "bind" "Mover5"
- "cinematic" "1"
The bind property allows Camera5 to follow Mover5 as Mover5 follows the spline.
Now we have the three entities for a moving camera, but Camera5 is too high up off the porch. We'd like it to start low and rise until it's even with the center of the bulletin board.
- Swap Camera5 with Spline5 to get this arrangement:
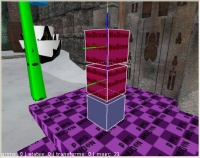
Now that Camera5 is where we want it, we'll give it a target_null to point at.
- Create a target_null beneath the bulletin board and set its Z origin to Camera5's Z origin so they're at the same height.
- Give it the Property/Value pair:
- "name" "target_null_5"
- Give Camera5 the Property/Value pair:
- "target" "target_null_5"
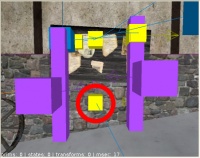
Roll Camera 5
Open snitch2a.script and find the function Roll5().
void Roll5()
{
   // Camera5 - focus on bulletin board

   $Camera5.activate($player1);   // Switch view
   $Mover5.time(12);              // How many seconds it will take to move along the spline
   $Mover5.accelTime(0.1);        // How long it takes to accelerate
   $Mover5.decelTime(0.1);        // How long it takes to decelerate
   $Mover5.disableSplineAngles(); // Stabilizes the camera view as the camera follows the spline
   $Mover5.startSpline($Spline5); // Start the func_mover $Mover5 moving along $Spline5
   sys.waitFor($Mover5);          // Wait for $Mover5 to finish its movement
   $Camera5.activate($player1);   // Return control to the player
}
The comments on each line tell us that Roll5() will:
- pass control to Camera5
- provide Mover5 with movement times (0.1s acceleration, 0.1s deceleration, 12s total duration)
- stabilize the camera view (otherwise you could get disorienting views)
- start Mover5 along the spline path
- wait for Mover5 (and Camera5, which is bound to it) to complete its movement
- pass control back to the player
All that remains now is to set up a trigger to call Roll5(). That's been done for you. If you look at the first button near the player start, you'll see that it targets the target_callscriptfunction Roll5, which calls the script function Roll5().
Save, build, and run. Press the first button once the actors have reached their marks and you should see a view from Camera5 as it rises off the porch. You could also press the button as soon as the informant steps off his porch, and Camera5 will show the arrival of both actors.
The cinematic Property
We've given a few of the entities the cinematic property, with a value of 1. Any entity that moves during the cutscene needs to have this property set, otherwise it won't show up and/or won't move. If you look at the two actors, you'll see that they already have this property set. If you run into problems with entities not moving in the scenes you create, the first thing to look at is whether the moving entities have this property.
Camera Movement - Pan
When a camera is fixed, but is rotating in the horizontal plane, it's called a pan shot. When it's rotating in the vertical plane, it's called a tilt shot.
Let's set up a pan shot that stays centered on the guard as he enters the scene.
In the dolly shot we just completed, we fixed the camera angle by pointing Camera5 at target_null_5. Once that angle is established at spawn time, it stays fixed as the camera rises.
For a pan shot, we have to change that angle in each frame. To do that, we're going to reset our camera's target property each frame, pointing it at a target_null bound to the guard's head. As he enters the scene and walks down the steps, the camera will keep his head in the center of the frame, which gives us the pan shot we want. (Yes, he is descending some steps, so you could make the argument that this is a pan and tilt shot, but the change is nearly all horizontal, so let's just stick with pan.)
Set Up the Guard
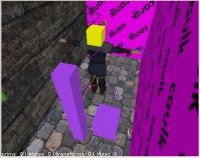
So that we see the guard's entrance in its entirety, let's hold him at his spawn spot until he's triggered. Then we'll trigger him when we start the shot.
A path_corner and path_waitfortrigger are already in the NE hallway near the guard ("SnitchGuard").
- Change SnitchGuard's target property to "path_corner_2".
- Create a target_null and place it on SnitchGuard's shoulders.
- Give the target_null the following Property/Value pairs:
- "name" "target_null_6"
- "bind" "SnitchGuard"
So target_null_6 will sit on SnitchGuard's shoulders wherever he goes on the set.
Camera6
- Create a func_cameraview slightly above the barrel in the SE corner. Give it these Property/Value pairs:
- "name" "Camera6"
- "trigger" "1"
- "target" "target_null_6"
Changing Camera6's Target
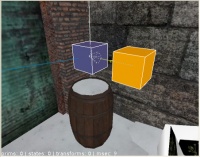
Since Camera6 needs to stay focused on SnitchGuard as he enters the courtyard, we'll need to update Camera6 each frame. To do that, we'll need a target_setkeyval.
- To one side of Camera6, create a target_setkeyval (
 ,Create entity, base/target_setkeyval).
 - Give it the following Property/Value pairs:
- "name" "target_setkeyval_6"
- "target" "Camera6"
- "keyval" "target;target_null_6"
When target_setkeyval_6 is triggered, it resets Camera6's target property to "target_null_6". This has the effect of turning Camera6 to point at target_null_6's new position. If we do this each frame, Camera6 will pan to follow SnitchGuard.
That's it for the entities we need. Now we turn to the scripting needed to make this work, and it's a bit more complicated than what we've been doing so far.
Roll Camera 6
In snitch2a.script, find the function Roll6().
void Roll6()
{
   // Camera6 - focus on the Guard's entrance

   $SnitchGuard.activate($player1); // SnitchGuard starts walking
   $Camera6.activate($player1);     // Switch view
   thread update_camera6();         // Call the function update_camera6() as a thread so it can run in parallel
   sys.wait(15);                    // Wait time in seconds
   sys.killthread("aim_loop6");     // Kill the thread "aim_loop6"
   $Camera6.activate($player1);     // Return control to the player
}
The comments on each line tell us that Roll6() will:
- start SnitchGuard on his way
- pass control to Camera6
- start a thread to update Camera6's target each frame
- wait 15 seconds (enough time to let SnitchGuard reach his mark)
- kill the thread we started
- pass control back to the player
If you're new to scripting, you might be asking "What's a thread?" Think of it as a fork in the road, where our main script continues processing along one fork, and the thread we created begins to process along the other fork. The two tasks run in parallel.
Above Roll6(), you'll find the function update_camera6():
void update_camera6()
{
   sys.threadname("aim_loop6");         // Gives this thread the name "aim_loop6" so it can be killed later.
   while (1)
   {
      sys.trigger($target_setkeyval_6); // keep Camera6 pointed at target_null_6
      sys.waitFrame();                  // wait a frame before continuing
   }
}
Reading the comments, we see that the instructions:
- give the new thread a unique name so we can kill it later (we don't want it to run forever)
- "run forever" the following instructions (while(1) means "run forever")
- trigger target_setkeyval_6 to update Camera6's target, which changes where it's pointing
- wait for one frame
Those last two instructions will be repeated until the thread is killed by the instruction sys.killthread("aim_loop6") in Roll6().
Well, we're ready to try this out. The second button near the player start is already set up to run Roll6() when you press it, so ...
... save, build, run, and press the second button.
You'll see the set from Camera6's POV, and the shot pans as SnitchGuard enters and walks to his mark.
Wrapup
In Part 2, we've learned how splines can be used to dolly a camera, and how a moving target_null can be used to pan a camera.
Alongside snitch2.map and snitch2.script, which we've been using above, you'll find snitch2a.map and snitch2a.script, which include the cameras and targets we've discussed. You can build and run snitch2a.map and compare it to your own work.
In Part 3, we'll investigate something else.