Patches: Difference between revisions
No edit summary |
|||
| (80 intermediate revisions by 9 users not shown) | |||
| Line 4: | Line 4: | ||
* is a two dimensional sheet with only one visible surface. It can be bent, curved and twisted in three dimensions but always remains a sheet. It produces better curves and textures better on them than multiple brushes. | * is a two dimensional sheet with only one visible surface. It can be bent, curved and twisted in three dimensions but always remains a sheet. It produces better curves and textures better on them than multiple brushes. | ||
* can also be a cylinder, great for pipes or | * can also be a cylinder, great for pipes, bars, logs, ect... or it can be a cone good for tree branches. | ||
* is a primitive - a child of the worldspawn entity. This means it is a direct offshoot of the game world and inherits any properties applied to the worldspawn. If you select a brush and look in the Entity Inspector you will see the worldspawn properties. | * is a primitive - a child of the worldspawn entity. This means it is a direct offshoot of the game world and inherits any properties applied to the worldspawn. If you select a brush and look in the Entity Inspector you will see the worldspawn properties. | ||
* may be parented to another entity when it will inherit its properties. | * may be parented to another entity when it will inherit its properties. | ||
| Line 36: | Line 36: | ||
[[Image:bevel05.jpg|center|200px]] | [[Image:bevel05.jpg|center|200px]] | ||
* Bevels | * Bevels may need to be rotated to the orientation you want and also you may have to invert the texture so it is on the inside or outside. Use menu > Patch > Matrix > invert to do that. | ||
* Select {{menu|l1=Patch|l2=Bevel}} | * Select {{menu|l1=Patch|l2=Bevel}} | ||
* If the bevel is facing the wrong way (in top view) then rotate it, grid snap if necessary to as shown in the image below. The bevel might not have the same number of faces as in the diagram. Don't worry. We set that separately anyway. | * If the bevel is facing the wrong way (in top view) then rotate it, grid snap if necessary to as shown in the image below. The bevel might not have the same number of faces as in the diagram. Don't worry. We set that separately anyway. | ||
| Line 43: | Line 43: | ||
* Delete the original brush corner triangle that was the template for this bevel. | * Delete the original brush corner triangle that was the template for this bevel. | ||
* Reselect the bevel patch. | |||
* Press {{key-shift}}+{{key|name=S}} for patch inspector | * Press {{key-shift}}+{{key|name=S}} for patch inspector | ||
* Click the check box 'Fixed Subdivision' else Doom might change the quality when optimising. | * Click the check box 'Fixed Subdivision' else Doom might change the quality when optimising. | ||
| Line 61: | Line 62: | ||
{{clear}} | {{clear}} | ||
'''Note:''' These bevels should not come into contact with other visportal areas but should be in two or more parts (see [[Patch Troubleshooter#Patch texture rendering error]]) | |||
== | == Cylinders and Cones == | ||
''by Baddcog'' | |||
To create a cylindrical patch: | |||
* drag out a brush an ortho view. The cylinder will be created in the plane of the ortho view you created the brush in. If you used the top view you will end up with a cylinder standing upright. | |||
* with the brush selected choose the ''patch'' menu | |||
* '''cylinder''' will give you a nice and round cylinder with one set of rows (lenghtwise). It will be the size of the brush you had selected. | |||
{{tutorial- | 'More cylinders' gives you more options: '''dense cylinder'''; a cylinder with 2 rows, '''very dense cylinder'''; a cylinder with 3 rows, '''square cylinder'''; a four sided cylinder. All patches are rendered smooth, so you can use a square cylinder and it will still have an almost round look to it in game as opposed to a square brush that will render flat and very square. | ||
The more dense of a cylinder you use the more you can bend it into a tight angle. | |||
[[Image:patch_tut_08.jpg]] | |||
*deleted the brush you used to create the cylinder, you will notice that it has no ends and looks pretty bad. To fix this we'll need to create an ''end cap'', see below. | |||
[[Image:patch_tut_09.jpg]] | |||
Hit the ''v'' and you'll see the verts of the cylinder, these can be dragged around to create shapes, bends. Hit v again to toggle the vert edit mode off, or hit escape twice. In this picture I used a very dense cylinder and dragged the verts to make a bend, it's very rough but there are already alot of Doom3 tuts out there that go into detail about how to bend a cylinder. | |||
[[Image:patch_tut_11.jpg]] | |||
Creating a cone is the same process but you will choose'' cone'' from the patch menu. | |||
== End Caps == | |||
''by Baddcog'' | |||
End caps are useful for sealing off the end of a cylinder patch. The patch is created like a piece of paper wrapped around in a circle leaving two open ends. | |||
To create an end cap: | |||
* select the cylinder patch you just made | |||
* choose patch menu '''cap selection''' {{Shift}}+{{C}} and choose ''cylinder''. | |||
[[Image:Patch_tut_05.jpg]] | |||
If you did everything correctly you will have a round cap at each end of your cylinder. You can only see these caps if you are looking at them as they only have tex on one side. If your cylinder was setting on the floor you will have to fly down below it and look up. | |||
[[Image:Patch_tut_10.jpg]] | |||
You can bend a patch, then cap it and the caps will be in the correct places. You can also select a cap and a cylinder at the same time, hit {{V}} and drag verts of both patches together to keep their shapes aligned. | |||
You also notice that in the caps menu there are other shapes of end caps, these can be good to fill in archways. | |||
== Archways == | |||
''by Baddcog'' | |||
Patches are great for smooth arches, much smoother than can be created with brushes. You can also create the opposite of an archway using the same steps, this could be useful for creating a covered wagons top. | |||
To create an archway: | |||
* create a doorway or hallway with terrain brushes, you can use caulk on the ceiling as those polys won't be seen and this way they won't be rendered either. | |||
[[Image:Patch_tut_01.jpg]] | |||
* create a brush in the doorway you want an arch in, make it the size you want the arch, so approximately the size of the curves at the top of the doorway. | |||
* out of the patch menu select '''end cap''', end caps are not only round cylinder caps, in this case we will get the inside of the archway. Most likely it will have to be rotated/resized to fit the area you want it in. | |||
Again, patches only have tex on one side so if you don't see it in 3d it doesn't mean it isn't there. Look in the ortho views when you create it. Delete the brush you used to create the end cap patch. | |||
[[Image:Patch_tut_02.jpg]] [[Image:Patch_tut_03.jpg]] | |||
Sometimes the texture ends up on the wrong side, so it would be facing the ceiling and the player couldn't see it. To fix it: | |||
* select the patch | |||
* patch menu: Matrix: '''Invert''' {{Ctrl}}+{{I}} | |||
[[Image:Patch_tut_04.jpg]] | |||
Now you've got a doorway or a hallway and an arched ceiling to it, but the ends of it are open and it looks like the ceiling is just paper. We need to cap the end so it looks solid. | |||
* select the arch patch you just created. | |||
* patch menu: '''cap selection''' {{Shift}}+{{C}} | |||
* choose ''inverted end cap'' | |||
[[Image:Patch_tut_05.jpg]] | |||
As you can see from the icon (the blue is what you get) you will get caps on each side of the arch that fill in the corners. Like the cylinder cap this will give you a cap on each end, so if you only needed one you'll have to delete the spare. Maybe you made an alcove and the back side of the arch is against a wall. | |||
[[Image:Patch_tut_06.jpg]] | |||
You can see that the inc=verted end cap has a pretty ugly looking texture alignment, this needs fixed. | |||
To align the textures with the surrounding bricks: | |||
* {{Shift}}+{{Ctrl}}+{{LMB}} click on the wall next to the arch. | |||
* Edit menu: copy shader | |||
* Select the end cap(s) | |||
* Edit menu: paste shader | |||
(I think the shortcut for this is {{Shift}}+{{Ctrl}}+{{MMB}} | |||
[[Image:Patch_tut_07.jpg]] | |||
I failed to align the texture properly on the left wall due to a pizza break during the tut, forgive my slacker ways, however I did get the end cap properly textured and aligned to the wall on the right. (I should've aligned the textures top, left and right before doing the end cap). | |||
Do the same with one of the inside walls and the inside of the arch. Aligning this inside curve with the outside curve is probably impossible, in that case you'll probably want to create another stone trim arch for the end. This is up to you, do you want to build a decent level fast or do you want to create the mother of all beautiful levels? You aren't getting paid, how much free time do you have? | |||
==Trim Arches== | |||
OK, you've decided that you do have more time and want your arches to look better than a simple cap like above. Instead you want a realistic arch with stones across the top. This effect can easily be achieved by using patches and a little bit of texture alignment. | |||
* Select the ''end cap patch'' that creates the inside of the archway, the one the player will look up at inside the hall or doorway. | |||
[[Image:Archway_01.jpg]] | |||
* The tetxure used there is obviously a terrible choice for a stable archway so pick something that is made up of large square stones and apply it to the patch. Then drag the patch out so it is wider than the doorway. This will make the bricks wider than the doorway giving more depth and also avoiding any z-fighting issues with the wall. Now use the texture alignment tools to fit the bricks onto that patch nicely. I prefer to work with very small increments in the horizontal and vertical scaling and alignment sliders. | |||
* With the patch selected go to the patch menu and select '''Thicken Patch'''. Use the setting shown. '''16''' will make the new patch 16 units thick, approximately a foot. | |||
[[Image:Thicken_Patches.jpg]] [[Image:Patch_Thicken.jpg]] | |||
* Now you will have a complete stone arch. It's easiest to drag all the patches away from the wall and into an open area so you can easily see and align the textures. Also you will notice there are 2 patches at the bottom of the arch, these will most likely end up inside your wall so they can be deleted. | |||
[[Image:Archway_02.jpg]] | |||
* There is a problem with this arch, this happened because I made a very flat topped arch. Patches will ''optimize'' themselves and because the arch was fairly ''flat'' it doesn't have enough shape to match the outside of the arch. The cure for this is to make the arch rounder in shape. So with all the arch patches selected (don't forget both sides, top and bottom) resize it height-wise until you see the patch sub-divide so it has the same amount of sections as the outside. | |||
[[Image:Archway_03.jpg]] | |||
* This creates another issue, the patches no longer align properly. Hit {{V}} to enter vertex edit mode and adjust the verts so the patches match up or come very close to matching. If you can't get an exact match it is alright, just hit {{Ctrl}} + {{G}} to grid snap the verts. This should snap them altogether, if not try a different grid size. | |||
[[Image:Archway_04.jpg]] | |||
* Your patches now align cleanly and make a nice archway, now spend a little time aligning the textures on each side of the arch. You will have ''holes'' at the bottom of the arch so add a few blocks at the bottom of it to support it and give it a little extra realism. | |||
* I like to select all the patches and the two blocks under the arch, right-click in an ortho view and convert them to a func_static. This will keep the arch from divinding the surrounding terrain into more triangles, make it easier to move by itself and clone for other doorways. You can also add ''NoShadows 1'' to it if you are trying to drop framerate in that area, this may or may not be good depending on how lights in the area hit the archway. | |||
== Bending Patches, Curves, L-shapes, etc == | |||
Patches can be bent, twisted, turned, in all sorts of ways. | |||
=== Curves === | |||
This is how to add a 90 degree curve to a flat patch or pipe and in the same plane rather like adding a curved section to a model railway layout or adding a bend to a pipe. The same method could be used for different degrees and sizes of patch. Scan down the images to the end one to see if this is what you want. This example is for a flat patch. For a pipe just create a cylinder and work constantly from one side. It will look much the same but there will be more vertices exactly behind the front ones which will get selected and moved automatically with them. | |||
LMB = Left mouse button, etc. | |||
In this example I start with a simple flat patch 128 x 64. Note that I've got a grid size large enough to see what I'm doing. | |||
Select vertex mode (default key V) so you can these vertices. | |||
I'm going to add a curve to the right at the top as shown by the red arrow in the image.<br>[[image:PatchBend01.jpg]] | |||
This is '''without''' any fixed sub-divisions of tesselations which is default (see patch inspector.) If later in this tutorial you can't see any curves, only straight lines then this is probably the reason - UNcheck sub-divisions in patch inspector. [EDIT] I have later made a very small pipe bend and in this I had to give it fixed sub-divisions. So all I can say is try both to see which works. Always use the minimum number that looks OK in-game. | |||
Menu > patch > Append two rows at the end (this might vary depending on which you are doing yours.)<br> [[image:PatchBend02.jpg]] | |||
Shift + LMB over the top 3 vertices to select them<br> [[image:PatchBend03.jpg]] | |||
Rotate these 90 degrees to the right. I use the the transform dialog (no key by default - see hot keys: transformDialog)For example, if your patch is vertical and aligned east - west so you are facing it full on from the front view looking north along the Y axis then you would chose the Y rotation.<br> [[image:PatchBend04.jpg]] | |||
With them all still selected (black) grab one with LMB and drag the lot up and right to the place shown in the image. Note that alternatively you can just drag each vertex individually without any rotation.<br> [[image:PatchBend05.jpg]] | |||
Click on the next (green) vertex down on the left shown (I used Shift + LMB so you can see which one.)<br> [[image:PatchBend06.jpg]] | |||
Drag it up to top left.<br> [[image:PatchBend07.jpg]] | |||
Likewise grab the one that was to its right.<br> [[image:PatchBend08.jpg]] | |||
Drag it up vertically to the same level as the middle one one the far right.<br> [[image:PatchBend09.jpg]] | |||
Notice how you dragged up that last one in a straight line, parallel to the vertical side lines, until it hit the diagonal? Similarly, the horizontal middle line is also in a straight line parallel to the horizontal sides and meets the other centre line at that diagonal. But what if you want to reshape the patch? | |||
Often you will need to reshape your patch to fit so it won't be this classic example shape; it might be long and thin with a fat side piece in a real case. You do that by dragging vertices of course but all you have to remember is after moving the sides the middle lines should be parallel to the straight part of the side lines. | |||
You can append any number of extra sections and bend them which way you want. | |||
=== Bend L Shapes === | |||
This is how to add a 90 degree square bend like an L shape. The same method could be used for different degrees and sizes of patch. Scan down the images to the end one to see if this is what you want. | |||
LMB = Left mouse button, etc. | |||
In this example I start with a simple flat patch 128 x 64. Note that I've got a grid size large enough to see what I'm doing. | |||
Select vertex mode (default key V) so you can these vertices. | |||
I'm going to add an L bend to the right at the top as shown by the red arrow in the image.<br>[[image:PatchBend01.jpg]] | |||
First set fixed sub-divisions of tesselations to 1 x 1 (see menu > view > patch inspector.) If later in this tutorial you see curves not straight lines then this is probably the reason - check sub-divisions in patch inspector and make sure the values are both 1. | |||
Menu > patch > Append two rows at the end (this might vary depending on which you are doing yours.) The blue arrow in the image indicates this added section will be bent in that direction later.<br>[[image:PatchBend10.jpg]] | |||
Shift + LMB over the top SIX vertices to select them<br>[[image:PatchBend11.jpg]] | |||
Rotate these 90 degrees to the right. I use the the transform dialog (no key by default - see hot keys: transformDialog) For example, if your patch is vertical and aligned east - west so you are facing it full on from the front view looking north along the Y axis then you would chose the Y rotation.<br>[[image:PatchBend12.jpg]] | |||
With them all still selected (black) grab one with LMB and drag all six right to the place shown in the image. Note that alternatively you can just drag each vertex individually without any rotation.<br>[[image:PatchBend13.jpg]] | |||
Click on the next (green) vertex down on the left shown (I used Shift + LMB so you can see which one.)<br>[[image:PatchBend14.jpg]] | |||
Drag it up to top left.<br>[[image:PatchBend15.jpg]] | |||
Likewise grab the one that was to its right.<br>[[image:PatchBend16.jpg]] | |||
Drag it up vertically to the same level as the middle one one the far right.<br>[[image:PatchBend17.jpg]] | |||
Notice how you dragged up that last one in a straight line, parallel to the vertical side lines, until it hit the diagonal? Similarly, the horizontal middle line is also in a straight line parallel to the horizontal sides and meets the other centre line at that diagonal. But what if you want to reshape the patch? | |||
Often you will need to reshape your patch to fit so it won't be this classic example shape; it might be long and thin with a fat side piece in a real case. You do that by dragging vertices of course but all you have to remember is after moving the sides the middle lines should be parallel to the side lines and they should meet at the diagonal. If they don't, no worries, move the vertex of one to the centre of the diagonal then move its other vertices sideways until the line is parallel to the side lines. | |||
You can append any number of extra sections and bend them which way you want, eg, to make a U shape. | |||
==Patches and Terrain== | |||
''by Geep 2021'' | |||
Extremely complicated landscapes can be modeled using third-party terrain generators like Terragen or Gensurf. But often, just building patches within DR is fine. | |||
If you have an essentially flat landscape, then you might: | |||
* Just supplement it in spots with patches, either from scratch or using prefabs with decals. Springheel has some helpful videos here. See [https://www.youtube.com/watch?v=hwE9Mge9E2M| TDM New Mappers Workshop, Lesson 6; Outdoor 'rooms'] and more about prefabs in [https://www.youtube.com/watch?v=RRIY0K_8B2A| Springheel Modules 4; Street details] | |||
* Or cover a base plane entirely with a patch, to introduce slight irregularities, as Sotha does to a courtyard in his video [https://www.youtube.com/watch?v=f-oFxWs8cWQ| Let's Map TDM! Part 6; Backyard Details]. | |||
For landscapes with more structure, Sotha's [[Roads]] covers the fundamentals involved in shaping, abutting, and texturing multiple patches. | |||
In any event, while an AI can walk on a patch, it has to "want to", that is, pathfind successfully across it. This requires underlying brush (e.g., monsterclip steps), within a nominal 16 units of the patch surface. For a simple example, see Springheel's [https://www.youtube.com/watch?v=VfqSB6NkqLI| TDM New Mappers Workshop/Lesson 11; AI] | |||
With rolling terrain, Dragofer's [[Systematic Method for Adding Pathfinding to Uneven Terrain]] provides guidance. | |||
==Splitting Patches== | |||
See [[Patch Splitting - Basic Tutorial]] | |||
== Other References == | |||
* [[Patch constructions]] has further examples. | |||
* A tutorial on simulated patch splitting: [http://www.doom3world.org/phpbb2/viewtopic.php?t=10517], TDM Forum mirror: [http://forums.thedarkmod.com/topic/9082-newbie-darkradiant-questions/page__view__findpost__p__199332 ], with advanced example: [http://www.doom3world.org/phpbb2/viewtopic.php?p=119203#p119203] and map file: [http://www.dramthethief.com/darkmod/files/patchtower.zip], mirror: [http://72.8.59.188/TheDarkMod/files/patchtower.zip] | |||
* For problems with patches, see [[Patch Troubleshooter]] | |||
* Texture Tool Tut, can help align arch textures: [[Texture_Tool|Texture Tool]] | |||
{{patches}} | |||
[[Category:Mapping Tutorials]] | |||
Latest revision as of 09:18, 8 June 2024
Introduction
A patch:
- is a two dimensional sheet with only one visible surface. It can be bent, curved and twisted in three dimensions but always remains a sheet. It produces better curves and textures better on them than multiple brushes.
- can also be a cylinder, great for pipes, bars, logs, ect... or it can be a cone good for tree branches.
- is a primitive - a child of the worldspawn entity. This means it is a direct offshoot of the game world and inherits any properties applied to the worldspawn. If you select a brush and look in the Entity Inspector you will see the worldspawn properties.
- may be parented to another entity when it will inherit its properties.
- will not seal against the void.
- is suitable for decals - textures such as stains to be placed over other surfaces.
Round and Softened Corners: Bevels
written by Fidcal
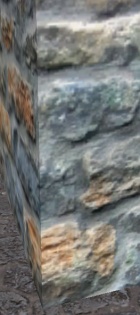
No matter how beautiful the texturing, a mathematically-sharp convex corner is likely to spoil it.
These can be rounded off nicely using a patch bevel. The same method can of course be used to produce larger rounded corners.
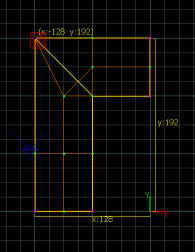
- Select the brush that forms the corner.
- Zoom in and set the grid to about 4 or 8. How rounded you want the corner will depend on the texture and other things. I crisp new brick wall might be better with a small rounded corner whereas old round stone blocks will take a larger curve. You can of course, use this method for very large curves where they are an architectural feature not merely a softening of a sharp edge.
- Press CTRL+X for Clipper or select
 on the left toolbar
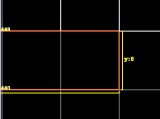
- Click the two diagonals in order 0 then 1 as shown in the diagram so that the corner is to the right if 0 was 12 on a clock and 1 is 6.
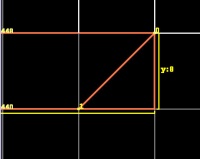
- SHIFT+ENTER to split off the corner without deleting it
- ESC to deselect then exclusively select the corner triangle. This might be easier in camera view.
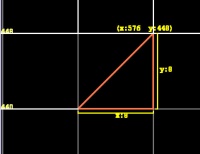
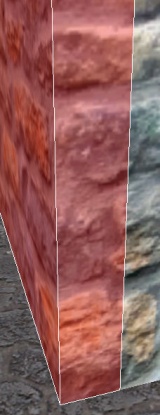
- Bevels may need to be rotated to the orientation you want and also you may have to invert the texture so it is on the inside or outside. Use menu > Patch > Matrix > invert to do that.
- Select Patch -> Bevel
- If the bevel is facing the wrong way (in top view) then rotate it, grid snap if necessary to as shown in the image below. The bevel might not have the same number of faces as in the diagram. Don't worry. We set that separately anyway.
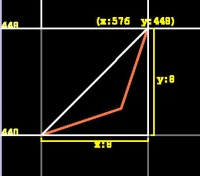
- Delete the original brush corner triangle that was the template for this bevel.
- Reselect the bevel patch.
- Press SHIFT+S for patch inspector
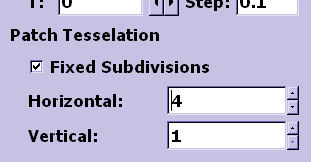
- Click the check box 'Fixed Subdivision' else Doom might change the quality when optimising.
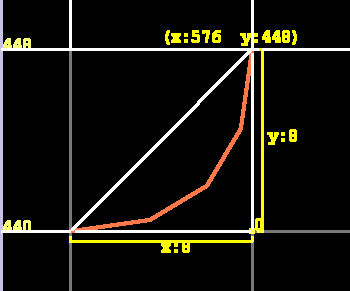
- In the 'Horizontal' input just below that in Patch Inspector set the value to 3 or 4. The higher the value the lower the game performance and beyond a certain value you cannot tell any difference so don't be tempted to go high. It's a matter of experience, judgement, how big the curve is, and the type of texture.
- Close the Patch Inspector and use ESC to deselect the bevel
- Use CTRL+SHIFT+
 to select only the surface of the brush wall to one side of the bevel. Use a side where you do not want to have to re-align the texture on that wall, eg, there is a window further along and it might be awkward. This is because later, the wall texture on the OTHER side of the bevel may have to be realigned to the bevel.
 - Use Edit -> Copy Shader or the key/mouse shortcut
- Press ESC to deselect and select the bevel again
- Use Edit -> Paste Shader (Natural) or the shortcut. Do NOT use the normal paste - nor normal paste followed by Natural in the Surface Inspector.
- The texture on the bevel should be aligned to that wall.
- Check texture alignment on the wall on the other side of the bevel and shift it in Surface Inspector as needed.
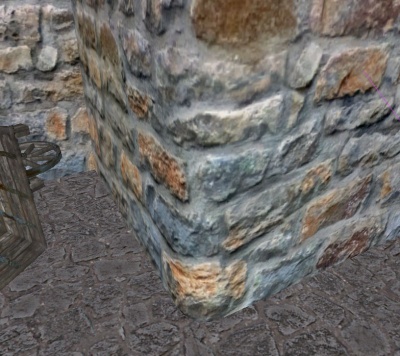
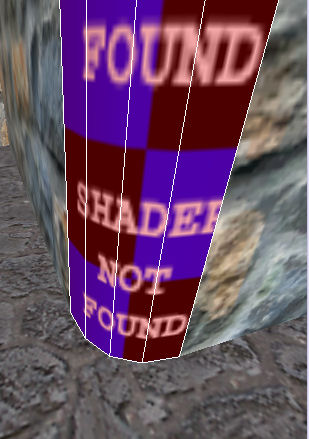
Hopefully that should now look far better:
Note: These bevels should not come into contact with other visportal areas but should be in two or more parts (see Patch Troubleshooter#Patch texture rendering error)
Cylinders and Cones
by Baddcog
To create a cylindrical patch:
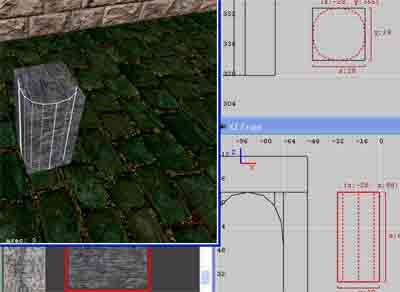
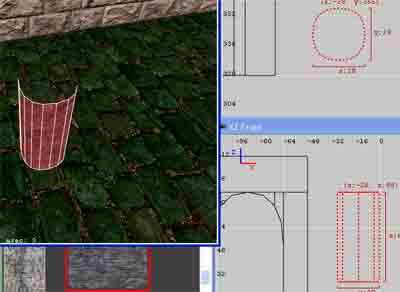
- drag out a brush an ortho view. The cylinder will be created in the plane of the ortho view you created the brush in. If you used the top view you will end up with a cylinder standing upright.
- with the brush selected choose the patch menu
- cylinder will give you a nice and round cylinder with one set of rows (lenghtwise). It will be the size of the brush you had selected.
'More cylinders' gives you more options: dense cylinder; a cylinder with 2 rows, very dense cylinder; a cylinder with 3 rows, square cylinder; a four sided cylinder. All patches are rendered smooth, so you can use a square cylinder and it will still have an almost round look to it in game as opposed to a square brush that will render flat and very square. The more dense of a cylinder you use the more you can bend it into a tight angle.
- deleted the brush you used to create the cylinder, you will notice that it has no ends and looks pretty bad. To fix this we'll need to create an end cap, see below.
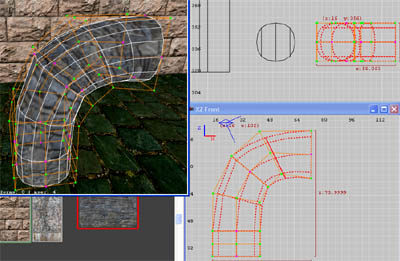
Hit the v and you'll see the verts of the cylinder, these can be dragged around to create shapes, bends. Hit v again to toggle the vert edit mode off, or hit escape twice. In this picture I used a very dense cylinder and dragged the verts to make a bend, it's very rough but there are already alot of Doom3 tuts out there that go into detail about how to bend a cylinder.
Creating a cone is the same process but you will choose cone from the patch menu.
End Caps
by Baddcog
End caps are useful for sealing off the end of a cylinder patch. The patch is created like a piece of paper wrapped around in a circle leaving two open ends.
To create an end cap:
- select the cylinder patch you just made
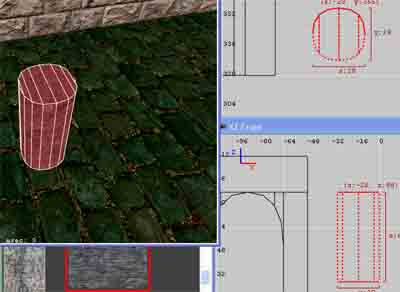
- choose patch menu cap selection Shift+C and choose cylinder.
If you did everything correctly you will have a round cap at each end of your cylinder. You can only see these caps if you are looking at them as they only have tex on one side. If your cylinder was setting on the floor you will have to fly down below it and look up.
You can bend a patch, then cap it and the caps will be in the correct places. You can also select a cap and a cylinder at the same time, hit V and drag verts of both patches together to keep their shapes aligned.
You also notice that in the caps menu there are other shapes of end caps, these can be good to fill in archways.
Archways
by Baddcog
Patches are great for smooth arches, much smoother than can be created with brushes. You can also create the opposite of an archway using the same steps, this could be useful for creating a covered wagons top.
To create an archway:
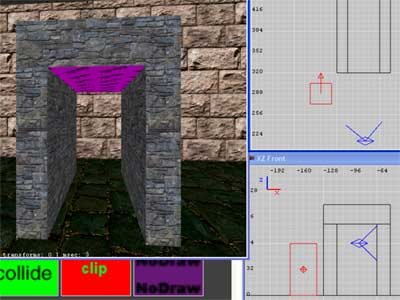
- create a doorway or hallway with terrain brushes, you can use caulk on the ceiling as those polys won't be seen and this way they won't be rendered either.
- create a brush in the doorway you want an arch in, make it the size you want the arch, so approximately the size of the curves at the top of the doorway.
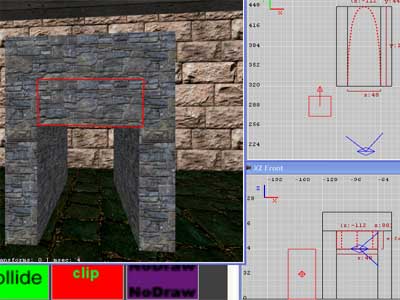
- out of the patch menu select end cap, end caps are not only round cylinder caps, in this case we will get the inside of the archway. Most likely it will have to be rotated/resized to fit the area you want it in.
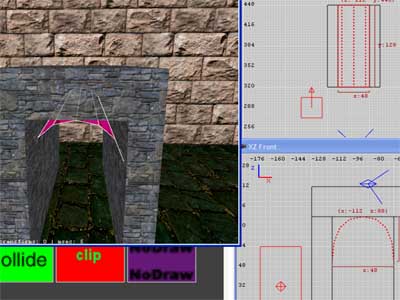
Again, patches only have tex on one side so if you don't see it in 3d it doesn't mean it isn't there. Look in the ortho views when you create it. Delete the brush you used to create the end cap patch.
Sometimes the texture ends up on the wrong side, so it would be facing the ceiling and the player couldn't see it. To fix it:
- select the patch
- patch menu: Matrix: Invert Ctrl+I
Now you've got a doorway or a hallway and an arched ceiling to it, but the ends of it are open and it looks like the ceiling is just paper. We need to cap the end so it looks solid.
- select the arch patch you just created.
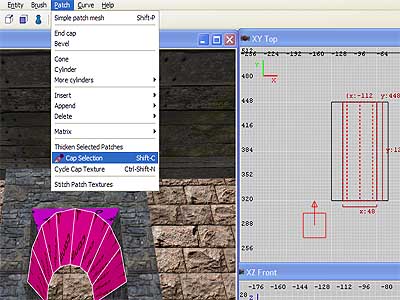
- patch menu: cap selection Shift+C
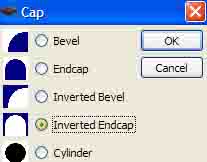
- choose inverted end cap
As you can see from the icon (the blue is what you get) you will get caps on each side of the arch that fill in the corners. Like the cylinder cap this will give you a cap on each end, so if you only needed one you'll have to delete the spare. Maybe you made an alcove and the back side of the arch is against a wall.
You can see that the inc=verted end cap has a pretty ugly looking texture alignment, this needs fixed. To align the textures with the surrounding bricks:
- Shift+Ctrl+
 click on the wall next to the arch.
 - Edit menu: copy shader
- Select the end cap(s)
- Edit menu: paste shader
(I think the shortcut for this is Shift+Ctrl+![]()
I failed to align the texture properly on the left wall due to a pizza break during the tut, forgive my slacker ways, however I did get the end cap properly textured and aligned to the wall on the right. (I should've aligned the textures top, left and right before doing the end cap). Do the same with one of the inside walls and the inside of the arch. Aligning this inside curve with the outside curve is probably impossible, in that case you'll probably want to create another stone trim arch for the end. This is up to you, do you want to build a decent level fast or do you want to create the mother of all beautiful levels? You aren't getting paid, how much free time do you have?
Trim Arches
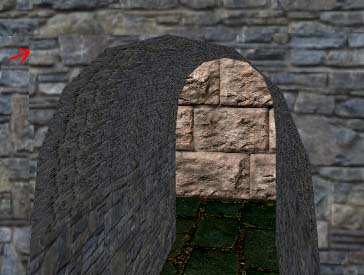
OK, you've decided that you do have more time and want your arches to look better than a simple cap like above. Instead you want a realistic arch with stones across the top. This effect can easily be achieved by using patches and a little bit of texture alignment.
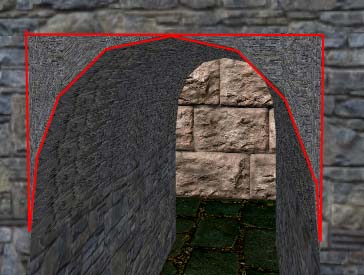
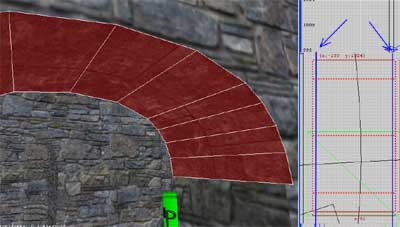
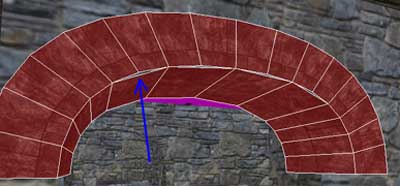
- Select the end cap patch that creates the inside of the archway, the one the player will look up at inside the hall or doorway.
- The tetxure used there is obviously a terrible choice for a stable archway so pick something that is made up of large square stones and apply it to the patch. Then drag the patch out so it is wider than the doorway. This will make the bricks wider than the doorway giving more depth and also avoiding any z-fighting issues with the wall. Now use the texture alignment tools to fit the bricks onto that patch nicely. I prefer to work with very small increments in the horizontal and vertical scaling and alignment sliders.
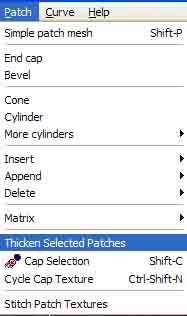
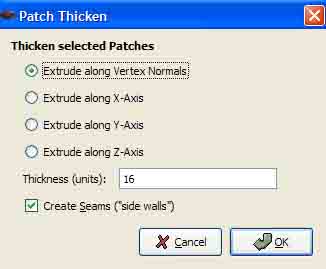
- With the patch selected go to the patch menu and select Thicken Patch. Use the setting shown. 16 will make the new patch 16 units thick, approximately a foot.
- Now you will have a complete stone arch. It's easiest to drag all the patches away from the wall and into an open area so you can easily see and align the textures. Also you will notice there are 2 patches at the bottom of the arch, these will most likely end up inside your wall so they can be deleted.
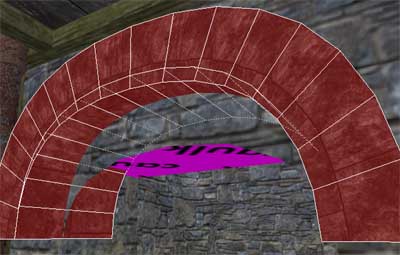
- There is a problem with this arch, this happened because I made a very flat topped arch. Patches will optimize themselves and because the arch was fairly flat it doesn't have enough shape to match the outside of the arch. The cure for this is to make the arch rounder in shape. So with all the arch patches selected (don't forget both sides, top and bottom) resize it height-wise until you see the patch sub-divide so it has the same amount of sections as the outside.
- This creates another issue, the patches no longer align properly. Hit V to enter vertex edit mode and adjust the verts so the patches match up or come very close to matching. If you can't get an exact match it is alright, just hit Ctrl + G to grid snap the verts. This should snap them altogether, if not try a different grid size.
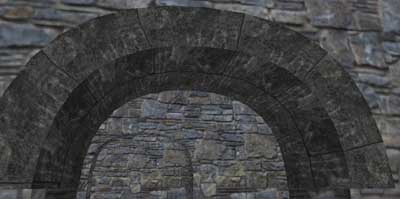
- Your patches now align cleanly and make a nice archway, now spend a little time aligning the textures on each side of the arch. You will have holes at the bottom of the arch so add a few blocks at the bottom of it to support it and give it a little extra realism.
- I like to select all the patches and the two blocks under the arch, right-click in an ortho view and convert them to a func_static. This will keep the arch from divinding the surrounding terrain into more triangles, make it easier to move by itself and clone for other doorways. You can also add NoShadows 1 to it if you are trying to drop framerate in that area, this may or may not be good depending on how lights in the area hit the archway.
Bending Patches, Curves, L-shapes, etc
Patches can be bent, twisted, turned, in all sorts of ways.
Curves
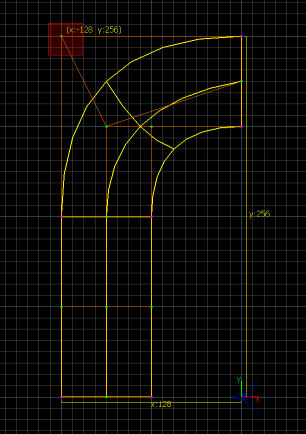
This is how to add a 90 degree curve to a flat patch or pipe and in the same plane rather like adding a curved section to a model railway layout or adding a bend to a pipe. The same method could be used for different degrees and sizes of patch. Scan down the images to the end one to see if this is what you want. This example is for a flat patch. For a pipe just create a cylinder and work constantly from one side. It will look much the same but there will be more vertices exactly behind the front ones which will get selected and moved automatically with them.
LMB = Left mouse button, etc.
In this example I start with a simple flat patch 128 x 64. Note that I've got a grid size large enough to see what I'm doing.
Select vertex mode (default key V) so you can these vertices.
I'm going to add a curve to the right at the top as shown by the red arrow in the image.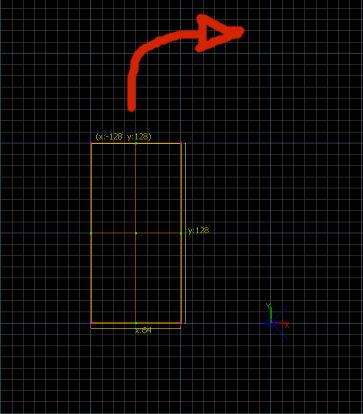
This is without any fixed sub-divisions of tesselations which is default (see patch inspector.) If later in this tutorial you can't see any curves, only straight lines then this is probably the reason - UNcheck sub-divisions in patch inspector. [EDIT] I have later made a very small pipe bend and in this I had to give it fixed sub-divisions. So all I can say is try both to see which works. Always use the minimum number that looks OK in-game.
Menu > patch > Append two rows at the end (this might vary depending on which you are doing yours.)
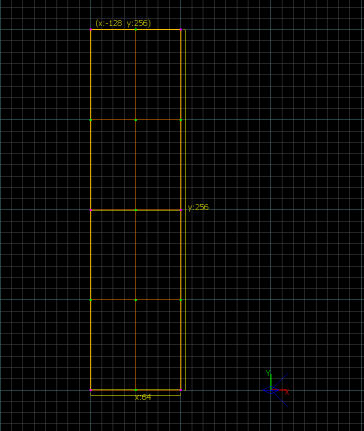
Shift + LMB over the top 3 vertices to select them
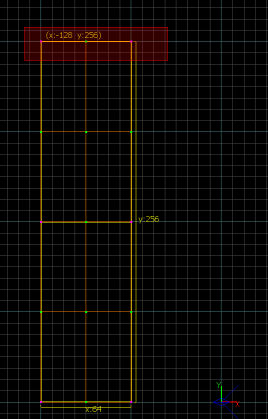
Rotate these 90 degrees to the right. I use the the transform dialog (no key by default - see hot keys: transformDialog)For example, if your patch is vertical and aligned east - west so you are facing it full on from the front view looking north along the Y axis then you would chose the Y rotation.
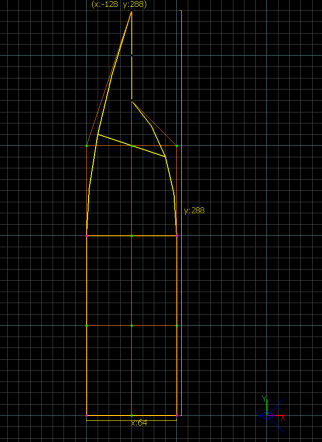
With them all still selected (black) grab one with LMB and drag the lot up and right to the place shown in the image. Note that alternatively you can just drag each vertex individually without any rotation.
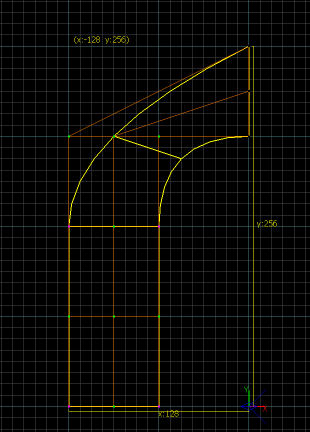
Click on the next (green) vertex down on the left shown (I used Shift + LMB so you can see which one.)
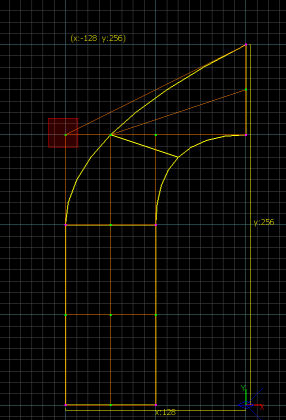
Likewise grab the one that was to its right.
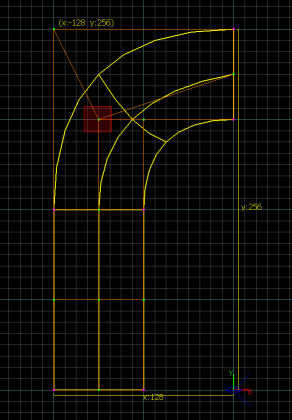
Drag it up vertically to the same level as the middle one one the far right.
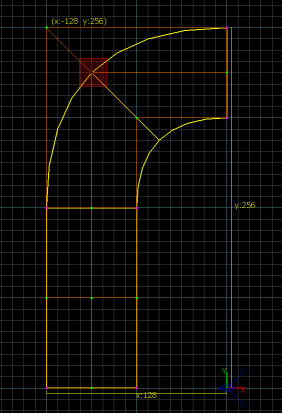
Notice how you dragged up that last one in a straight line, parallel to the vertical side lines, until it hit the diagonal? Similarly, the horizontal middle line is also in a straight line parallel to the horizontal sides and meets the other centre line at that diagonal. But what if you want to reshape the patch?
Often you will need to reshape your patch to fit so it won't be this classic example shape; it might be long and thin with a fat side piece in a real case. You do that by dragging vertices of course but all you have to remember is after moving the sides the middle lines should be parallel to the straight part of the side lines.
You can append any number of extra sections and bend them which way you want.
Bend L Shapes
This is how to add a 90 degree square bend like an L shape. The same method could be used for different degrees and sizes of patch. Scan down the images to the end one to see if this is what you want.
LMB = Left mouse button, etc.
In this example I start with a simple flat patch 128 x 64. Note that I've got a grid size large enough to see what I'm doing.
Select vertex mode (default key V) so you can these vertices.
I'm going to add an L bend to the right at the top as shown by the red arrow in the image.
First set fixed sub-divisions of tesselations to 1 x 1 (see menu > view > patch inspector.) If later in this tutorial you see curves not straight lines then this is probably the reason - check sub-divisions in patch inspector and make sure the values are both 1.
Menu > patch > Append two rows at the end (this might vary depending on which you are doing yours.) The blue arrow in the image indicates this added section will be bent in that direction later.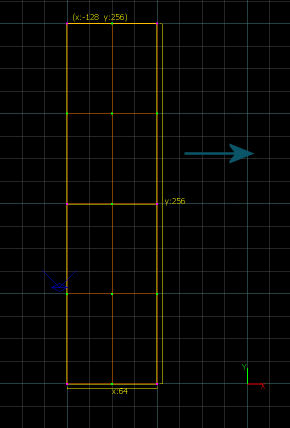
Shift + LMB over the top SIX vertices to select them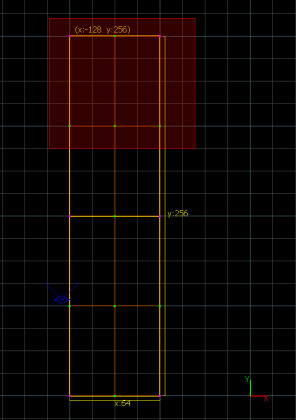
Rotate these 90 degrees to the right. I use the the transform dialog (no key by default - see hot keys: transformDialog) For example, if your patch is vertical and aligned east - west so you are facing it full on from the front view looking north along the Y axis then you would chose the Y rotation.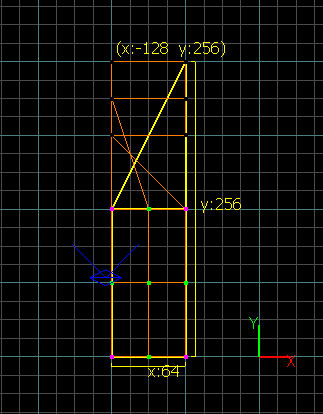
With them all still selected (black) grab one with LMB and drag all six right to the place shown in the image. Note that alternatively you can just drag each vertex individually without any rotation.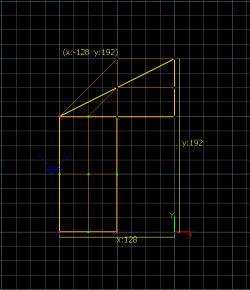
Click on the next (green) vertex down on the left shown (I used Shift + LMB so you can see which one.)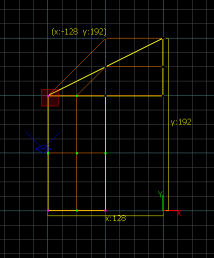
Likewise grab the one that was to its right.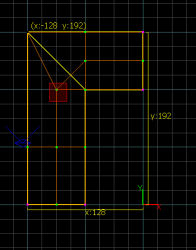
Drag it up vertically to the same level as the middle one one the far right.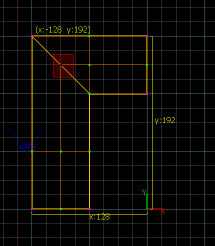
Notice how you dragged up that last one in a straight line, parallel to the vertical side lines, until it hit the diagonal? Similarly, the horizontal middle line is also in a straight line parallel to the horizontal sides and meets the other centre line at that diagonal. But what if you want to reshape the patch?
Often you will need to reshape your patch to fit so it won't be this classic example shape; it might be long and thin with a fat side piece in a real case. You do that by dragging vertices of course but all you have to remember is after moving the sides the middle lines should be parallel to the side lines and they should meet at the diagonal. If they don't, no worries, move the vertex of one to the centre of the diagonal then move its other vertices sideways until the line is parallel to the side lines.
You can append any number of extra sections and bend them which way you want, eg, to make a U shape.
Patches and Terrain
by Geep 2021
Extremely complicated landscapes can be modeled using third-party terrain generators like Terragen or Gensurf. But often, just building patches within DR is fine.
If you have an essentially flat landscape, then you might:
- Just supplement it in spots with patches, either from scratch or using prefabs with decals. Springheel has some helpful videos here. See TDM New Mappers Workshop, Lesson 6; Outdoor 'rooms' and more about prefabs in Springheel Modules 4; Street details
- Or cover a base plane entirely with a patch, to introduce slight irregularities, as Sotha does to a courtyard in his video Let's Map TDM! Part 6; Backyard Details.
For landscapes with more structure, Sotha's Roads covers the fundamentals involved in shaping, abutting, and texturing multiple patches.
In any event, while an AI can walk on a patch, it has to "want to", that is, pathfind successfully across it. This requires underlying brush (e.g., monsterclip steps), within a nominal 16 units of the patch surface. For a simple example, see Springheel's TDM New Mappers Workshop/Lesson 11; AI
With rolling terrain, Dragofer's Systematic Method for Adding Pathfinding to Uneven Terrain provides guidance.
Splitting Patches
See Patch Splitting - Basic Tutorial
Other References
- Patch constructions has further examples.
- A tutorial on simulated patch splitting: [1], TDM Forum mirror: [2], with advanced example: [3] and map file: [4], mirror: [5]
- For problems with patches, see Patch Troubleshooter
- Texture Tool Tut, can help align arch textures: Texture Tool
