Vaulting Junctions: Difference between revisions
m external image |
m adding category tag |
||
| (One intermediate revision by one other user not shown) | |||
| Line 1: | Line 1: | ||
{{Original_Reference|Demigod|1786}} | {{Original_Reference|Demigod|1786}} | ||
| Line 7: | Line 6: | ||
This is described in the previous chapter [[Vaulting]]. For the purposes of this tutorial we will be making a 4 way junction as shown below. The caps from the previous tutorial may be made but are not necessary for this tutorial. | This is described in the previous chapter [[Vaulting]]. For the purposes of this tutorial we will be making a 4 way junction as shown below. The caps from the previous tutorial may be made but are not necessary for this tutorial. | ||
[[Image:Vaulting1.jpg]] | |||
== Vertex Manipulation == | == Vertex Manipulation == | ||
Select the vaulting and turn on vertex manipulation (Key V) Select the centre point of the vaulting, on the bottom row in this case and drag it down to what you estimate is the centre point of the junction. | Select the vaulting and turn on vertex manipulation (Key V) Select the centre point of the vaulting, on the bottom row in this case and drag it down to what you estimate is the centre point of the junction. | ||
[[Image:Vaulting2.jpg]] | |||
== Duplicate it == | == Duplicate it == | ||
To make sure this is in fact the centre turn of vertex manipulation (key V again) and duplicate the object, rotate it on the z axis and move it into place. | To make sure this is in fact the centre turn of vertex manipulation (key V again) and duplicate the object, rotate it on the z axis and move it into place. | ||
[[Image:Vaulting3.jpg]] | |||
In this case I guessed the centre correctly. If the points don’t match then turn on vertex manipulation and move the centre points on both one object then the other until the centre point is found. TO check it is the correct point delete one of the object. Duplicate the one left rotate it on the z axis and the points should meet as above. To complete the vaulting duplicate the object twice more | In this case I guessed the centre correctly. If the points don’t match then turn on vertex manipulation and move the centre points on both one object then the other until the centre point is found. TO check it is the correct point delete one of the object. Duplicate the one left rotate it on the z axis and the points should meet as above. To complete the vaulting duplicate the object twice more | ||
[[Image:Vaulting4.jpg]] | |||
== Apply Textures == | == Apply Textures == | ||
Texturing can be a problem on these surfaces. While it is not necessary an easier way to get the desired effect is to create a flat brush and texture it the way you wish then select the vaulting and middle mouse click on the flat brush. This will not be perfect, as stretching can be visible at the edges of some textures, but should aid in the texturing of the vaulting. | Texturing can be a problem on these surfaces. While it is not necessary an easier way to get the desired effect is to create a flat brush and texture it the way you wish then select the vaulting and middle mouse click on the flat brush. This will not be perfect, as stretching can be visible at the edges of some textures, but should aid in the texturing of the vaulting. | ||
[[Category:Editing]] | |||
[[Category:Tutorial]] | |||
[[Category:Mapping Tutorials]] | |||
Latest revision as of 14:20, 21 November 2018
Originally written by Demigod on http://forums.thedarkmod.com/topic/1786
This tutorial takes up from the previous on Vaulting and arched doors. Gain it is based on the tutorial by John "Anwulf" Hutton (http://anwulf.teamhuh.com/vaulting.html) It has been updated simply to reflect the changes introduced by the Doom3 engine.
Create the vaulting
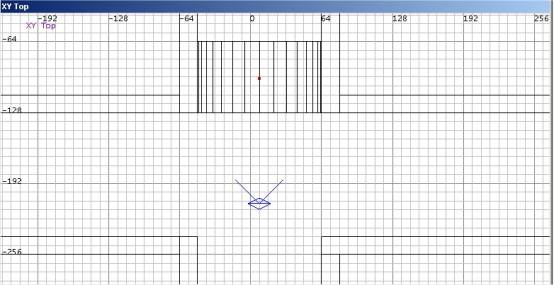
This is described in the previous chapter Vaulting. For the purposes of this tutorial we will be making a 4 way junction as shown below. The caps from the previous tutorial may be made but are not necessary for this tutorial.
Vertex Manipulation
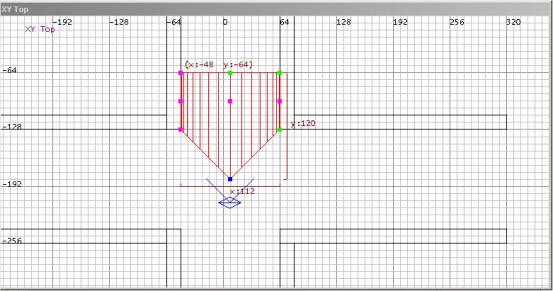
Select the vaulting and turn on vertex manipulation (Key V) Select the centre point of the vaulting, on the bottom row in this case and drag it down to what you estimate is the centre point of the junction.
Duplicate it
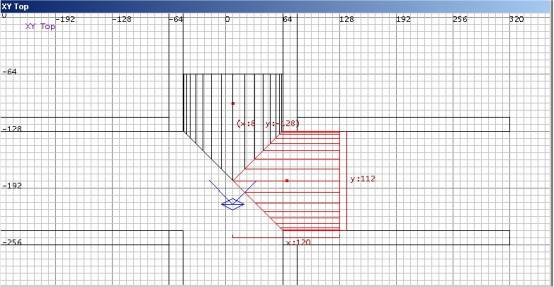
To make sure this is in fact the centre turn of vertex manipulation (key V again) and duplicate the object, rotate it on the z axis and move it into place.
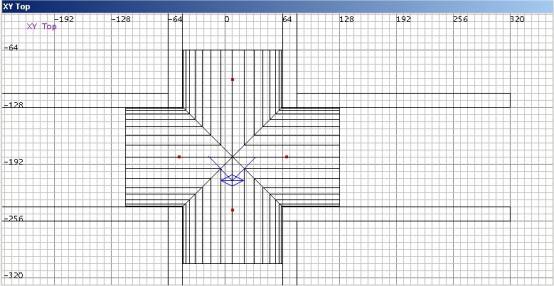
In this case I guessed the centre correctly. If the points don’t match then turn on vertex manipulation and move the centre points on both one object then the other until the centre point is found. TO check it is the correct point delete one of the object. Duplicate the one left rotate it on the z axis and the points should meet as above. To complete the vaulting duplicate the object twice more
Apply Textures
Texturing can be a problem on these surfaces. While it is not necessary an easier way to get the desired effect is to create a flat brush and texture it the way you wish then select the vaulting and middle mouse click on the flat brush. This will not be perfect, as stretching can be visible at the edges of some textures, but should aid in the texturing of the vaulting.


