Font Bitmaps in DDS Files: Difference between revisions
→Example of ExportFontToDoom3 Generation: improve text |
Add link to datBounds |
||
| (3 intermediate revisions by the same user not shown) | |||
| Line 47: | Line 47: | ||
[[File:For wiki Font Bitmaps in DDS Files, detail of Polish L within TDM's Stone 0 24 in GIMP no Alpha.png|185px]] | [[File:For wiki Font Bitmaps in DDS Files, detail of Polish L within TDM's Stone 0 24 in GIMP no Alpha.png|185px]] | ||
For this font and size, there has been a substantial ([https://forums.thedarkmod.com/index.php?/topic/21741-subtitles-possibilities-beyond-211/&do=findComment&comment=492454 | For this font and size, there has been a substantial effort (though incomplete; see [https://forums.thedarkmod.com/index.php?/topic/21741-subtitles-possibilities-beyond-211/&do=findComment&comment=492454 here] and [https://forums.thedarkmod.com/index.php?/topic/22427-analysis-of-212-tdm-fonts/ here]) to incorporate European characters in conjunction with [[I18N_-_Charset | TDM's custom character mapping]]. A glance makes it is apparent that several methods have worked over this file during its creation and life, resulting in many "footprints" in the middle panel, where the Alpha channel is turned off. While a mess, this doesn't harm the end result in the left panel. The right panel shows a closeup of the backing RGB pixels for the Polish L, from the third row of characters. Aligned with it, the alpha channel (not shown here, unlike Figure 1) would have the same outline, but with anti-aliased edges. | ||
== Editing a Bitmap == | |||
A DDS file is generated from a TGA file. For editing purpose, try to locate and make edits to that TGA file, then regenerate the DDS. This is because DDS is a lossy format, so every direct edit of a DDS file may reduce its quality slightly. Fortunately, TDM maintains an SVN archive of the font-categorized TGA, DDS, and in some cases upstream TTF files; ping the admins about such resources. | |||
When a font's source TTF is available, another possibility is to use a TTF editor, then (as discussed in [[Font Conversion & Repair]]) regenerate the DAT and TGA files, and onward to DDS. However, some careful comparison of old and new DAT files and old and new bitmaps should be undertaken, to see if, in the past, there were post-TTF edits that need to be somehow incorporated into the new files. Preservation of some of the font metrics like xSkip in DAT is a particular concern. | |||
As a pertinent example of TTF sourcing: TDM's readable fonts are currently ASCII only. Some were made from a still-available TTF. If such a TTF covers Latin-1 or more, then you could imagine (with some complications regarding codepoint shuffling and the conversion software) regenerating an improved-coverage TDM font from that. | |||
Finally, if for some reason you ''must'' edit a DDS file directly, do so as few times as possible. Think about: | |||
* batching up all the needed DDS edits into a single session. | |||
* use a tool to back-convert a DDS into a working TGA. Edit that, then regenerate the DDS for distribution. That round-trip process would still cause an extra generation of quality loss, but at least you'd have a TGA in hand, for iterative editing without cumulative losses. | |||
== For More == | == For More == | ||
* The [[datBounds]] article, about a 2024 tool to visualize font boundaries inside of bitmaps, has additional examples of bitmap editing. It includes using a GIMP project file as the master source for a font. | |||
[Doom3 Tutorials 10 and 11] In 2004, zeh (aka Zeh Fernando) developed an informal "Complete GUI Scripting" tutorial series in a doom3world forum. Relevant topics are still accessible from the Wayback Machine: | [Doom3 Tutorials 10 and 11] In 2004, zeh (aka Zeh Fernando) developed an informal "Complete GUI Scripting" tutorial series in a doom3world forum. Relevant topics are still accessible from the Wayback Machine: | ||
* [https://web.archive.org/web/20081028224423/http://www.doom3world.org/phpbb2/viewtopic.php?t=11923 Tutorial 10: Using custom fonts (classic DOOM HUD #5)] | * [https://web.archive.org/web/20081028224423/http://www.doom3world.org/phpbb2/viewtopic.php?t=11923 Tutorial 10: Using custom fonts (classic DOOM HUD #5)] | ||
* [https://web.archive.org/web/20100522173219/http://www.doom3world.org/phpbb2/viewtopic.php?t=11924 Tutorial 11: Editing fonts (classic DOOM HUD #6)] | * [https://web.archive.org/web/20100522173219/http://www.doom3world.org/phpbb2/viewtopic.php?t=11924 Tutorial 11: Editing fonts (classic DOOM HUD #6)] | ||
Also [[DDS creation]] and its links has more about the general treatment of textures in TDM as TGA and DDS files. | |||
{{tutorial}} [[Category:Fonts]] | {{tutorial}} [[Category:Fonts]] | ||
Latest revision as of 20:06, 10 May 2024
Introduction
It would be good to review these articles first:
- Font Files describes DAT and DDS file naming, directory location, scaling, and usage by TDM.
- Font Metrics & DAT File Format provides an Overview and helpful details.
- Font Conversion & Repair touches on tools to generate, visualize, and adjust DAT and DSS files, including utilities ExportFontToDoom3, Q3Font, Refont, and Font Patcher.
Briefly, a font DDS is a 256 x 256 bitmap, containing the usual additional "MipMaps" pyramid of images, into which individual glyphs (all or part of a font set) are packed.
It may have started life as a TGA file from a generation tool, but is distributed in TDM as a DDS.
Attributes of a Good Glyph Packing/Layout
The layout of glyphs into any given bitmap may be done by a generation tool. Or perhaps a manual layout is involved, either within an empty bitmap or to extend the content of a generated one. With a manual layout, usually you devise an organizing grid structure. And if a set involves multiple bitmaps (which is normal for sizes 24 and 48), you have to decide into which bitmap each new glyph goes.
The algorithms of generated layouts typically strive to place glyphs snugly against the top and left edges of the bitmap. This can be a problem if you need to enlarge the glyphs (e.g., for bolding, or menu-system "glow").
Glyph bitmap placement and DAT metrics need to avoid introducing stray marks from adjoining glyphs. Consider the tight bounding box containing any given character (shown in gray in Figure 1 of Font Metrics & DAT File Format) and the looser overall cell given by imageWidth x imageHeight. A good packing strives to ensure that the gray bounding box from only one character is contained in any given cell.
Pixel Color Representation in a DDS File
Each pixel of the bitmap is an RGBA value, where R, G, B, and A values are 8-bit (i.e., 256 values).
Back in Doom3 days, fonts tended to be multicolor, and a bit ragged. For examples, see "Doom3 Tutorials 10 and 11" under For More below.
TDM has gone in another direction. The glyphs are "gray-level" (i.e., with anti-aliased edges), so it is the Alpha channel that defines them. TDM convention has the fonts stored with a white color. This is for the benefit of GUI coding, so the font can be recolored using the GUI "forecolor" command.
That means that every pixel whose Alpha channel has a non-zero value must have RGB of white (e.g., all max values). This can be done in different ways:
- Have the entire bitmap uniformly white in RGB.
- Have just the bounding boxes in white, with the rest 0 (representing transparent). This is the approach of tool ExportFontToDoom3. It is useful if editing the DDS while leaving the DAT data unchanged. Doom3 Tutorial 11 shows this approach too.
- Have the only the character strokes in 100% white. This is can be done manually in the bitmap editor.
Example of ExportFontToDoom3 Generation
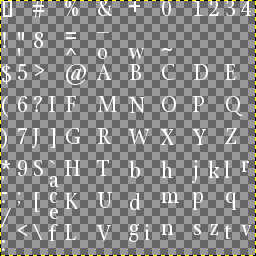
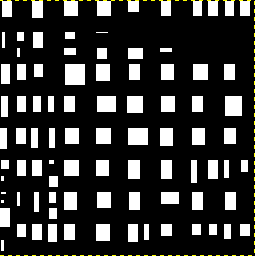
Figure 1 (below) shows font bitmap StonePrint_0_24.tga, freshly generated just for this wiki page, using the ASCII-only version of ExportFontToDoom3 v1.02 with its default options. By default, DAT and bitmap files for sizes 12, 24, and 48 are generated, and the bitmaps are TGA (because the tool author warns against using the built-in DDS output.) The TrueType font in this example, StonePrint.ttf, is of the same family as Stone in TDM, but perhaps not the same variant. One of the generated bitmap files, StonePrint_0_24.tga, is examined here in GIMP.
In the left panel, the soft-edged white characters appear on a transparent background (shown as the usual checkerboard). If you turn off visibility of the Alpha channel (middle panel), you see the white backing rectangle behind each character. Inside GIMP, you can toggle this back and forth while focused on any individual character, to see the relationship between a character and its backing white rectangle. (TIP: turn off the blue channel, so pixels appear in yellow, easier to distinguish from grey checkerboard empty pixels.)
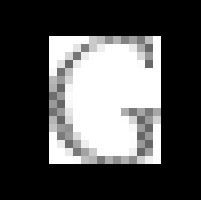
It is possible in GIMP to get a static simultaneous representation of characters and their backings, such as the "G" closeup in the right panel, where the inside of the character itself is transparent. (With the image layer chosen, click the lower-right button "Add a mask to a layer". In the pop-up "Initialize Layer Mask to:" dialog, select "Transfer Layer's alpha channel", as well as checkbox "Invert Mask".)
ExportFont2Doom3 fulfills the requirement to generate a backing rectangle for each glyph (i.e., the box shown as an abstract gray rectangle in Font Metrics & DAT File Format) at least large enough to cover the glyph's pixels. But evidently no larger. (It is not possible to also visualize in GIMP the corresponding imageWidth x imageHeight box, since that is specified in the DAT file. As discussed, this box must encapsulate the backing rectangle within a typically larger area.)
Also, as mentioned earlier, for certain purposes (e.g., to allow hand-thickening for bolding, or for main-menu peripheral "glow" treatment of special fonts like "mason"), some glyphs will need to have a more-generous spacing within the bitmap than this tool creates. This is particularly true for glyphs abutting the top or left sides of the overall bitmap.
Another Example – Cumulative Adjustments with Diverse Methods
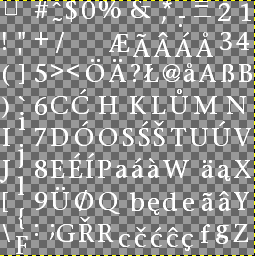
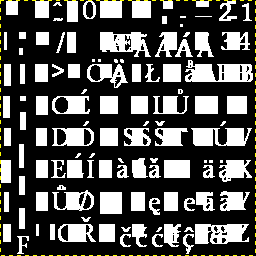
Figure 2 shows an actual DDS file (namely, fonts/english/Stone_0_24.dds) from TDM 2.11 and earlier.
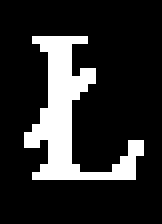
For this font and size, there has been a substantial effort (though incomplete; see here and here) to incorporate European characters in conjunction with TDM's custom character mapping. A glance makes it is apparent that several methods have worked over this file during its creation and life, resulting in many "footprints" in the middle panel, where the Alpha channel is turned off. While a mess, this doesn't harm the end result in the left panel. The right panel shows a closeup of the backing RGB pixels for the Polish L, from the third row of characters. Aligned with it, the alpha channel (not shown here, unlike Figure 1) would have the same outline, but with anti-aliased edges.
Editing a Bitmap
A DDS file is generated from a TGA file. For editing purpose, try to locate and make edits to that TGA file, then regenerate the DDS. This is because DDS is a lossy format, so every direct edit of a DDS file may reduce its quality slightly. Fortunately, TDM maintains an SVN archive of the font-categorized TGA, DDS, and in some cases upstream TTF files; ping the admins about such resources.
When a font's source TTF is available, another possibility is to use a TTF editor, then (as discussed in Font Conversion & Repair) regenerate the DAT and TGA files, and onward to DDS. However, some careful comparison of old and new DAT files and old and new bitmaps should be undertaken, to see if, in the past, there were post-TTF edits that need to be somehow incorporated into the new files. Preservation of some of the font metrics like xSkip in DAT is a particular concern.
As a pertinent example of TTF sourcing: TDM's readable fonts are currently ASCII only. Some were made from a still-available TTF. If such a TTF covers Latin-1 or more, then you could imagine (with some complications regarding codepoint shuffling and the conversion software) regenerating an improved-coverage TDM font from that.
Finally, if for some reason you must edit a DDS file directly, do so as few times as possible. Think about:
- batching up all the needed DDS edits into a single session.
- use a tool to back-convert a DDS into a working TGA. Edit that, then regenerate the DDS for distribution. That round-trip process would still cause an extra generation of quality loss, but at least you'd have a TGA in hand, for iterative editing without cumulative losses.
For More
- The datBounds article, about a 2024 tool to visualize font boundaries inside of bitmaps, has additional examples of bitmap editing. It includes using a GIMP project file as the master source for a font.
[Doom3 Tutorials 10 and 11] In 2004, zeh (aka Zeh Fernando) developed an informal "Complete GUI Scripting" tutorial series in a doom3world forum. Relevant topics are still accessible from the Wayback Machine:
- Tutorial 10: Using custom fonts (classic DOOM HUD #5)
- Tutorial 11: Editing fonts (classic DOOM HUD #6)
Also DDS creation and its links has more about the general treatment of textures in TDM as TGA and DDS files.
