Security Camera: Difference between revisions
No edit summary |
mNo edit summary |
||
| (15 intermediate revisions by the same user not shown) | |||
| Line 1: | Line 1: | ||
==Security Camera== | ==Security Camera== | ||
<span style="color: red">This article | <span style="color: red">This is the article documenting the security camera of TDM 2.09 and older. As of 2.10, the article [[Security Camera (2.10+)]] will be accurate.</span> | ||
The security camera | The security camera (aka remote camera) has been a part of TDM for years, but has been rarely, if ever, used. Recent problems came to light when trying to use it, so I (grayman) decided to flesh it out for 2.06. That done, some issues supporting a more Thief-like camera model were discovered too late in the 2.06 release cycle to safely accommodate required changes in the camera, so work will continue into 2.07. | ||
The security camera is different than the cinematic camera discussed in [[Cutscenes]]. The cinematic camera takes over the entire screen and presents to the player what the camera sees. The security camera paints its view on a func_static display provided by the map author. | |||
There are different types of cameras: | |||
* A rotating camera that sweeps back and forth. | |||
* A stationary camera that doesn't move. | |||
* A camera that uses the view from another entity (typically a target_null) to show a scene on its display screen. | |||
The camera provides the following features: | |||
* An optional spotlight that points forward, lighting the area in the direction the camera faces. This spotlight can be toggled on/off. | |||
* The ability to toggle the camera power on/off. This is useful if the mapper wants to give the player the ability to shut down power to an area. | |||
* The ability to halt a rotating camera so it stops sweeping. It then becomes equivalent to a stationary camera. Sweeping can be started back up again. | |||
* The camera will normally spot the player, but this can be toggled on/off. When the player is spotted, the camera initially plays a short alert sound. The player is given a short time to hide, but when that time expires and the player is still in view, another alarm sounds. This alarm will play intermittently for a while, even if the player moves out of sight. This second alarm will alert nearby guards. | |||
* If the camera has targets, these will be activated when the second "player alarm" plays. This gives the map author the ability to play a more powerful alarm than the one given off by the camera. (Or to do a variety of other things.) | |||
==The Security Camera Entity and its Spawnargs== | |||
The camera is ''func_securitycamera'', and it's found in the ''Func'' folder in DR. It comes with a default model, which the map author can change if he wishes. | |||
Place the camera entity in your map, and orient it toward its starting direction. A rotating camera will sweep clockwise, then halt a moment, then sweep back counter-clockwise. | |||
Spawnargs: | |||
* "rotate" - If "1" (default) the camera will rotate. If "0", the camera is | * "rotate" - If "1" (default) the camera will rotate. If "0", the camera becomes stationary. | ||
* "sweepSpeed" - How many seconds it takes a rotating camera to complete a sweep in one direction. | * "scanDist" - The distance limit for spotting the player, and how far forward the spotlight will travel. Default is 200 units. | ||
* "sweepAngle" - The angle of sweep. You can cause a camera to initially sweep in the counter-clockwise direction by setting this to a negative number. | * "sweepSpeed" - How many seconds it takes a rotating camera to complete a sweep in one direction. Default is 5 seconds. | ||
* "health" - Cameras can be 'killed'. Default is 100. | |||
* "scanFov" - The camera's FOV. Default is 90 degrees. | |||
* "sweepAngle" - The angle of sweep. Default is 90 degrees. You can cause a camera to initially sweep in the counter-clockwise direction by setting this to a negative number. | |||
* "seePlayer" - If "1" (default) the camera will react if it sees the player. If "0", it won't. | |||
* "sightResume" - How long the camera pauses after losing sight of the player. When this expires, the camera will resume scanning. Default is 1.5 seconds. | |||
* "sightTime" - After spotting the player, the camera will pause this amount of time before it sounds an alarm. Default is 5 seconds. This gives the player some time to hide. | |||
* "sweepWait" - How long the pause is after a sweep completes and starting the return sweep. Default is 0.5 seconds. | * "sweepWait" - How long the pause is after a sweep completes and starting the return sweep. Default is 0.5 seconds. | ||
* "wait" - How long the camera will play its alarm after spotting the player (and deciding it's really the player). Default is 20 seconds. If the player is still visible at the end of this time, the clock will start over again. Otherwise, the camera will pause "sightResume" seconds, then return to scanning. | |||
* "spotLight" - If "1" the camera will start with a spotlight. If you choose not to start with a spotlight, change the camera's skin spawnarg to "security_camera_on_spotlight_off". | |||
Important Spawnargs if you change the camera model: | |||
The default camera uses spawnargs to place its 'eye' and spotlight. If you use a different model, you might need to change these. | |||
* "viewOffset" - A vector that defines the offset of the camera's 'eye' from the camera's origin. | * "viewOffset" - A vector that defines the offset of the camera's 'eye' from the camera's origin. | ||
* "lightOffset" - A vector that defines the spotlight offset from the camera's origin. | * "lightOffset" - A vector that defines the spotlight offset from the camera's origin. | ||
The | The "cameraTarget" Spawnarg: | ||
For a camera that's displaying its view on a screen, this spawnarg can be left undefined. | |||
For a camera that's replacing its own view with that of another entity (i.e. a target_null), set the following: | |||
* "cameraTarget" - The name of the entity supplying the view. | |||
==The Display Screen== | |||
The display screen where the camera's image is shown is a func_static patch that uses the shader ''textures/darkmod/camera''. Size the patch appropriately. | |||
Spawnargs: | |||
* cameraTarget - The name of the camera whose view will be painted on this display. | |||
* | |||
If you plan to use more than one camera in your mission, or if the camera display will appear in the same player POV as the sky or reflective water surfaces, you'll need to copy the material shader ''textures/darkmod/camera'' (in materials/tdm_security_camera.mtr) to a map-specific *.mtr file, rename it to something like ''camera1'', and give it a unique ''map'' keyword. Place this file in your mission's ''materials'' folder. | |||
If you plan to use more than one camera | |||
For example, if you have two cameras in your mission, you would assign one of these shaders to the display for the first camera, and the other shader to the display for the second: | For example, if you have two cameras in your mission, you would assign one of these shaders to the display for the first camera, and the other shader to the display for the second: | ||
| Line 204: | Line 102: | ||
Note the ''map "camera1"'' and ''map "camera2"'' lines. These unique names allow the renderer to correctly display both camera displays in the same mission. | Note the ''map "camera1"'' and ''map "camera2"'' lines. These unique names allow the renderer to correctly display both camera displays in the same mission. | ||
==Examining a Test Map== | ==Examining a Test Map== | ||
You can obtain a test map with sample cameras in it here: [ | You can obtain a test map with sample cameras in it here: [https://ftp.thedarkmod.com/tutorials/RemoteCamera/camerawiki.pk4 camerawiki.pk4]. | ||
Open the map ''camerawiki.map'' in Dark Radiant. In this map, we have examples of the different cameras. | Open the map ''camerawiki.map'' in Dark Radiant. In this map, we have examples of the different cameras. | ||
Revision as of 08:50, 29 January 2022
Security Camera
This is the article documenting the security camera of TDM 2.09 and older. As of 2.10, the article Security Camera (2.10+) will be accurate.
The security camera (aka remote camera) has been a part of TDM for years, but has been rarely, if ever, used. Recent problems came to light when trying to use it, so I (grayman) decided to flesh it out for 2.06. That done, some issues supporting a more Thief-like camera model were discovered too late in the 2.06 release cycle to safely accommodate required changes in the camera, so work will continue into 2.07.
The security camera is different than the cinematic camera discussed in Cutscenes. The cinematic camera takes over the entire screen and presents to the player what the camera sees. The security camera paints its view on a func_static display provided by the map author.
There are different types of cameras:
- A rotating camera that sweeps back and forth.
- A stationary camera that doesn't move.
- A camera that uses the view from another entity (typically a target_null) to show a scene on its display screen.
The camera provides the following features:
- An optional spotlight that points forward, lighting the area in the direction the camera faces. This spotlight can be toggled on/off.
- The ability to toggle the camera power on/off. This is useful if the mapper wants to give the player the ability to shut down power to an area.
- The ability to halt a rotating camera so it stops sweeping. It then becomes equivalent to a stationary camera. Sweeping can be started back up again.
- The camera will normally spot the player, but this can be toggled on/off. When the player is spotted, the camera initially plays a short alert sound. The player is given a short time to hide, but when that time expires and the player is still in view, another alarm sounds. This alarm will play intermittently for a while, even if the player moves out of sight. This second alarm will alert nearby guards.
- If the camera has targets, these will be activated when the second "player alarm" plays. This gives the map author the ability to play a more powerful alarm than the one given off by the camera. (Or to do a variety of other things.)
The Security Camera Entity and its Spawnargs
The camera is func_securitycamera, and it's found in the Func folder in DR. It comes with a default model, which the map author can change if he wishes.
Place the camera entity in your map, and orient it toward its starting direction. A rotating camera will sweep clockwise, then halt a moment, then sweep back counter-clockwise.
Spawnargs:
- "rotate" - If "1" (default) the camera will rotate. If "0", the camera becomes stationary.
- "scanDist" - The distance limit for spotting the player, and how far forward the spotlight will travel. Default is 200 units.
- "sweepSpeed" - How many seconds it takes a rotating camera to complete a sweep in one direction. Default is 5 seconds.
- "health" - Cameras can be 'killed'. Default is 100.
- "scanFov" - The camera's FOV. Default is 90 degrees.
- "sweepAngle" - The angle of sweep. Default is 90 degrees. You can cause a camera to initially sweep in the counter-clockwise direction by setting this to a negative number.
- "seePlayer" - If "1" (default) the camera will react if it sees the player. If "0", it won't.
- "sightResume" - How long the camera pauses after losing sight of the player. When this expires, the camera will resume scanning. Default is 1.5 seconds.
- "sightTime" - After spotting the player, the camera will pause this amount of time before it sounds an alarm. Default is 5 seconds. This gives the player some time to hide.
- "sweepWait" - How long the pause is after a sweep completes and starting the return sweep. Default is 0.5 seconds.
- "wait" - How long the camera will play its alarm after spotting the player (and deciding it's really the player). Default is 20 seconds. If the player is still visible at the end of this time, the clock will start over again. Otherwise, the camera will pause "sightResume" seconds, then return to scanning.
- "spotLight" - If "1" the camera will start with a spotlight. If you choose not to start with a spotlight, change the camera's skin spawnarg to "security_camera_on_spotlight_off".
Important Spawnargs if you change the camera model:
The default camera uses spawnargs to place its 'eye' and spotlight. If you use a different model, you might need to change these.
- "viewOffset" - A vector that defines the offset of the camera's 'eye' from the camera's origin.
- "lightOffset" - A vector that defines the spotlight offset from the camera's origin.
The "cameraTarget" Spawnarg:
For a camera that's displaying its view on a screen, this spawnarg can be left undefined.
For a camera that's replacing its own view with that of another entity (i.e. a target_null), set the following:
- "cameraTarget" - The name of the entity supplying the view.
The Display Screen
The display screen where the camera's image is shown is a func_static patch that uses the shader textures/darkmod/camera. Size the patch appropriately.
Spawnargs:
- cameraTarget - The name of the camera whose view will be painted on this display.
If you plan to use more than one camera in your mission, or if the camera display will appear in the same player POV as the sky or reflective water surfaces, you'll need to copy the material shader textures/darkmod/camera (in materials/tdm_security_camera.mtr) to a map-specific *.mtr file, rename it to something like camera1, and give it a unique map keyword. Place this file in your mission's materials folder.
For example, if you have two cameras in your mission, you would assign one of these shaders to the display for the first camera, and the other shader to the display for the second:
camera1
{
	qer_editorimage textures/editor/cameragui.tga
	noshadows
	{
		red Parm0
		green Parm1
		blue Parm2
		remoteRenderMap 232 232 // width / height of render image, ie resolution of screen
  		scale -1, -1
		translate -1, -1
		map "camera1"
	}
}

camera2
{
	qer_editorimage textures/editor/cameragui.tga
	noshadows
	{
		red Parm0
		green Parm1
		blue Parm2
		remoteRenderMap 232 232 // width / height of render image, ie resolution of screen
  		scale -1, -1
		translate -1, -1
		map "camera2"
	}
}
Note the map "camera1" and map "camera2" lines. These unique names allow the renderer to correctly display both camera displays in the same mission.
Examining a Test Map
You can obtain a test map with sample cameras in it here: camerawiki.pk4.
Open the map camerawiki.map in Dark Radiant. In this map, we have examples of the different cameras.

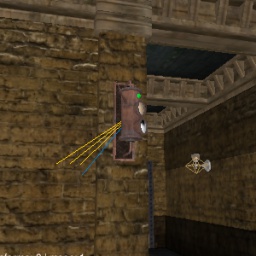
A rotating camera that sweeps back and forth
This camera (cam1) starts its rotation at 135 degrees (assuming +X is 0 degrees), and sweeps clockwise until it reaches 45 degrees. It pauses for a moment, then return-sweeps back to 135 degrees. It has a spotlight.
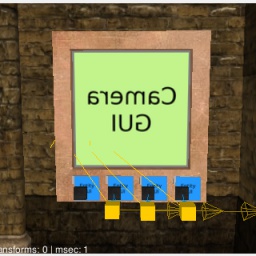
The display for cam1 is on the wall behind it. (Don't worry about the material being displayed backward.)
The display patch uses a custom material camera1 (provided in the camerawiki/materials/camera.mtr file). It's custom because there are other displays in this test map.
The four buttons below the display do the following (from left to right):
- Toggle Power - targets cam1 directly. When power is off, the display screen is hidden. You can simulate an "off" screen by making sure there's a black material behind the display. You could also place a glass material behind the display.
- Toggle Spotlight - calls the toggleSCSpotlight() routine in the camera's scriptobject, turning the spotlight on/off
- Toggle Player Sighting - calls the toggleSCPlayer() routine in the camera's scriptobject, turning Player detection on/off
- Toggle Sweep - calls the toggleSCSweep() routine in the camera's scriptobject, turning camera sweep on/off

A stationary camera that doesn't move

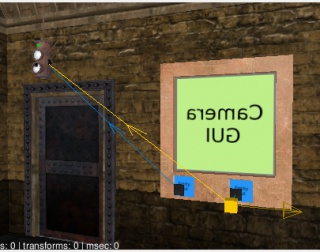
This camera (cam2) is stationary, w/o a spotlight.
Its display, to its left, uses a custom material camera2 (provided in the camerawiki/materials/camera.mtr file). It's custom because there are other displays in this test map.
The two buttons below the display do the following (from left to right):
- Toggle Power - targets cam2 directly. When power is off, the display screen is hidden.
- Toggle Player Sighting - calls the toggleSCPlayer() routine in the camera's scriptobject, turning Player detection on/off
A camera that uses the view from another entity (typically a target_null) to show a scene on its display screen

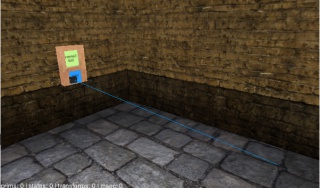
This camera (cam3) is stationary, w/o a spotlight, and it doesn't spot the player. In the test map, you'll find it in the blue room. Note that the camera uses the following spawnarg:
"cameraTarget" "Cam3View"
If you look in the room where the guard is standing, you'll see a target_null named Cam3View, which provides the view to the display screen.
Look at the other spawnargs on the camera. You'll see that it doesn't rotate, it doesn't have a spotlight, and it won't spot the player.
This camera could be used for something like 'peeking through keyholes', though that functionality hasn't been tested in 2.06. It would most likely need an accompanying 'player ear' in the observed room (not yet implemented). To simulate a keyhole, the display screen would be placed inside the opening. You'd also need a companion camera looking the other way (room->hall).
The button below the display does the following
- Toggle Power - targets cam3 directly. When power is off, the display screen is hidden.