Readables: Difference between revisions
(minor clarification) |
(wip) |
||
| Line 21: | Line 21: | ||
''following written by greebo'' | ''following written by greebo'' | ||
For this tutorial, I made a small test room and placed an info_player_start entity and a light in it. I also put a barebone socket in front of the player, to put the readable onto. | |||
== Making Readables out of Brushes == | == Making Readables out of Brushes == | ||
First, you'll need to create two brushes like shown below. One brush (the larger one) will be the readable's background (like a parchment), the other one will show the text of the readable. To avoid Z-fighting, the smaller brush must be a tad thicker than the larger one, as indicated in the screenshot. Just activate the smallest grid size (0.125) and drag it one grid unit larger. (The smaller one is narrower and ''inside'' the bigger one but protruding slightly above it.) | First, you'll need to create two brushes like shown below. One brush (the larger one) will be the readable's background (like a parchment), the other one will show the text of the readable. To avoid Z-fighting, the smaller brush must be a tad thicker than the larger one, as indicated in the screenshot. Just activate the smallest grid size (0.125) and drag it one grid unit larger. (The smaller one is narrower and ''inside'' the bigger one but protruding slightly above it.) | ||
[[Image:readables_brushes.jpg]] | |||
== Apply the right textures == | == Apply the right textures == | ||
It is important to apply the '''common/nodrawsolid''' | It is important to apply the '''textures/common/nodrawsolid''' shader onto the brushes (not just the "nodraw" one) to prevent the player clipping into the readable. | ||
Press ESC and select the '''top face''' of the smaller brush by selecting it with Ctrl-Shift-LMB. Apply the '''common/entitygui''' texture onto it, rotate and fit it (1x1). | Press ESC and select the '''top face''' of the smaller brush by selecting it with Ctrl-Shift-LMB. Apply the '''textures/common/entitygui''' texture onto it, rotate and fit it (1x1). | ||
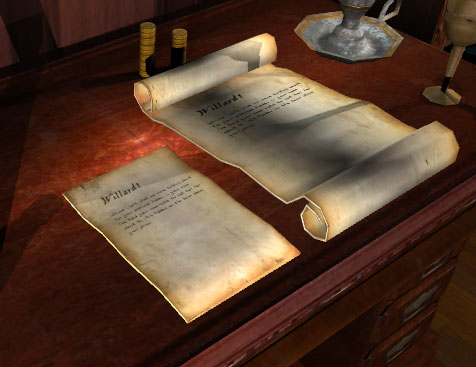
Press ESC and select the top face of the larger brush. Select the '''readables/page/ | Press ESC and select the top face of the larger brush. Select the '''textures/readables/page/old_parchment''' (or any other texture you like from that folder) texture from the texture browser, rotate and fit the texture to your needs (1x1). It should now look something like this: | ||
[[Image: | [[Image:Readables_tut_textures.jpg]] | ||
== Create the Entity == | == Create the Entity == | ||
Press ESC and select '''both''' brushes with Shift-LMB. | Press ESC and select '''both''' brushes with Shift-LMB. | ||
DoomEdit: Select the '''atdm:readable_immobile''' entity and click on "Create" | [[DarkRadiant]]: Just right-click into the orthogonal view, select "Create Entity" and choose the '''atdm:readable_immobile''' one (it's located in the darkmod/Readables folder). (DoomEdit: Select the '''atdm:readable_immobile''' entity and click on "Create") | ||
Voilà, the entity is created: | |||
[[Image:readables_tut_entity.jpg]] | |||
== Create your custom text == | == Create your custom text == | ||
Create your xdata file containing your readable text. This is explained here: [[XData File Creation]]. | Create your xdata file containing your readable text. This is explained here: [[XData File Creation]]. You can of course skip that step and use the '''readables_test.xd''' file, which is already prefabricated in the darkmod repository. Alternatively, you can also define the text data on the entity itself (see below). | ||
== Entity Keys/Values == | == Entity Keys/Values == | ||
Once you have your custom xdata-File, you are ready to set the entity keys. | Once you have your custom xdata-File, you are ready to set the entity keys. | ||
Press ESC to deselect everything (if you haven't already) and select one of your readable brushes (Shift-LMB). As they both belong to the same entity, the other brush is selected as well, which is good. Select the Entity Inspector and add the values shown below. | |||
[[Image:readables_tut_keyvalues.jpg]] | |||
=== readable_face === | === readable_face === | ||
| Line 80: | Line 78: | ||
page1_body Your Body Text here | page1_body Your Body Text here | ||
gui_page1 guis/readables/page_test.gui (or any other GUI you may have created) | gui_page1 guis/readables/page_test.gui (or any other GUI you may have created) | ||
Now compile your map. | Now compile your map. | ||
Revision as of 13:33, 10 October 2007
following written by Springheel
Adding Readables to your Map
Readables can be made with brushes (see below) or by using models. Any model can be used, technically, though if you want the readable text to display on the model in the game, you need to follow these directions.
Add a readable entity to your map by selecting adtm:readables from the dropdown menu. You can currently select readable_immobile_paper01, readable_immobile_scroll01, or readable_immobile_open_book01 (which isn't fully working atm).
Position the entity wherever you want it in your map.
You need to set one key/value on your entity:
"xdata_contents" "[readable text name]"
This key holds the name of the readable text as defined in your .xd File. See XData File Creation.
That's it. Later you will be able to select skins to match the parchment of your model to your gui, but that's another day.
There is another way to make readables without using a model. This is probably more useful for rectangular plaques:
following written by greebo
For this tutorial, I made a small test room and placed an info_player_start entity and a light in it. I also put a barebone socket in front of the player, to put the readable onto.
Making Readables out of Brushes
First, you'll need to create two brushes like shown below. One brush (the larger one) will be the readable's background (like a parchment), the other one will show the text of the readable. To avoid Z-fighting, the smaller brush must be a tad thicker than the larger one, as indicated in the screenshot. Just activate the smallest grid size (0.125) and drag it one grid unit larger. (The smaller one is narrower and inside the bigger one but protruding slightly above it.)

Apply the right textures
It is important to apply the textures/common/nodrawsolid shader onto the brushes (not just the "nodraw" one) to prevent the player clipping into the readable.
Press ESC and select the top face of the smaller brush by selecting it with Ctrl-Shift-LMB. Apply the textures/common/entitygui texture onto it, rotate and fit it (1x1).
Press ESC and select the top face of the larger brush. Select the textures/readables/page/old_parchment (or any other texture you like from that folder) texture from the texture browser, rotate and fit the texture to your needs (1x1). It should now look something like this:

Create the Entity
Press ESC and select both brushes with Shift-LMB.
DarkRadiant: Just right-click into the orthogonal view, select "Create Entity" and choose the atdm:readable_immobile one (it's located in the darkmod/Readables folder). (DoomEdit: Select the atdm:readable_immobile entity and click on "Create")
Voilà, the entity is created:

Create your custom text
Create your xdata file containing your readable text. This is explained here: XData File Creation. You can of course skip that step and use the readables_test.xd file, which is already prefabricated in the darkmod repository. Alternatively, you can also define the text data on the entity itself (see below).
Entity Keys/Values
Once you have your custom xdata-File, you are ready to set the entity keys.
Press ESC to deselect everything (if you haven't already) and select one of your readable brushes (Shift-LMB). As they both belong to the same entity, the other brush is selected as well, which is good. Select the Entity Inspector and add the values shown below.

readable_face
These three values form the normal vector of the face holding the text. In this example the readable text is facing upwards, its normal vector is pointing upwards too. Therefore we type in the value "0 0 1", which represents a vector pointing straight upwards (x=0, y=0, z=1).
readable_face_tolerance
This value defines how "far" the player has to look away from the readable to leave the "reading mode" and let the on-screen readable disappear. The value "90" is just fine, so we leave it as it is.
xdata_contents
This key holds the name of the readable text as defined in your .xd File. See XData File Creation.
Press OK and save the map, the values should be ok by now.
page1_title & page1_body
Note that it's not exactly required to create an xdata file, you can also add the appropriate keys directly to the entity itself. However, for large maps this should not be the way to go, as maintaining and translating the texts could become more complicated.
Just drop the xdata_contents key and add the following key/value pairs in the Entity Inspector like this:
page1_title    Your Title Here
page1_body     Your Body Text here
gui_page1      guis/readables/page_test.gui (or any other GUI you may have created)
Now compile your map.
Test your Readable!

