DDS creation: Difference between revisions
No edit summary |
No edit summary |
||
| Line 1: | Line 1: | ||
<br> | |||
==Converting Image TO DDS== | |||
This should describe the steps you'll have to follow in order to create DDS files suitable for use in your Dark Mod maps. | This should describe the steps you'll have to follow in order to create DDS files suitable for use in your Dark Mod maps. | ||
| Line 7: | Line 10: | ||
__TOC__ | __TOC__ | ||
== Compress Diffuse/Specular Maps == | === Compress Diffuse/Specular Maps === | ||
* Open your source (TGA) file | * Open your source (TGA) file | ||
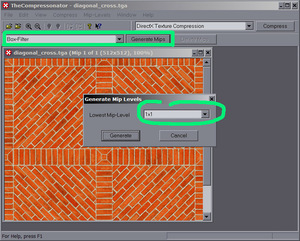
* Create Mip Maps using the '''Box-Filter''' with the lowest mip map size of '''1x1'''. | * Create Mip Maps using the '''Box-Filter''' with the lowest mip map size of '''1x1'''. | ||
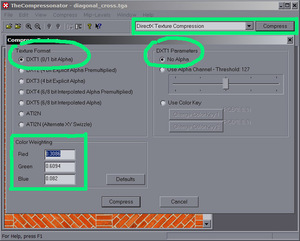
| Line 17: | Line 20: | ||
* Save your DDS to the '''dds/''' tree, e.g. dds/textures/darkmod/stone/blah.dds. You won't need to add the dds/ path prefix to your shader definition, this is automatically added by the game. | * Save your DDS to the '''dds/''' tree, e.g. dds/textures/darkmod/stone/blah.dds. You won't need to add the dds/ path prefix to your shader definition, this is automatically added by the game. | ||
== Compress Normalmaps == | === Compress Normalmaps === | ||
{{important|headline=Important|text=The normalmap DDS compression section is here for documentation purposes only. You '''don't''' need to compress the normalmaps for using them in The Dark Mod.}} | {{important|headline=Important|text=The normalmap DDS compression section is here for documentation purposes only. You '''don't''' need to compress the normalmaps for using them in The Dark Mod.}} | ||
| Line 27: | Line 30: | ||
* Save your DDS to the '''dds/''' tree, e.g. dds/textures/darkmod/stone/blah_local.dds. You won't need to add the dds/ path prefix to your shader definition, this is automatically added by the game. | * Save your DDS to the '''dds/''' tree, e.g. dds/textures/darkmod/stone/blah_local.dds. You won't need to add the dds/ path prefix to your shader definition, this is automatically added by the game. | ||
== Batch Processing == | === Batch Processing === | ||
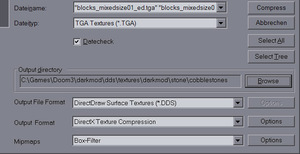
Choose '''File > Batch Compress''' or hit F4 to open the batch compression dialog. Choose the same compression settings as described above for your diffuse and normal maps. Don't mix diffuse/speculars with normals as they require different compression settings. | Choose '''File > Batch Compress''' or hit F4 to open the batch compression dialog. Choose the same compression settings as described above for your diffuse and normal maps. Don't mix diffuse/speculars with normals as they require different compression settings. | ||
[[Image:dds_batch_screenshot.jpg|frameless]] | [[Image:dds_batch_screenshot.jpg|frameless]] | ||
== Change the File Extension to lowercase == | === Change the File Extension to lowercase === | ||
The Compressonator automatically names the file *.DDS, but all files should be lowercase (also the TGAs). Be sure to rename the files to a lowercase .dds extension before uploading them. | The Compressonator automatically names the file *.DDS, but all files should be lowercase (also the TGAs). Be sure to rename the files to a lowercase .dds extension before uploading them. | ||
| Line 45: | Line 48: | ||
ren *.DDS *.dds | ren *.DDS *.dds | ||
== Command Line Parameters == | === Command Line Parameters === | ||
ATI's compressonator provides some command line parameters to compress the textures: | ATI's compressonator provides some command line parameters to compress the textures: | ||
thecompressonator -convert "normal.tga" "normal.dds" RXGB +red 0.0 +green 0.5 +blue 0.5 -mipmaps | thecompressonator -convert "normal.tga" "normal.dds" RXGB +red 0.0 +green 0.5 +blue 0.5 -mipmaps | ||
| Line 51: | Line 54: | ||
thecompressonator -convert "diffuse.tga" "diffuse.dds" DXT1 -mipmaps | thecompressonator -convert "diffuse.tga" "diffuse.dds" DXT1 -mipmaps | ||
thecompressonator -convert "diffuse_with_alpha.tga" "diffuse.dds" DXT3 -mipmaps | thecompressonator -convert "diffuse_with_alpha.tga" "diffuse.dds" DXT3 -mipmaps | ||
==Converting FROM DDS to common image file formats== | |||
This is trivial but slightly confusing on The Compressonator: | |||
* File Menu > Save Original | |||
* At the bottom of the dialog below the file name input select ''save as type''. It may show DDS by default so don't be put off. | |||
* Select file format from BMP, PNG, or TGA (use TGA generally for Dark Mod.) | |||
* Make sure the filename you want is shown in the input box and click ''save''. | |||
[[Category:Tutorial]] | [[Category:Tutorial]] | ||
[[Category:Textures]] | [[Category:Textures]] | ||
Revision as of 09:33, 1 October 2008
Converting Image TO DDS
This should describe the steps you'll have to follow in order to create DDS files suitable for use in your Dark Mod maps.
You'll need ATI's "The Compressonator" application version 1.21.1044 with this exact version - other (newer) versions will not work! Install/unzip it to a folder and create a shortcut if you like.
Important
The normalmap DDS compression section is here for documentation purposes only. You don't need to compress the normalmaps for using them in The Dark Mod. Only compress the diffusemaps and speculars.Compress Diffuse/Specular Maps
- Open your source (TGA) file
- Create Mip Maps using the Box-Filter with the lowest mip map size of 1x1.
- Compress the Image using DXT1 compression (0/1 bit alpha) with a colour weighting of red=0.3086, green=0.6094, blue=0.082. This applies for images without alpha. For images with alpha you'll have to choose the DXT3 compression.
- Save your DDS to the dds/ tree, e.g. dds/textures/darkmod/stone/blah.dds. You won't need to add the dds/ path prefix to your shader definition, this is automatically added by the game.
Compress Normalmaps
Important
The normalmap DDS compression section is here for documentation purposes only. You don't need to compress the normalmaps for using them in The Dark Mod.- Open your source (TGA) file
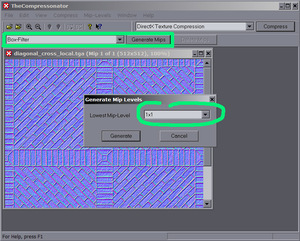
- Create Mip Maps using the Box-Filter with the lowest mip map size of 1x1 (same as for the diffuse maps).
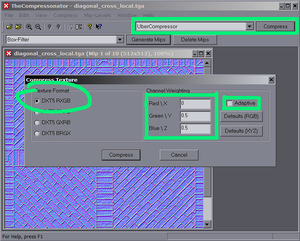
- Compress your normalmap using the UberCompressor in DXT5 RXGB format with the colour weighting of red=0, green=0.5, blue=0.5 and "adaptive" ticked off.
- Save your DDS to the dds/ tree, e.g. dds/textures/darkmod/stone/blah_local.dds. You won't need to add the dds/ path prefix to your shader definition, this is automatically added by the game.
Batch Processing
Choose File > Batch Compress or hit F4 to open the batch compression dialog. Choose the same compression settings as described above for your diffuse and normal maps. Don't mix diffuse/speculars with normals as they require different compression settings.
Change the File Extension to lowercase
The Compressonator automatically names the file *.DDS, but all files should be lowercase (also the TGAs). Be sure to rename the files to a lowercase .dds extension before uploading them.
Option A: Use Windows Explorer. You need to change your Explorer settings to display the file extension:
- Open up Windows Explorer
- Go Tools > Folder Options
- Click the View tab and uncheck Hide extensions for known file types
Then you can highlight your file and hit F2 (or right-click > Rename) and change the extension to lowercase.
Option B: This can also be done via the command line Start > Run... > cmd (then cd to your textures folder) and rename the files via:
ren *.DDS *.dds
Command Line Parameters
ATI's compressonator provides some command line parameters to compress the textures:
thecompressonator -convert "normal.tga" "normal.dds" RXGB +red 0.0 +green 0.5 +blue 0.5 -mipmaps
thecompressonator -convert "specular.tga" "specular.dds" DXT1 -mipmaps
thecompressonator -convert "diffuse.tga" "diffuse.dds" DXT1 -mipmaps
thecompressonator -convert "diffuse_with_alpha.tga" "diffuse.dds" DXT3 -mipmaps
Converting FROM DDS to common image file formats
This is trivial but slightly confusing on The Compressonator:
- File Menu > Save Original
- At the bottom of the dialog below the file name input select save as type. It may show DDS by default so don't be put off.
- Select file format from BMP, PNG, or TGA (use TGA generally for Dark Mod.)
- Make sure the filename you want is shown in the input box and click save.
