Texture Tool
written by Fidcal
Introduction
The Dark Radiant editor has a surface inspector for general manipulation of textures but there is also texture tool to help with alignment. Basically it displays the entire texture tiled with the selected surfaces outlined on it so you can see what texture lies beyond the sides of the surface and scroll the texture and see more clearly how to do so. With patches you can also stretch the texture to fit awkward slopes and curves while still retaining the physical profile of the patch.
Toggle display of the Texture Tool via the menu View > Texture Tool or by the default keys Ctrl+Alt+T.
Note: Generally, the Texture Tool will only work if the selected objects share the same shader. As the Tool displays the infinite texture plane (also called U/V space) this wouldn't make sense if more than one texture was selected.
Controls, Features, How to use the Texture Tool
The controls are the same but there are variations in what you see and what you can do whether processing a single brush surface, multiple (or complete brush,) or a patch...
Single Brush Surface
- Select a single brush surface in Dark Radiant's camera view using Shift+Ctrl-
 . You can select and deselect while the texture tool is displaying.
 - Toggle the texture tool (menu View > Texture Tool or default keys Ctrl+Alt+T.)
- You should see the texture displayed in the texture tool with a lighter area to show what part of the whole texture the selected surface covers. It might not be the same shape/proportions as your surface if the horizontal/vertical scales are different. You might need to zoom in or out to see where you are, see next.
- Zoom the texture in and out and using the mouse wheel. If zoomed out beyond one texture tile then each tile is outlined.
- RMB drag to scroll the whole texture around
- You can resize the texture tool window but it seems to me it ought to remain square to give a true image so keep that in mind.
- If the texture image disappears then click in the window and it should re-appear.
- The fourth button from the left toggles the display of a grid to help with alignment similar, but not the same, as the orthoview grid.
- The first and second buttons decrease and increase the grid size (whether it is showing or not.)
- The third button should snap the texture surface texture to the grid but I found it only seemed to snap to the left grid and even then there was a little gap so you may need to adjust manually by decreasing the grid size and dragging the surface (see next.)
- You can drag the surface around the tile (effectively scrolling the texture on the brush surface by...
- First SHIFT + LMB the CENTRE vertex (tiny green square) of the surface.
- It should highlight the surface in orange to show it is selected. (repeat or Esc to DEselect but remember Esc will also Deselect the brush surface if not selected in the texture tool.)
- You can now LMB drag the highlighted surface around one texture tool grid square at a time (so use finest for smooth scrolling.) If you have camera view visible then you should also see the texture scroll around.
- The corner vertices have no effect on brushes - they are only for use with Patches see below.
- The fifth and sixth buttons flip the texture much like in Surface Inspector. 'Vertical' means around a vertical axis, ie, mirror left and right. 'Horizontal' means mirror top/bottom. (note: some people may see this as if bump mapping is inverted, eg, sunken bricks but it is an optical illusion - probably because of the way it is lit in Dark Radiant's camera view compared to the other surfaces.)
- Note that you can still use some other Dark Radiant controls while the texture tool is displayed, such as undo etc. copy/paste shader didn't seem to be effective.
Multiple Brush Surfaces
I'll just describe for two selected surfaces but the principles should be the same for several including a complete brush...
- Select two (or more) brush surfaces in Dark Radiant's camera view using Shift+Ctrl+
 . You can select and deselect while the texture tool is displaying.
 - Toggle the Texture Tool (menu View > Texture Tool or default keys Ctrl+Alt+T.)
- You may probably only see a large black or grey area in the texture tool divided by pale lines. Here and there are a few small white square dots. What is happening is that the selections are spread out over different tiles and the texture tool has zoomed way out to show them all at once. The pale lines are the perimeters of each tile and the small white squares are your selections. Shift+LMB click one of the white square dots. If it won't move you probably didn't select it correctly. If more than one small white square move then either you are RMB scrolling instead of LMB dragging or you have more than one selected - deselect except the one you want. It should then have a tiny red line round it to indicate it is selected (might be hard to see.) Now LMB drag it very close to [one of] the other one[s]. You can drag across the white lines to any tile. RMB scroll the white squares to the centre of the texture tool window and zoom in as far as you can still keeping them in the window. Repeat if necessary until you can make out your surface textures.
- . You can now treat each surface as described above for a Single Brush Surface either one at a time or select them all together.
Patches
All of the above for faces also applies to patches plus the following...
- Select a single patch in Dark Radiant's camera view using Shift+
 . (multiple patches can be selected but only if they share the same shader.) You can select and deselect while the texture tool is displaying.
 - Toggle the texture tool (menu View > Texture Tool or default keys Ctrl+Alt+T.)
- You should see the texture displayed in the texture tool with a lighter area to show what part of the whole texture the selected surface covers.
- As well as selecting the centre vertex, with patches you can also select any corner vertex (or several but it may get complicated!) and drag the corner to stretch/reduce the texture area covered by the patch. This is best explained by example...

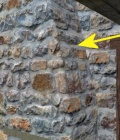
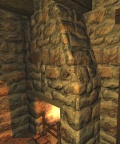
In this patch example there is a sloping chimney above a fireplace. This is made of brushes (with narrow patch bevels to soften the edges.) You can see from the image on the right that the texture on the slope pointed to by the yellow arrow aligns at the base of that slope with the front surface of the chimney on the left. But higher up the slope it does not align (indeed cannot, with a brush except perhaps with a custom texture.) If you scroll the texture along to align the top then it will not align further down.

To fix this I retextured the sloping surface with caulk and fitted a patch exactly over it with the required texture. I aligned this with the texture below that slope to start with in the normal way (using copy shader then paste shader natural.) With the patch selected I used the texture tool, selected the top left vertex and LMB dragged it sideways until it was at the point where the texture just to the left of the edge matched (actually the edge bevel in this case but it would be the same for just a brush edge.) I kept the top vertex line horizontal. DeSelect and the result is a perfect match as you see in the image on the right. What has happened is that the texture tool has squashed up the texture along the top of that patch and different degrees of squash all the way down that edge to the bottom while leaving the bottom as it was, normal. The right edge of the patch texture doesn't move. In the texture tool it looks the opposite of course - it looks stretched across the top but it is actually stretching the amount of texture covered by the patch - so more texture in the same width of patch.
Texture Tool Commands
Select Related Items
When editing patch vertices, it's might be required to select all vertices of the patch. Drag-selecting vertices in the Texture Tool could be troublesome if two patches partially overlap, like this:
To select all vertices of one patch, highlight one of them with Shift-Alt-![]() and hit "Select Related". This will expand the selection to all vertices of the same patch:
and hit "Select Related". This will expand the selection to all vertices of the same patch:
Merge Selection
This command is designed to help when editing patch vertices. To make a patch texture transition seamless, it's necessary that vertices share the same U/V coordinate in texture space. The Merge command takes the currently selected items and places them in a common position in the middle. An example: the two patches below share the same texture and are both selected. They are obviously not seamlessly textured:
The texture seam is well visible (both in the camera as in the texture tool - there is a gap between the two patches). Now, select the two vertices that should be merged and hit "Mege Selection":
Do the same to the next two vertex pairs to yield this:
The patch texture transition is now seamless.
Troubleshooting
- If while using the texture tool the texture image is lost and seems to scrunch up in one corner then click on the window might bring it back else try reselecting the surfaces should work.
- You click flip horizontal or vertical but nothing happens - check you have a surface selected in Texture Tool. If you have then you it might be that you have to deselect the surface in Dark Radiant for it to appear in camera.
- If you can see the main texture but your surface is not visible (eg, after flip) then it is probably off-window. In some situations Texture Tool draws the texture tiles in 'texture space' (think of it as a two-dimensional plane of tiling textures, the texture repeats at every round coordinate) and your surface is on a different tile. Zoom out - often WAY out! until you can see all the texture tiles shrink to small grid and you should see your surface as a small white square. RMB scroll it into the centre of Texture Tool, zoom in a little, and repeat until you can see it clearly.
- You can't select a surface in the texture tool? Make sure you are using SHIFT + LMB. Make sure you actually have a surface selected in Dark Radiant's camera view.


