DatBounds
Title: DatBounds
By Geep, 2024
Introduction
DatBounds is a Windows command-line utility to help visualize TDM/Doom3 bitmap font bounding boxes and related metrics. It generates a special set of .tga image files, which are then brought into a tool like GIMP to view. But only view; any needed metric changes must be applied separately (e.g., by editing a .ref file). Nevertheless, this viewing helps (when used in conjunction with other tools like refont's "stats") to understand, improve, and extend complex and often overlapping metadata relationships.
The command-line format is:
datBounds -in <path to input metrics file> [options]
with options:
-tag = each drawn bounds box has a 2-hex-digit codepoint label.
-hug = show, in tan, horizontal baseline & pitch (as vertical line) that 'hug' each glyph.
-xskip = show xSkip as red dot on rightside of baseline.
-from <codepoint num> (default   0)
-to   <codepoint num> (default 255)
    shows codepoints between 'from' and 'to', inclusive,
    where <codepoint num> is 0xHH or decimal from 0 to 255.
-alpha = render background transparent instead of white.
Running "datbounds" with no arguments, or with "-h" or "?", will show this summary.
Otherwise, the program will generate one special .tga file for every regular glyph-containing .tga/.dds file. To keep datbounds relatively simple:
- the .tga format is used for output, instead of, say, .jpg or .png, that need more code or libraries;
- the names of the output files are not specified, but just derived from shader names contained in the -in file. For example, "stone_0_24" --> "stone_0_24_bounds.tga";
- These special files do not contain images of the font glyphs themselves.
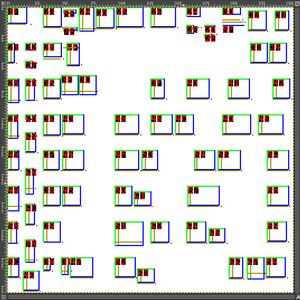
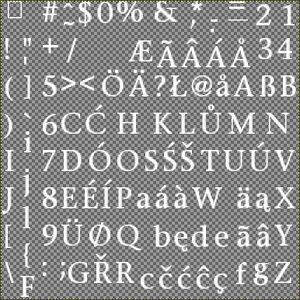
So either view each one side by side with the corresponding glyph-containing file [Figure 1 below], or import copies of those paired files into GIMP as separate layers for combined viewing, as discussed further below.
File I/O
The input file, with metadata for a particular font and fontsize, should be one of these formats:
- TDM/Doom3's '.dat'
- refont's '.ref'
- q3font's '.fnt'
Note that DatBounds does not read bitmap files, nor does it make use of refont’s annotation file.
DatBounds outputs multiple .tga files, into the same directory as the input file. The generated filenames are that of the set of shaderNames given in the input file, but with suffix "_bounds.tga".
Example Output
Figure 1. [Click either to enlarge.] These show information about the english/stone font of 24 pt size, as distributed with TDM 2.12 in Feb, 2024. That size requires two bitmaps; we see just one of them here. Both images are screenshots of GIMP. The left image shows the datBounds output, framed in the gray scales of the GIMP view/edit panel. The right image shows the corresponding glyph bitmap, with the usual checkerboard indicating a transparent background.
This command was used to generate the left image, which has the default opaque white background:
datBounds -in fontImage_24.ref -tag -hug -xskip -to 127
For simplicity, this figure has only bounds for the ASCII codepoints (due to "-to 127"). For each of those, it shows:
- the overall bounds as a green/blue box
- the pitch (aka xOffset) as a vertical tan line, and the baseline as a horizontal tan line (because of "-hug")
- the 2-digit-hex codepoint label, red on black (because of "-tag")
- the horizontal xSkip distance from the pitch line, shown as a red dot near the right end of the baseline (due to "-xskip")
Generated Visualizations and Options
Within each ...bounds.tga file will be a 256 x 256 image. It contains, for each codepoint's glyph outer bounds, a two-color box. The walls of the box are defined by integer values in the range 0-255, namely:
- s_coord, t_coord, (s2_coord - 1), (t2_coord - 1) in .ref terms
- round(s*256), round(t*256), round((s2-1)*256), round ((t2-1)*256) in .dat or .fnt terms
Since s2 & t2 are considered to just beyond the glyph’s actual pixels, 1 is subtracted here. So the glyph pixels (if they were seen) would partially lap the box edges (except for the left edge due to pitch offset.) A box is rendered in two colors to help disambiguate abutting glyphs. Green for top & left edges (sharing s & t), blue for right & bottom (s2 & t2).
Visualization Order
The visualization algorithm uses a loop in codepoint order. Consequently, visual elements of higher codepoint numbers may obscure or hide those of lower numbers. This often occurs with shared or overlapping bounding boxes. While it can’t be avoided, if you wish you can manage it with the "from" and "to" options.
Tag Option
This shows a "tag", i.e., a label, having the codepoint value as a 2-digit hexadecimal number. It appears in the upper-left corner of the bounding box, with red digits on a black background. The tiny "dot matrix" font here is generated within the program. It is legible with practice when zoomed in within GIMP.
Hug Option
This shows two lines in a tan color, that informally can be said to "hug" the glyph:
- The baseline, shown as a horizontal line, offset downward from the bounding box top edge by the "top" metric value. For a glyph without descender, this is often just below the bounding box bottom edge (because of latter’s t2-1 subtraction); the glyph is visualized as resting on the baseline.
- The "pitch", shown as a vertical line, offset rightward from the bounding box left edge by the "pitch" metric value. Most glyphs will not extend leftward beyond the pitch line.
XSkip Option
Invoked with either "xskip" or "xSkip", this shows a red dot on the rightside of the baseline, corresponding to:
s_coord + pitch + xSkip
Codepoint Range Options: From and To
These accept decimal or two-digit hex numbers (the latter preceded by "0x"). If both are given, the value of "To" should be greater than or equal to "From". These can be helpful to reduce the complexity of visualization with densely overlapping bounding boxes.
Alpha Option – Make Background Transparent.
By default, the background is opaque white. This provides good contrast if, in GIMP, you prefer to turn on grid lines, which are black. However, a transparent background option is provided in case you want to also see the glyphs and metrics superimposed, as discussed next.
A Combined View of Both Metrics and Glyphs in GIMP
For some fonts and font sizes, there is an existing TDM-created GIMP .xcf project file, that contains each bitmap of a glyph set as a separate layer, and that serves as the source file for TDM’s version of the font. Make a working copy of that for what is described here.
Or you can create your own version of this, e.g., importing both the _bounds file(s) and the corresponding glyph-containing bitmap file(s) into GIMP, as separate layers.
In either case, GIMP’s "Open as Layers..." is what you use. Be sure the _bounds files were created with the –alpha option. Once files are imported, hide all the layers except those of a particular pair (i.e., matching bounds & glyphs) of interest. Which one you place in front of the other depends on whether it’s more important to see the glyphs unclipped or the tags (if present) un-obscured.
More elaborately, you can import and stack multiple versions of a _bounds file, e.g., with different ranges, to toggle for differences.
TIP: Viewing glyphs against the checkerboard "transparency" pattern can be tedious. Consider adding an all-black background layer. To do so in GIMP, set the foreground color to black, then, when creating a new layer, you can ask it to fill with the foreground color.
You are creating a "snapshot in time", great for planning and quality control. But of course any subsequent edits to the DAT metrics renders the _bounds file(s) within the .xcf somewhat obsolete.
Example Combined View
[Coming soon]
Downloads
[Coming soon]
[template]

