Security Camera: Difference between revisions
No edit summary |
No edit summary |
||
| Line 119: | Line 119: | ||
A similar approach is to bind a brush that leaves parts of the camera exposed, i.e. the lens or face. Be sure to consider that the camera may be using a separate clipmodel with a different shape. Note that this brush will block fire arrow hits, preventing most of their damage. | A similar approach is to bind a brush that leaves parts of the camera exposed, i.e. the lens or face. Be sure to consider that the camera may be using a separate clipmodel with a different shape. Note that this brush will block fire arrow hits, preventing most of their damage. | ||
In any case, be sure to communicate the camera's vulnerabilities to the player. | |||
| Line 149: | Line 148: | ||
# let it target the security camera | # let it target the security camera | ||
# when desired, trigger this entity (from a script, from a button etc.). | # when desired, trigger this entity (from a script, from a button etc.). | ||
===Upon Destruction=== | |||
You may call a script when the camera is destroyed, as per the "break_up_script" spawnarg. This script should be able to receive the name of the destroyed security camera as input, i.e.: | |||
void camera_destroyed ( entity camera ) | |||
Revision as of 23:20, 13 February 2021
Security Camera
This article documents the security camera in its state from 2.10 onwards. See Security Camera (legacy) if you're currently working with TDM 2.09 or older.
The security camera provides the following features:
- It can either sweep back and forth between two angles or remain stationary.
- If the camera sees the player, it initially plays a short alert sound that is silent to nearby guards. If the player is still in view several seconds later, another alarm sounds. This alarm will play intermittently for a while, even if the player moves out of sight. This second alarm will alert nearby guards.
- An optional spotlight that points forward, lighting the area in the direction the camera faces.
- The ability to toggle the camera power on/off by triggering it. Alternatively, the 3 features above can be toggled individually.
- If the camera has targets, these will be activated when the camera is fully alerted. This gives the map author the ability to play a more powerful alarm than the one given off by the camera. (Or to do a variety of other things.)
- Sending what it sees to a separate, func_static display screen. Alternatively, it can send what another entity (typically a target_null) sees.
The Security Camera: Entities and Prefabs
Security camera entities can be found in AI/Machines/Security Camera and inherit from func_securitycamera. Prefabs can be found in Mechanical/Machines.
Place the camera entity in your map, and orient it toward its starting direction. A rotating camera will sweep clockwise, halt a moment, then sweep back counter-clockwise.
Some cameras may be designed to use additional parts, i.e. a ceiling pivot entity with scripted gears. See the entity descriptions inside DR for more.
Spawnargs
Movement Spawnargs
- "rotate" - If "1" (default) the camera will rotate. If "0", the camera is stationary.
- "sweepSpeed" - How many seconds it takes a rotating camera to complete a sweep in one direction.
- "sweepAngle" - The angle of sweep. You can cause a camera to initially sweep in the counter-clockwise direction by setting this to a negative number.
- "sweepWait" - How long the pause is after a sweep completes and starting the return sweep. Default is 0.5 seconds.
Detection Spawnargs
- "scanDist" - The distance limit for spotting the player.
- "scanFov" - The camera's field of view.
- "seePlayer" - Whether the camera will react to the player.
- "sightTime" - After seeing the player (partial alert), the camera will wait this amount of time. If it still sees the player, it will sound the alarm. This gives the player some time to hide.
- "sightResume" - If the camera can't see the player anymore after a partial alert, pause for this amount of time. When this expires, the camera will resume sweeping.
- "wait" - How long the camera will stay fully alerted and play the alarm. If the player is still visible at the end of this time, the clock will start over again.
- "alarm_interval" - Amount of time inbetween each activation of the alarm sound, when fully alerted.
Spotlight Spawnargs
- "spotLight" - If "1" the camera will start with a spotlight.
- "spotlight_texture" - Texture used by the spotlight, corresponds to the "texture" spawnarg.
- "spotlight_range" - Reach of the spotlight.
- "spotlight_diameter" - Diameter of the spotlight's projection.
Color Spawnargs
- "useColors" - If "1" the camera will change the colour of its model and spotlight depending on its alert state.
- "color_sweeping" - Color when the camera is sweeping = unalerted. Default green.
- "color_sighted" - Color when the camera has noticed the player = partially alerted. Default yellow.
- "color_alerted" - Color when the camera has sounded the alarm = fully alerted. Default red.
- "_color" - If "useColors" is disabled, the model and spotlight will always have this color.
As an alternative or complement to color spawnargs, you may make use of shaderParm7 in materials used by the security camera. shaderParm7 represents the alert state of the camera:
- 0 = unalerted
- 1 = was partially alerted for "sightTime" seconds but player has disappeared, now waiting "sightResume" seconds before resuming sweeping.
- 2 = partially alerted
- 3 = fully alerted
Damage Spawnargs
- "health" - Cameras can be 'killed', including by swords, broadhead arrows and fire arrows, but not blackjacks. You may protect (parts of) the camera from damage with nodrawsolid brushes, but note that fire arrows only do 30 splash damage, equivalent to 1 broadhead hit.
- "fx_damage" - Fx to play whenever the camera is damaged.
- "fx_destroyed" - Fx to play whenever the camera is destroyed.
- "break_up_script" - This script is called when the camera is destroyed.
Sound Spawnargs
- "snd_sight" - Sound emitted when the camera notices the player.
- "snd_moving" - Sound emitted when the camera is rotating.
- "snd_stationary" - Sound emitted by a stationary type of camera.
- "snd_alert" - Alarm sound emitted when fully alerted.
- "snd_end" - Sound emitted when the camera is about to reach the end point of a sweep.
- "snd_death" - Sound emitted when the camera is destroyed.
- "snd_sparks" - Sound emitted when the camera emits sparks after it was destroyed.
- "sprS_alert" - How far snd_alert propagates to AIs, at default this is a few rooms. Higher settings than mild can cause large framedrops.
Model Spawnargs
These spawnargs are important if you change the camera model:
- "clipmodel" - Assign a simplified collision mesh to this camera. Should be under 32 tris, have no convex angles and use textures/common/collision.
- "viewOffset" - A vector that defines the offset of the camera's 'eye' from the camera's origin.
- "lightOffset" - A vector that defines the spotlight offset from the camera's origin.
- "flipAxis" - This and the next spawnarg can be used to turn a model such that it faces forwards. Not needed if the model was created forward-facing.
- "modelAxis"
- "skin" - This is the "on" skin. It may contain materials that make use of the colored keyword or shaderParm7, to change depending on alert state.
- "skin_on_spotlight_off" - This is the "on" skin, but with the spotlight toggled off. This is useful if your model contains inbuilt lightrays that should represent the spotlight.
- "skin_off" - This is the "off" skin. It should not contain materials with the colored keyword or shaderParm7.
- "skin_broken" - When the camera is destroyed it will switch to this skin.
Misc Spawnargs
- "start_on" - Whether the camera starts powered on or off.
- "cameraTarget" - Use the view from this entity instead of from self if sending a view to the display screen. See section The Display Screen for more.
The security camera uses spawnargs to place its 'eye' and spotlight in front of the model to ensure the view and spotlight aren't blocked by the model. If you use a different model, you might need to change these.
- "lightOffset"
- "viewOffset"
Damaging the Camera
By default the security camera is vulnerable to sword attacks, broadhead arrows and fire arrows. The player will receive feedback that a hit was successful in the form of spark effects, specified in "fx_damage" and "fx_destroyed" spawnargs. An .fx definiton is basically an instruction to emit a sequence of particles and sounds.
You can easily make the camera immune to everything but fire arrow splash damage by binding a tight-fitting nodrawsolid_metal brush. Note that fire arrows only do 30 splash damage throughout a large radius, so you may want to lower the camera's health.
A similar approach is to bind a brush that leaves parts of the camera exposed, i.e. the lens or face. Be sure to consider that the camera may be using a separate clipmodel with a different shape. Note that this brush will block fire arrow hits, preventing most of their damage.
In any case, be sure to communicate the camera's vulnerabilities to the player.
Scripting
Script Functions
The security camera supports the following global script functions:
- getSecurityCameraState() - Returns the security camera's state. 1 = unalerted, 2 = suspicious, 3 = fully alerted, 4 = inactive (power off), 5 = destroyed, 0 = not a security camera.
- getShaderParm(7) - Returns the current value of shaderParm7 on the camera model. 0 = unalerted, 1 = about to resume sweep after a partial alert, 2 = partially alerted, 3 = fully alerted.
- activate() and trigger() - These activate or deactivate the camera fully, representing switching power on or off.
Not supported:
- getHealth() - this only works on AIs and the player.
Object Functions
With the correct setup, you can also access object functions from the tdm_security_camera scriptobject:
- toggleSCSpotlight() - toggle the spotlight on or off. Sets skin to "skin_on_spotlight_off" if appropriate.
- toggleSCSweep() - toggle the spotlight between sweeping or being stationary.
- toggleSCPlayer() - toggle whether the camera reacts to the player.
The easiest way to call object functions is by triggering atdm:target_callobjectfunction entities. To do so:
- create an atdm:target_callobjectfunction entity
- give it the spawnarg "call" with the name of the desired object function, i.e. "toggleSCSpotlight"
- let it target the security camera
- when desired, trigger this entity (from a script, from a button etc.).
Upon Destruction
You may call a script when the camera is destroyed, as per the "break_up_script" spawnarg. This script should be able to receive the name of the destroyed security camera as input, i.e.:
void camera_destroyed ( entity camera )
Sending to a Display Screen
You can let the security camera send a view, either its own or another entity's view, to a display screen. The display screen is simply a func_static patch that uses the shader textures/darkmod/camera. Size the patch appropriately.
Both the screen and the security camera entity may use the cameraTarget spawnarg:
- "cameraTarget" - On the display screen entity: the name of the camera whose view will be painted on this display.
- "cameraTarget" - On the security camera entity (optional): specify a different entity that should supply the view, i.e. in order to get a better vantage point. Usually this is a target_null entity.
Multiple Display Screens / Reflective Water / Skybox
If you plan to use more than one camera with display screens in your mission, or if the camera display will appear in the same player POV as the sky or reflective water surfaces, you'll need to copy the material shader textures/darkmod/camera (in materials/tdm_security_camera.mtr) to a map-specific *.mtr file, rename it to something like camera1, and give it a unique map keyword. Place this file in your mission's materials folder.
For example, if you have two cameras in your mission, you would assign one of these shaders to the display for the first camera, and the other shader to the display for the second:
camera1
{
	qer_editorimage textures/editor/cameragui.tga
	noshadows
	{
		red Parm0
		green Parm1
		blue Parm2
		remoteRenderMap 232 232 // width / height of render image, ie resolution of screen
  		scale -1, -1
		translate -1, -1
		map "camera1"
	}
}

camera2
{
	qer_editorimage textures/editor/cameragui.tga
	noshadows
	{
		red Parm0
		green Parm1
		blue Parm2
		remoteRenderMap 232 232 // width / height of render image, ie resolution of screen
  		scale -1, -1
		translate -1, -1
		map "camera2"
	}
}
Note the map "camera1" and map "camera2" lines. These unique names allow the renderer to correctly display both camera displays in the same mission.
Examining a Test Map
You can obtain a test map with sample cameras in it here: camerawiki.pk4.
Open the map camerawiki.map in Dark Radiant. In this map, we have examples of the different cameras.

A rotating camera that sweeps back and forth
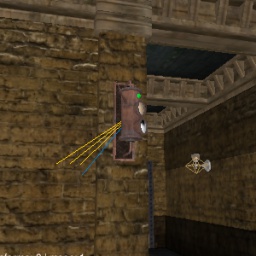
This camera (cam1) starts its rotation at 135 degrees (assuming +X is 0 degrees), and sweeps clockwise until it reaches 45 degrees. It pauses for a moment, then return-sweeps back to 135 degrees. It has a spotlight.
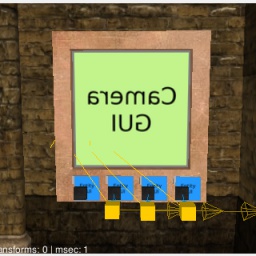
The display for cam1 is on the wall behind it. (Don't worry about the material being displayed backward.)
The display patch uses a custom material camera1 (provided in the camerawiki/materials/camera.mtr file). It's custom because there are other displays in this test map.
The four buttons below the display do the following (from left to right):
- Toggle Power - targets cam1 directly. When power is off, the display screen is hidden. You can simulate an "off" screen by making sure there's a black material behind the display. You could also place a glass material behind the display.
- Toggle Spotlight - calls the toggleSCSpotlight() routine in the camera's scriptobject, turning the spotlight on/off
- Toggle Player Sighting - calls the toggleSCPlayer() routine in the camera's scriptobject, turning Player detection on/off
- Toggle Sweep - calls the toggleSCSweep() routine in the camera's scriptobject, turning camera sweep on/off

A stationary camera that doesn't move

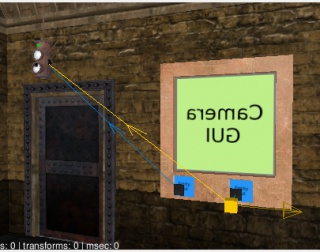
This camera (cam2) is stationary, w/o a spotlight.
Its display, to its left, uses a custom material camera2 (provided in the camerawiki/materials/camera.mtr file). It's custom because there are other displays in this test map.
The two buttons below the display do the following (from left to right):
- Toggle Power - targets cam2 directly. When power is off, the display screen is hidden.
- Toggle Player Sighting - calls the toggleSCPlayer() routine in the camera's scriptobject, turning Player detection on/off
A camera that uses the view from another entity (typically a target_null) to show a scene on its display screen

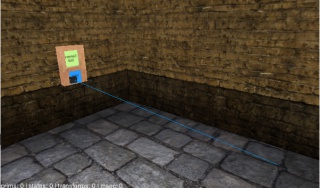
This camera (cam3) is stationary, w/o a spotlight, and it doesn't spot the player. In the test map, you'll find it in the blue room. Note that the camera uses the following spawnarg:
"cameraTarget" "Cam3View"
If you look in the room where the guard is standing, you'll see a target_null named Cam3View, which provides the view to the display screen.
Look at the other spawnargs on the camera. You'll see that it doesn't rotate, it doesn't have a spotlight, and it won't spot the player.
This camera could be used for something like 'peeking through keyholes', though that functionality hasn't been tested in 2.06. It would most likely need an accompanying 'player ear' in the observed room (not yet implemented). To simulate a keyhole, the display screen would be placed inside the opening. You'd also need a companion camera looking the other way (room->hall).
The button below the display does the following
- Toggle Power - targets cam3 directly. When power is off, the display screen is hidden.