Creating Multiple Skins For A Model: Difference between revisions
No edit summary |
VanishedOne (talk | contribs) Added a note on wildcard skin capability |
||
| Line 115: | Line 115: | ||
* You want to precisely fit a "trim" texture onto a specific part of the model (UV editing required) | * You want to precisely fit a "trim" texture onto a specific part of the model (UV editing required) | ||
* You need to determine the UV face layout, and this has not been provided by the modeller | * You need to determine the UV face layout, and this has not been provided by the modeller | ||
== Wildcard skins == | |||
(Note added by VanishedOne) | |||
If you want to replace every material on a model with the same material, you can use the * character like this: | |||
skin all_dark_rough_stone { | |||
* textures/darkmod/stone/natural/dark_rough | |||
} | |||
This skin will turn an entire model to stone, regardless of what materials it used originally. | |||
{{tutorial-models}} | {{tutorial-models}} | ||
Revision as of 20:41, 6 November 2017
Originally written by OrbWeaver on http://forums.thedarkmod.com/topic/3098
The skins functionality in D3 allows a single model to have a number of textures ("skins") which can be selected from a dialog in the editor. This provides ease-of-use for mappers and (possibly) reduced memory usage as the model only needs to be loaded once.
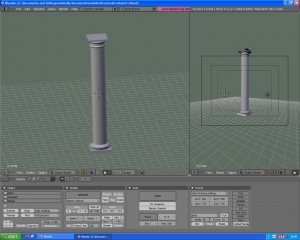
Model your object in the usual way
Model your object using your 3D application of choice. Here a simple pillar is being created.
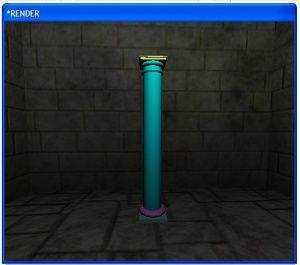
Default Skin
As usual, the model file points to the material paths that should be applied to that model in-game. This is the "default skin". In this example, I have given the model a default skin consisting of test colours only, to illustrate the process.
The material file for this is as follows:
sk/templecolumn1_gndsupport
{
  {
     blend diffusemap
     map _white
     red 0.5
  }
}

sk/templecolumn1_pillar
{
  {
     blend diffusemap
     map _white
     red 0.0
  }
}

sk/templecolumn1_pillarbase
{
  {
     blend diffusemap
     map _white
     green 0.5
  }
}

sk/templecolumn1_topsupport
{
  {
     blend diffusemap
     map _white
     blue 0.5
  }
}
As you can see this model consists of four parts (submeshes), each of which can have its texture changed independently. This allows a greater variety of skins to be produced, just from stock textures.
Create the Skin File
Now the .skin file is created. This is a simple declaration which substitutes new textures for the default ones ("sk/templecolumn_whatever"). It contains an optional model specification which allows the skin to be easily matched to the model.
skin templecolumn1_whitemarble
{
   model models/custom/structural/column_pillar/templecolumn1.ase
   sk/templecolumn1_gndsupport textures/custom/marble/whitemarble
   sk/templecolumn1_pillar textures/custom/marble/whitemarble
   sk/templecolumn1_pillarbase textures/custom/marble/whitemarble
   sk/templecolumn1_topsupport textures/custom/marble/whitemarble
}

skin templecolumn1_whitemarble_vcol
{
   model models/custom/structural/column_pillar/templecolumn1.ase
   sk/templecolumn1_gndsupport textures/custom/marble/whitemarble_vcol
   sk/templecolumn1_pillar textures/custom/marble/whitemarble_vcol
   sk/templecolumn1_pillarbase textures/custom/marble/whitemarble_vcol
   sk/templecolumn1_topsupport textures/custom/marble/whitemarble_vcol
}

skin templecolumn1_speckedmarble
{
   model models/custom/structural/column_pillar/templecolumn1.ase
   sk/templecolumn1_gndsupport textures/custom/marble/whitemarble
   sk/templecolumn1_pillar textures/custom/marble/specked_marble
   sk/templecolumn1_pillarbase textures/custom/marble/specked_marble
   sk/templecolumn1_topsupport textures/custom/marble/whitemarble
}

skin templecolumn1_greystone
{
   model models/custom/structural/column_pillar/templecolumn1.ase
   sk/templecolumn1_gndsupport textures/custom/stone/crackedgreystone
   sk/templecolumn1_pillar textures/custom/stone/crackedgreystone
   sk/templecolumn1_pillarbase textures/custom/stone/crackedgreystone
   sk/templecolumn1_topsupport textures/custom/stone/crackedgreystone
}
Each skin has a name (which must be unique), a link to the model file, and a set of subtitutions in the form "old/texture/path new/texture/path". In this case the test colour textures are being replaced with stock textures that are already in my textures list, however they could just as easily be replaced by specific per-model skins or even nodraw textures if parts of the model should be hidden.
Notice that the skin "templecolumn1_speckedmarble" is applying different textures to different parts of the model (the top and bottom square supports will get a whitemarble texture, whereas the round pillar will get a specked marble texture).
Save this file in the skins/ folder with a .skin extension.
Choose your Skin in the Entity Inspector
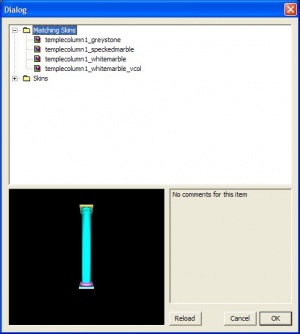
When all is set up correctly, the skins become available in the Skin Browser, which is accessed by clicking the Skin... button in the Entity Inspector.
Notice how the model's alternative skins are automatically located and listed under Matching Skins, due to the existence of a "model" line in the skin declarations. If no matching skins are found, check that the model path has been entered correctly.
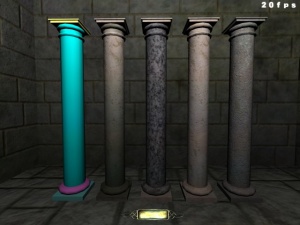
The finished Product
Note that the use of vertex colours is a stage-specific keyword, therefore this can be selected on a per-skin basis. This model has vertex colours which are applied in only one skin (second from left).
Note: You don't need modelling software unless
- You want to add vertex colours to modulate a texture or blend between textures
- You want to divide the mesh into submeshes in order to apply a different texture to each
- You want to precisely fit a "trim" texture onto a specific part of the model (UV editing required)
- You need to determine the UV face layout, and this has not been provided by the modeller
Wildcard skins
(Note added by VanishedOne)
If you want to replace every material on a model with the same material, you can use the * character like this:
 skin all_dark_rough_stone {
 	* textures/darkmod/stone/natural/dark_rough
 }
This skin will turn an entire model to stone, regardless of what materials it used originally.


