DDS creation: Difference between revisions
m Removed linkspam |
Serpentinee (talk | contribs) Quite a lot of changes, hopefully it makes sense... someone should check/edit as its 4am. Urrrg |
||
| Line 1: | Line 1: | ||
This | This quick guide will describe the steps you'll have to follow in order to create DDS files suitable for use in your Dark Mod maps and how to convert from DDS to other image formats using "The Compressonator". DDS files are a lot smaller than the uncompressed TGAs, often around 15% of the size. The greatest benefit of this is seen in performance and the benefit of using higher res textures. | ||
It is strongly suggested that while you are creating and adjusting your texture that you should use TGA until you are ready to release it and then compressing the relevant images to DDS for release. | |||
== Guidelines for DDS Textures == | |||
Due to these reasons it is '''strongly recommended''' that you compress both '''diffuse''' and '''specular''' textures. Normalmaps should however not be compressed, please use TGA! | |||
*'''Diffusemap :''' | |||
:Does the texture have '''transparency'''?(i.e leaves, spiderwebs etc) | |||
:*If '''NO: DXT1''' | |||
:*If '''YES: DXT5''' and read the following note: | |||
Note : Please be aware that at the moment TDM/Doom 3 only supports hard edges for transparency, as such you wont get the gradual blending from transparency, however in the future it is likely that we will be able to have this smooth blending, so saving your transparency in with DXT5 and then using the alphaTest keyword in your material will allow you to control where the hard edge is located easily. If your texture is meant to only ever have a hard edge you may also experiment with using the explicit alpha in DXT1 as this compresses much better. | |||
*'''Specularmap :''' | |||
:*'''DXT1''' - should be more than adequate as specular does not require alpha information. | |||
*'''Normalmap :''' | |||
:*'''NONE''' - Use TGA! | |||
DXT3 can be used, however it has very little benefit and is not worth using unless you have a specific reason. | |||
==Converting Image To DDS== | |||
=== Compress Diffuse/Specular Maps === | === Compress Diffuse/Specular Maps === | ||
* Open your source (TGA) file | * Open your source (TGA) file | ||
| Line 13: | Line 30: | ||
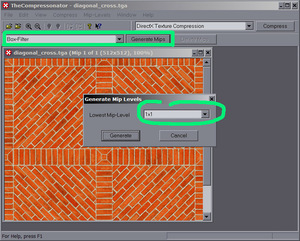
[[Image:01_mips.jpg|frameless]] | [[Image:01_mips.jpg|frameless]] | ||
* Compress the | * Click the Compress button next to "ATI 3Dc Compression" | ||
* Select the correct compression type by reading the section above, [[DDS creation#Guidelines for DDS Textures|Guidelines for DDS Textures]] | |||
* Make sure that the channel weighting values are as follows : | |||
:'''red=0.3086''' | |||
:'''green=0.6094''' | |||
:'''blue=0.082''' | |||
* Click Compress | |||
[[Image:02_compression.jpg|frameless]] | [[Image:02_compression.jpg|frameless]] | ||
* Save your DDS to the '''dds/''' tree, e.g. dds/textures/darkmod/stone/blah.dds. | * Save your DDS to the '''dds/''' tree, e.g. dds/textures/darkmod/stone/blah.dds. | ||
'''Note about file locations:''' | |||
If the TGA version of your image (e.g a working diffuse) was located at : | |||
:/doom3/mymission/textures/brick/mybrick.tga | |||
You will save the dds to : | |||
:/doom3/mymission/dds/textures/brick/mybrick.dds | |||
However in the material file you will still refer to it as : | |||
:textures/brick/mybrick | |||
Make sure to remove your TGA to test the finished DDS, if you have followed this it will work flawlessly. | |||
=== Change the File Extension to lowercase === | === Change the File Extension to lowercase === | ||
The Compressonator automatically names the file *.DDS, but all files should be lowercase ( | The Compressonator automatically names the file *.DDS, but all files should be lowercase (including TGAs). Be sure to rename the files to a lowercase .dds extension before uploading them. | ||
Option A: Use Windows Explorer. You need to change your Explorer settings to display the file extension: | Option A: Use Windows Explorer. You need to change your Explorer settings to display the file extension: | ||
# Open up Windows Explorer | # Open up Windows Explorer | ||
# Go '''Tools''' > '''Folder Options''' | # Go '''Tools''' > '''Folder Options''' | ||
# Click the View tab and | # Click the View tab and disable '''Hide extensions for known file types''' | ||
Then you can highlight your file and hit F2 (or right-click > Rename) and change the extension to lowercase. | Then you can highlight your file and hit F2 (or right-click > Rename) and change the extension to lowercase. | ||
Option B: This can also be done via the command line '''Start''' > '''Run...''' > '''cmd''' (then cd to your textures folder) and rename the files via: | Option B: This can also be done via the command line '''Start''' > '''Run...''' > '''cmd''' (then cd to your textures folder) and rename the files via: | ||
:ren *.DDS *.dds | |||
=== Command Line Parameters | |||
== Working with Transparency/Alpha== | |||
Quite often when working with alpha and converting from TGA to DDS you will have trouble getting the alpha to work correctly. There are a number of causes for this however the easiest way to deal with it is to rather save your texture out as a TIFF and then open it in The Compressonator, if you are saving from Photoshop/GIMP disable layers in the save options but make sure its set to preserve transparency. When opening it in The Compressinator remember to right click in the image and view RGBA/Alpha to check that it is correct before generating mipmaps or compressing. | |||
== Batch Processing == | |||
Choose '''File > Batch Compress''' or hit F4 to open the batch compression dialog. Choose the same compression settings as described above for your diffuse and normal maps. Don't mix diffuse/speculars with normals as they require different compression settings. | |||
[[Image:dds_batch_screenshot.jpg|frameless]] | |||
== Command Line Parameters == | |||
ATI's compressonator provides some command line parameters to compress the textures: | ATI's compressonator provides some command line parameters to compress the textures: | ||
thecompressonator -convert "normal.tga" "normal.dds" RXGB +red 0.0 +green 0.5 +blue 0.5 -mipmaps | thecompressonator -convert "normal.tga" "normal.dds" RXGB +red 0.0 +green 0.5 +blue 0.5 -mipmaps | ||
thecompressonator -convert "specular.tga" "specular.dds" DXT1 -mipmaps | thecompressonator -convert "specular.tga" "specular.dds" DXT1 -mipmaps | ||
thecompressonator -convert "diffuse.tga" "diffuse.dds" DXT1 -mipmaps | thecompressonator -convert "diffuse.tga" "diffuse.dds" DXT1 -mipmaps | ||
thecompressonator -convert "diffuse_with_alpha.tga" "diffuse.dds" | thecompressonator -convert "diffuse_with_alpha.tga" "diffuse.dds" DXT5 -mipmaps | ||
| Line 62: | Line 95: | ||
* Select file format from BMP, PNG, or TGA (use TGA generally for Dark Mod.) | * Select file format from BMP, PNG, or TGA (use TGA generally for Dark Mod.) | ||
* Make sure the filename you want is shown in the input box and click ''save''. | * Make sure the filename you want is shown in the input box and click ''save''. | ||
[[Category:Tutorial]] | [[Category:Tutorial]] | ||
[[Category:Textures]] | [[Category:Textures]] | ||
Revision as of 02:18, 13 October 2010
This quick guide will describe the steps you'll have to follow in order to create DDS files suitable for use in your Dark Mod maps and how to convert from DDS to other image formats using "The Compressonator". DDS files are a lot smaller than the uncompressed TGAs, often around 15% of the size. The greatest benefit of this is seen in performance and the benefit of using higher res textures.
It is strongly suggested that while you are creating and adjusting your texture that you should use TGA until you are ready to release it and then compressing the relevant images to DDS for release.
Guidelines for DDS Textures
Due to these reasons it is strongly recommended that you compress both diffuse and specular textures. Normalmaps should however not be compressed, please use TGA!
- Diffusemap :
- Does the texture have transparency?(i.e leaves, spiderwebs etc)
- If NO: DXT1
- If YES: DXT5 and read the following note:
Note : Please be aware that at the moment TDM/Doom 3 only supports hard edges for transparency, as such you wont get the gradual blending from transparency, however in the future it is likely that we will be able to have this smooth blending, so saving your transparency in with DXT5 and then using the alphaTest keyword in your material will allow you to control where the hard edge is located easily. If your texture is meant to only ever have a hard edge you may also experiment with using the explicit alpha in DXT1 as this compresses much better.
- Specularmap :
- DXT1 - should be more than adequate as specular does not require alpha information.
- Normalmap :
- NONE - Use TGA!
DXT3 can be used, however it has very little benefit and is not worth using unless you have a specific reason.
Converting Image To DDS
Compress Diffuse/Specular Maps
- Open your source (TGA) file
- Create Mip Maps using the Box-Filter with the lowest mip map size of 1x1.
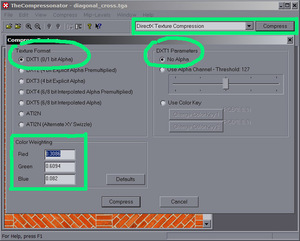
- Click the Compress button next to "ATI 3Dc Compression"
- Select the correct compression type by reading the section above, Guidelines for DDS Textures
- Make sure that the channel weighting values are as follows :
- red=0.3086
- green=0.6094
- blue=0.082
- Click Compress
- Save your DDS to the dds/ tree, e.g. dds/textures/darkmod/stone/blah.dds.
Note about file locations:
If the TGA version of your image (e.g a working diffuse) was located at :
- /doom3/mymission/textures/brick/mybrick.tga
You will save the dds to :
- /doom3/mymission/dds/textures/brick/mybrick.dds
However in the material file you will still refer to it as :
- textures/brick/mybrick
Make sure to remove your TGA to test the finished DDS, if you have followed this it will work flawlessly.
Change the File Extension to lowercase
The Compressonator automatically names the file *.DDS, but all files should be lowercase (including TGAs). Be sure to rename the files to a lowercase .dds extension before uploading them.
Option A: Use Windows Explorer. You need to change your Explorer settings to display the file extension:
- Open up Windows Explorer
- Go Tools > Folder Options
- Click the View tab and disable Hide extensions for known file types
Then you can highlight your file and hit F2 (or right-click > Rename) and change the extension to lowercase.
Option B: This can also be done via the command line Start > Run... > cmd (then cd to your textures folder) and rename the files via:
- ren *.DDS *.dds
Working with Transparency/Alpha
Quite often when working with alpha and converting from TGA to DDS you will have trouble getting the alpha to work correctly. There are a number of causes for this however the easiest way to deal with it is to rather save your texture out as a TIFF and then open it in The Compressonator, if you are saving from Photoshop/GIMP disable layers in the save options but make sure its set to preserve transparency. When opening it in The Compressinator remember to right click in the image and view RGBA/Alpha to check that it is correct before generating mipmaps or compressing.
Batch Processing
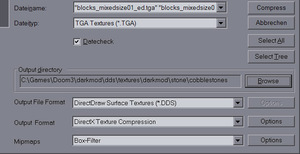
Choose File > Batch Compress or hit F4 to open the batch compression dialog. Choose the same compression settings as described above for your diffuse and normal maps. Don't mix diffuse/speculars with normals as they require different compression settings.
Command Line Parameters
ATI's compressonator provides some command line parameters to compress the textures:
thecompressonator -convert "normal.tga" "normal.dds" RXGB +red 0.0 +green 0.5 +blue 0.5 -mipmaps
thecompressonator -convert "specular.tga" "specular.dds" DXT1 -mipmaps
thecompressonator -convert "diffuse.tga" "diffuse.dds" DXT1 -mipmaps
thecompressonator -convert "diffuse_with_alpha.tga" "diffuse.dds" DXT5 -mipmaps
Converting FROM DDS to common image file formats
This is trivial but slightly confusing on The Compressonator:
- File Menu > Save Original
- At the bottom of the dialog below the file name input select save as type. It may show DDS by default so don't be put off.
- Select file format from BMP, PNG, or TGA (use TGA generally for Dark Mod.)
- Make sure the filename you want is shown in the input box and click save.


