SEED: Difference between revisions
add ideas |
|||
| (68 intermediate revisions by 2 users not shown) | |||
| Line 1: | Line 1: | ||
{{ | <center>[[Image:Lode pond map.jpg|400px|In the editor]] => [[Image:Lode pond map 3.jpg|350px|In game]]</center> | ||
{{clear}} | |||
== Introduction == | == Introduction == | ||
The new and improved [[LOD|LOD System]] for TDM v1. | The new and improved [[LOD|LOD System]] for TDM v1.04 lets you place entities in your map that reduce their own complexity when being far away from the player. However, there are still some huge drawbacks to this technique: | ||
* manually placing thousands of entities is very tedious and error prone | * manually placing thousands of entities is very tedious and error prone | ||
* 3000 entities "thinking" (deciding what LOD they have) takes about 7% of performance, even when they are not visible | * 3000 entities "thinking" (deciding what LOD they have) takes about 7% of performance, even when they are not visible | ||
* The overall entity limit of 8192 entities - even if only ever 100 entities are visible to the player, you would not be able to create a forest with 10000 objects (trees, treestumps, flower patches and rocks etc.) | * The overall entity '''limit of 8192 entities''' - even if only ever 100 entities are visible to the player, you would not be able to create a forest with 10000 objects (trees, treestumps, flower patches and rocks etc.), unless you combine them manually into ''func_statics''. | ||
* While it is possible to combine multiple brushes/patches into one ''func_static'' to improve performance (less drawcalls), this is not possible for static models (trees, chairs etc) unless you do so in a modelling program (like Blender). But even when you do so, the created models are either too generic or too specific (they are recognizable by the player because they always appear in the same relative position to each other). | |||
To overcome these limitations, the new ''' | To overcome these limitations, the new '''SEED''' (System for Environmental Entity Distribution) system was created by Tels between June and October 2010, and has been continually improved since then. | ||
=== What is it === | === What is it === | ||
| Line 15: | Line 19: | ||
It is foremost an entity manager that can: | It is foremost an entity manager that can: | ||
* | * '''[[SEED - Generating entities|Generate entities]]''' from "templates" (even multiple templates at the same time) | ||
* Place created entities on random positions with random rotations | * Place created entities on random positions with random rotations (and random vertex colors) | ||
* Only creates the entities that are "near" the player (saving memory and CPU time) | * Only creates (spawns) the entities that are "near" the player (saving memory and CPU time) | ||
* Removes entities "far" from the player, thus overcomes the entity limit | * Removes entities "far" from the player, thus overcomes the [[entity limit]] | ||
* | * Create entities depending on the surface of the floor (no trees on metal, or only pebbles on sand etc.), or based on an image map (greyscale image) | ||
* Works entirely automatic | * '''[[SEED - Watching entities|Manage entities]]''' that were manually placed in the map | ||
* '''[[SEED - Combining entities|Combine]]''' many entities into one rendermodel (with a matching physics object built from multiple clipmodels), speeding up drawing thousands of things on the screen at the same time dramatically (this also helps overcome the [[entity limit]]) | |||
* Is tied in with the "Object detail" menu setting (so the player can control the amount of detail, depending on the speed of his machine) | |||
* Works entirely automatic, but has still a lot of manual control for the mapper | |||
The system also includes support for inhibitors, e.g. areas that are clear of generated entities. This way a forest clearing can be specified with only | The system also includes support for inhibitors, e.g. areas that are clear of generated entities. This way a forest clearing can be specified with only a few entities, instead of being pieced together from multiple generators. | ||
== How to use it == | == How to use it == | ||
{{infobox|'''IMPORTANT'''<br>The current system '''only''' supports axis-aligned boxes. If you rotate the entity in DR, it will simply cover the area that the bounds of the rotated brush include! | {{infobox|'''IMPORTANT'''<br>The current system '''only''' supports axis-aligned boxes. If you rotate the entity in DR, it will simply cover the area that the bounds of the rotated brush include! To rotate the SEED around the z-axis, you '''must''' set an "angle" spawnarg instead.}} | ||
[[Image:Lode.png|400px|right|thumb|A SEED entity in the editor]] [[Image:Lode_pine.png|400px|right|thumb|An entity targeted by the SEED]] | |||
[[Image:Lode.png|400px|right|thumb|A | |||
* In [[DarkRadiant]], create a brush the size of the area you want to cover | * In [[DarkRadiant]], create a brush the size of the area you want to cover | ||
* With that brush still selected, {{RMB}} and select '''Create entity''' and select '''Darkmod/Info/atdm: | * With that brush still selected, {{RMB}} and select '''Create entity''' and select '''Darkmod/Info/atdm:seed''' | ||
:'''Note:'''<br> If you want to resize the | :'''Note:'''<br> If you want to resize the SEED entity after creating it, select it with {{SHIFT}} + {{LMB}} and press {{Key|TAB}} to select the brush, then resize it normally. | ||
* Now create the entities that you want to appear. Entities that use the [[LOD]] system should be | * Now '''either add''' the appropriate [[SEED - Templates via Spawnargs|'''templates via spawnargs''']] on the SEED, '''or create''' the entities that you want to appear and then link them from the SEED. (These entities are sometimes called "targets (because the SEED targets them) or templates (because they are just a blueprint for other entities that should be created). What types of entities can you use? | ||
* Link each entity from the | ** Place any entity by with {{RMB}} -> 'Create Entity'. Entities that use the [[LOD]] system should be preferred. | ||
* Put the entities at the | ** Draw brushes/patches in DR, then turn them into a func_static. | ||
* Remember to '''dmap''' whenever you add, delete or change the position/size of a | ** You can also place a model in DR, then use/link it as entity. | ||
* Link each entity from the SEED entity by selecting first the SEED, then the entity, and then press {{CTRL}}+{{Key|K}}. | |||
* Put the entities at the height you want them to appear. Alternatively, use the spawnarg '''"seed_floor"''' on the entity (see below for more spawnargs). The X/Y or rotation position of the entity does not matter, but you can f.i. use different skins. | |||
* Remember to '''dmap''' whenever you '''add, delete or change''' the position/size of a SEED! | |||
{{clear}} | {{clear}} | ||
| Line 47: | Line 55: | ||
=== Area shape and blocking areas === | === Area shape and blocking areas === | ||
[[Image:No_lode.png|400px|thumb|right|A NO | [[Image:No_lode.png|400px|thumb|right|A NO SEED entity blocking an area]] | ||
At the moment the area covered by the entity is always treated as a ( | At the moment the area covered by the entity is always treated as a (possibly rotated) box. That means you cannot get f.i. triangle shaped areas (yet). However, it is possible to block some areas inside the covered area from getting any entities via '''Darkmod/Info/atdm:no_seed''' entities. With this "boolean subtract" you can create "holes" or even more complex shapes. | ||
To get this to work, place '''atdm:: | To get this to work, place '''atdm::no_seed''' entities and then target them from the SEED. If you want one SEED inhibitor to block more than one intersecting SEED, simply target it from both. See screenshot at right for an example. If you have more than one inhibitor inside a SEED, target each from the seed ("target0", "target1", etc.) | ||
{{clear}} | {{clear}} | ||
| Line 57: | Line 65: | ||
== Important note == | == Important note == | ||
{{infobox|The current system '''only''' supports axis-aligned boxes. If you rotate the entity in DR, it will simply cover the area that the bounds of the rotated brush include! | {{infobox|The current system '''only''' supports axis-aligned boxes. If you rotate the entity in DR, it will simply cover the area that the bounds of the rotated brush include! To rotate the SEED around the z-axis, you '''must''' set an "angle" spawnarg instead.}} | ||
== GUI Setting == | == GUI Setting == | ||
The current "Object detail" setting | The current "Object detail" setting influences LOD distances, and also ''slightly'' the '''density''' spawnarg. | ||
We want to avoid overly complicated settings like some other games have, where you can control the density, the visibility distance, the texture quality etc all on their own. But rendering slightly less mushrooms for a playable framerate is still a good idea, so LOD distance and density are coupled. | We want to avoid overly complicated settings like some other games have, where you can control the density, the visibility distance, the texture quality etc all on their own. But rendering slightly less mushrooms for a playable framerate is still a good idea, so LOD distance and density are coupled. | ||
If you want a | If you want a SEED that always creates the same number of entities (e.g. does not scale wit the GUI setting), see [[LODE_-_Spawnargs#lod_scaling_limit|'''lod_scaling_limit''']]. | ||
== Spawnargs == | |||
Please see the [[SEED - Spawnargs]] and [[SEED - Templates via Spawnargs]] articles for the spawnargs you can set. | |||
== Script events == | |||
There exist a few script events that can be used either from scripts, or by setting up a trigger that links to an '''atdm:target_callobjectfunction''' with the spawnarg '''call''' set to one of the script functions below: | |||
=== | === disable() === | ||
Disabled the thinking of this SEED. Spawned entities are no longer culled and culled entities no longer respawned. | |||
=== enable() === | |||
Enables the thinking of this SEED again. E.g. spawned entities are culled and respawned if necessary. | |||
=== Activate() === | === Activate() === | ||
Activates the | Activates the SEED, e.g. if '''wait_for_trigger''' is true, it starts spawning entities. | ||
=== CullAll() === | === CullAll() === | ||
Removes all entities under control of this | Removes all entities under control of this SEED from the game. Only useful if either the player is very far away, or if you have called '''disable()''' before - otherwise the entities might be spawned again in the next frame. | ||
{{ | {{seed}} | ||
Latest revision as of 01:01, 24 March 2015
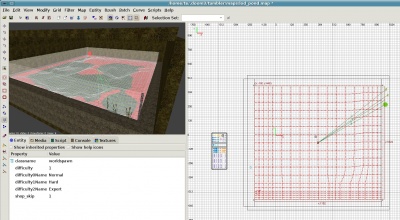 =>
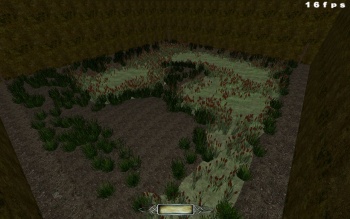
=> 
Introduction
The new and improved LOD System for TDM v1.04 lets you place entities in your map that reduce their own complexity when being far away from the player. However, there are still some huge drawbacks to this technique:
- manually placing thousands of entities is very tedious and error prone
- 3000 entities "thinking" (deciding what LOD they have) takes about 7% of performance, even when they are not visible
- The overall entity limit of 8192 entities - even if only ever 100 entities are visible to the player, you would not be able to create a forest with 10000 objects (trees, treestumps, flower patches and rocks etc.), unless you combine them manually into func_statics.
- While it is possible to combine multiple brushes/patches into one func_static to improve performance (less drawcalls), this is not possible for static models (trees, chairs etc) unless you do so in a modelling program (like Blender). But even when you do so, the created models are either too generic or too specific (they are recognizable by the player because they always appear in the same relative position to each other).
To overcome these limitations, the new SEED (System for Environmental Entity Distribution) system was created by Tels between June and October 2010, and has been continually improved since then.
What is it
It is foremost an entity manager that can:
- Generate entities from "templates" (even multiple templates at the same time)
- Place created entities on random positions with random rotations (and random vertex colors)
- Only creates (spawns) the entities that are "near" the player (saving memory and CPU time)
- Removes entities "far" from the player, thus overcomes the entity limit
- Create entities depending on the surface of the floor (no trees on metal, or only pebbles on sand etc.), or based on an image map (greyscale image)
- Manage entities that were manually placed in the map
- Combine many entities into one rendermodel (with a matching physics object built from multiple clipmodels), speeding up drawing thousands of things on the screen at the same time dramatically (this also helps overcome the entity limit)
- Is tied in with the "Object detail" menu setting (so the player can control the amount of detail, depending on the speed of his machine)
- Works entirely automatic, but has still a lot of manual control for the mapper
The system also includes support for inhibitors, e.g. areas that are clear of generated entities. This way a forest clearing can be specified with only a few entities, instead of being pieced together from multiple generators.
How to use it
The current system only supports axis-aligned boxes. If you rotate the entity in DR, it will simply cover the area that the bounds of the rotated brush include! To rotate the SEED around the z-axis, you must set an "angle" spawnarg instead.
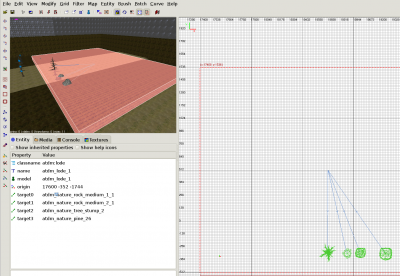
- In DarkRadiant, create a brush the size of the area you want to cover
- With that brush still selected,
 and select Create entity and select Darkmod/Info/atdm:seed
- Note:
If you want to resize the SEED entity after creating it, select it with SHIFT + and press TAB to select the brush, then resize it normally.
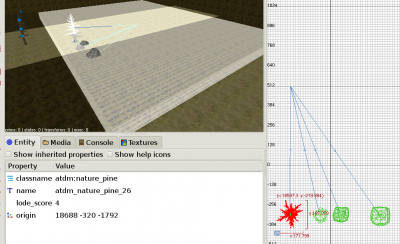
- Now either add the appropriate templates via spawnargs on the SEED, or create the entities that you want to appear and then link them from the SEED. (These entities are sometimes called "targets (because the SEED targets them) or templates (because they are just a blueprint for other entities that should be created). What types of entities can you use?
- Place any entity by with
 -> 'Create Entity'. Entities that use the LOD system should be preferred.
 - Draw brushes/patches in DR, then turn them into a func_static.
- You can also place a model in DR, then use/link it as entity.
- Place any entity by with
- Link each entity from the SEED entity by selecting first the SEED, then the entity, and then press CTRL+K.
- Put the entities at the height you want them to appear. Alternatively, use the spawnarg "seed_floor" on the entity (see below for more spawnargs). The X/Y or rotation position of the entity does not matter, but you can f.i. use different skins.
- Remember to dmap whenever you add, delete or change the position/size of a SEED!
Area shape and blocking areas
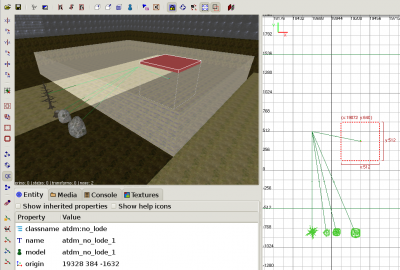
At the moment the area covered by the entity is always treated as a (possibly rotated) box. That means you cannot get f.i. triangle shaped areas (yet). However, it is possible to block some areas inside the covered area from getting any entities via Darkmod/Info/atdm:no_seed entities. With this "boolean subtract" you can create "holes" or even more complex shapes.
To get this to work, place atdm::no_seed entities and then target them from the SEED. If you want one SEED inhibitor to block more than one intersecting SEED, simply target it from both. See screenshot at right for an example. If you have more than one inhibitor inside a SEED, target each from the seed ("target0", "target1", etc.)
Important note
GUI Setting
The current "Object detail" setting influences LOD distances, and also slightly the density spawnarg.
We want to avoid overly complicated settings like some other games have, where you can control the density, the visibility distance, the texture quality etc all on their own. But rendering slightly less mushrooms for a playable framerate is still a good idea, so LOD distance and density are coupled.
If you want a SEED that always creates the same number of entities (e.g. does not scale wit the GUI setting), see lod_scaling_limit.
Spawnargs
Please see the SEED - Spawnargs and SEED - Templates via Spawnargs articles for the spawnargs you can set.
Script events
There exist a few script events that can be used either from scripts, or by setting up a trigger that links to an atdm:target_callobjectfunction with the spawnarg call set to one of the script functions below:
disable()
Disabled the thinking of this SEED. Spawned entities are no longer culled and culled entities no longer respawned.
enable()
Enables the thinking of this SEED again. E.g. spawned entities are culled and respawned if necessary.
Activate()
Activates the SEED, e.g. if wait_for_trigger is true, it starts spawning entities.
CullAll()
Removes all entities under control of this SEED from the game. Only useful if either the player is very far away, or if you have called disable() before - otherwise the entities might be spawned again in the next frame.