Texturing Archways: Difference between revisions
fixed image |
shortened link |
||
| (4 intermediate revisions by 2 users not shown) | |||
| Line 1: | Line 1: | ||
{{Original_Reference|Gildoran|2507}} | {{Original_Reference|Gildoran|2507}} | ||
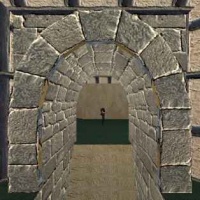
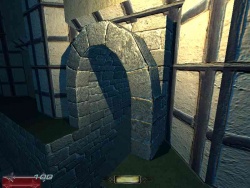
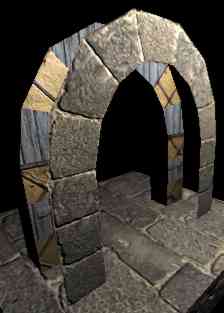
I've figured out a way of seamlessly texturing arches so that the blocks are the exact size and shape you want, using patch-meshes. It's low-poly, using 2 tris for each trapezoidal block (assuming you only have one visible face per block), and doesn't require new textures. Since it wasn't obvious to me and stone archways might be common in TDM, I figured I'd ask if anybody might be interested in a tutorial for it. Here's an example shot of what it looks like: | I've figured out a way of seamlessly texturing arches so that the blocks are the exact size and shape you want, using patch-meshes. It's low-poly, using 2 tris for each trapezoidal block (assuming you only have one visible face per block), and doesn't require new textures. Since it wasn't obvious to me and stone archways might be common in TDM, I figured I'd ask if anybody might be interested in a tutorial for it. Here's an example shot of what it looks like: | ||
[[Image:Arch.jpg|200px]] [[Image:Arch2.jpg|250px]] | |||
This is the first tutorial I've ever written, so any suggested changes are welcome. I'm not always the best at explaining things. It's a walk-through on how to take an already existing material and make one side of an archway that is properly textured without seams. It assumes the material is of a brick/block texture. | This is the first tutorial I've ever written, so any suggested changes are welcome. I'm not always the best at explaining things. It's a walk-through on how to take an already existing material and make one side of an archway that is properly textured without seams. It assumes the material is of a brick/block texture. | ||
| Line 12: | Line 10: | ||
Make an archway and decide how the blocks are going to be shaped/etc. | Make an archway and decide how the blocks are going to be shaped/etc. | ||
[[Image:Texturing archways0.jpg]] | |||
In the picture above, I gave the blocks alternating textures so it's easy to tell them apart. | In the picture above, I gave the blocks alternating textures so it's easy to tell them apart. | ||
| Line 33: | Line 31: | ||
Chop up the brush into several smaller quadrilateral ones so that each brush matches up with one block in the texture. I recommend using the clip tool and SHIFT+ENTER to split the brush along the seams between blocks, then going back and vertex editing them so they exactly match the shape of the blocks in the texture. | Chop up the brush into several smaller quadrilateral ones so that each brush matches up with one block in the texture. I recommend using the clip tool and SHIFT+ENTER to split the brush along the seams between blocks, then going back and vertex editing them so they exactly match the shape of the blocks in the texture. | ||
[[Image:Texturing_archways1.jpg]] | |||
It may be easier to see where the seams are if you turn on light rendering. Try to get the brushes to match the texture as closely as possible; I recommend using a grid-spacing of 1. Also, make sure that the first and last brush fit together perfectly without a texture seam. | It may be easier to see where the seams are if you turn on light rendering. Try to get the brushes to match the texture as closely as possible; I recommend using a grid-spacing of 1. Also, make sure that the first and last brush fit together perfectly without a texture seam. | ||
| Line 40: | Line 38: | ||
Vertex edit the patch mesh so that it matches the shape of its corresponding brush in the 2D window. Also, it is very important to make sure that it is in the same position as its corresponding brush in the 2D window. Then, select all the patch meshes, and copy the texture from the brushes by clicking on them with the middle mouse button. | Vertex edit the patch mesh so that it matches the shape of its corresponding brush in the 2D window. Also, it is very important to make sure that it is in the same position as its corresponding brush in the 2D window. Then, select all the patch meshes, and copy the texture from the brushes by clicking on them with the middle mouse button. | ||
[[Image:Texturing archways4.jpg]] | |||
This should cause your patch meshes to have the proper texturing, so you can repeat them without texture seams. | This should cause your patch meshes to have the proper texturing, so you can repeat them without texture seams. | ||
| Line 47: | Line 45: | ||
Clone your patch meshes as much as needed and vertex edit them so they match the shape of the blocks of your archway. | Clone your patch meshes as much as needed and vertex edit them so they match the shape of the blocks of your archway. | ||
[[Image:Texturing archways5.jpg]] | |||
You should end up with a bunch of patch meshes that act as one side of your archway being textured seamlessly. As a final touch, go into the surface editor, and turn on "subdivide patch" with horizontal and vertical at 1. If the texture looks distorted, you may need to increase the subdivisions, but that will result in more triangles being used. | You should end up with a bunch of patch meshes that act as one side of your archway being textured seamlessly. As a final touch, go into the surface editor, and turn on "subdivide patch" with horizontal and vertical at 1. If the texture looks distorted, you may need to increase the subdivisions, but that will result in more triangles being used. | ||
| Line 54: | Line 52: | ||
{{tutorial-textures}} | {{tutorial-textures}} | ||
Alternate method to texturing arches using patches: | |||
[[Patches#Trim_Arches|Trim Arches]] | |||
Latest revision as of 20:43, 23 February 2008
Originally written by Gildoran on http://forums.thedarkmod.com/topic/2507
I've figured out a way of seamlessly texturing arches so that the blocks are the exact size and shape you want, using patch-meshes. It's low-poly, using 2 tris for each trapezoidal block (assuming you only have one visible face per block), and doesn't require new textures. Since it wasn't obvious to me and stone archways might be common in TDM, I figured I'd ask if anybody might be interested in a tutorial for it. Here's an example shot of what it looks like:
This is the first tutorial I've ever written, so any suggested changes are welcome. I'm not always the best at explaining things. It's a walk-through on how to take an already existing material and make one side of an archway that is properly textured without seams. It assumes the material is of a brick/block texture.
Make an archway
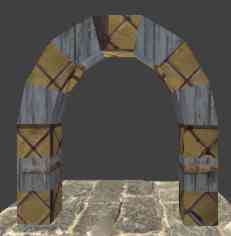
Make an archway and decide how the blocks are going to be shaped/etc.
In the picture above, I gave the blocks alternating textures so it's easy to tell them apart.
Choose what material you want to use.
Make a large brush and apply the material to it. Then decide which set of blocks you want to use.
Assuming you want the texturing to be seamless, choose a row or column of blocks that wrap. I think it's best to choose a set of blocks that are roughly the same size and proportions as the blocks of your archway, so the textures end up getting distorted the least.
Resize the large Brush
Resize the large brush so that its borders end just slightly outside your chosen set of blocks.
This is merely to make step 4 easier.
Chop up the brush into several smaller ones
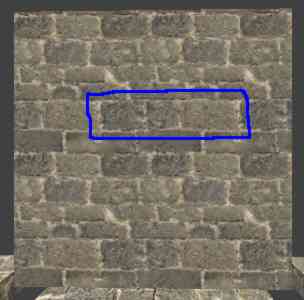
Chop up the brush into several smaller quadrilateral ones so that each brush matches up with one block in the texture. I recommend using the clip tool and SHIFT+ENTER to split the brush along the seams between blocks, then going back and vertex editing them so they exactly match the shape of the blocks in the texture.
It may be easier to see where the seams are if you turn on light rendering. Try to get the brushes to match the texture as closely as possible; I recommend using a grid-spacing of 1. Also, make sure that the first and last brush fit together perfectly without a texture seam.
For each block, make a simple patch mesh.
Vertex edit the patch mesh so that it matches the shape of its corresponding brush in the 2D window. Also, it is very important to make sure that it is in the same position as its corresponding brush in the 2D window. Then, select all the patch meshes, and copy the texture from the brushes by clicking on them with the middle mouse button.
This should cause your patch meshes to have the proper texturing, so you can repeat them without texture seams.
Clone your patch meshes as much as needed
Clone your patch meshes as much as needed and vertex edit them so they match the shape of the blocks of your archway.
You should end up with a bunch of patch meshes that act as one side of your archway being textured seamlessly. As a final touch, go into the surface editor, and turn on "subdivide patch" with horizontal and vertical at 1. If the texture looks distorted, you may need to increase the subdivisions, but that will result in more triangles being used.
This technique could be used again for the top and bottom of the archway if you want to construct it entirely out of patch meshes, or you could make it out of brushes and texture one side with caulk, then move the patch meshes so they're coplanar with the side of the archway.
Alternate method to texturing arches using patches:
Trim Arches
