Swimmable Water: Difference between revisions
m Add category tag |
|||
| (19 intermediate revisions by 7 users not shown) | |||
| Line 1: | Line 1: | ||
''written by angua'' | ''written by angua'' | ||
== Create | |||
== Create Some Walls == | |||
[[Image:Watertutorial1.jpg]] | [[Image:Watertutorial1.jpg]] | ||
| Line 8: | Line 9: | ||
== Fill in | == Fill in Your Water == | ||
Draw a brush that is going to be your water volume and texture it with common/nodraw | Draw a brush that is going to be your water volume and texture it with common/nodraw | ||
[[Image:Watertutorial2.jpg]] | [[Image:Watertutorial2.jpg]] | ||
== Create the | == Create the Entity == | ||
In [[DarkRadiant]]: Select your brush, RMB -> Create Entity -> | In [[DarkRadiant]]: Select your brush, {{RMB}} -> Create Entity -> '''atdm:liquid_water''' | ||
[[Image:Watertutorial5.jpg]] | [[Image:Watertutorial5.jpg]] | ||
In the Entity Inspector you can see that the classname is now | In the Entity Inspector you can see that the classname is now '''atdm:liquid_water''', and the name '''atdm:liquid_water_1''' (or similiar). It should also have a blue outline in the orthographic view (The XZ Front in this case). | ||
It should also have a blue outline in the orthographic view (The XZ Front in this case) | |||
Note: If you use "func_liquid" instead of "atdm:liquid_water", your water will not function correctly. It will f.i. not extinguish flames. | |||
== Texture the | == Texture the Surface == | ||
Select the face that is going to be the surface ( | Select the face that is going to be the surface ({{key|CTRL}} + {{key|SHIFT}} + {{LMB}}) and texture it with a nice water texture, for example '''water_source/water_clear'''. | ||
[[Image:Watertutorial6.jpg]] | [[Image:Watertutorial6.jpg]] | ||
Do not assign the water texture to the whole brush, or you will see this: (You can also get rid of that z-fighting by dragging the brush into the wall so that it | Do not assign the water texture to the whole brush, or you will see this: (You can also get rid of that z-fighting by dragging the brush into the wall so that it intersects with it.) | ||
[[Image:Watertutorial4.jpg]] | [[Image:Watertutorial4.jpg]] | ||
== Light Coloured, Crystal-Clear Water == | |||
Instead of water_clear, choose another surface, say water_green or water_colored. The latter is by default clear, but takes a "_color" spawnarg. The colour won't darken the water, i.e., its gray component is treated as 'clear'. And it affects only the external appearance, not underwater; so by itself, this works best for shallow, non-swimmable liquid. | |||
== Coloured, Murky Water == | |||
Want a water volume that looks coloured and murky underwater, with a surface that matches? Begin with the usual surface choice, ''textures/water_source/water_clear''. Then, to the water entity, add a special gui spawnarg to set the underwater colour and murkiness. Finally, create a separate, matching horizontal patch, coplanar with the volume's top surface. More specifically, to your water entity give the property: | |||
'''''underwater_gui''''' | |||
Now give the property the name of one of the overlay guis. The names are fairly descriptive so you can choose which type you want suitable for a river, a cave pool, or a sewer, etc.: | |||
guis/underwater/underwater_green_midmurk.gui | |||
guis/underwater/underwater_green_thickmurk.gui | |||
guis/underwater/underwater_green_thinmurk.gui | |||
guis/underwater/underwater_blue_midmurk.gui | |||
guis/underwater/underwater_blue_thickmurk.gui | |||
guis/underwater/underwater_blue_thinmurk.gui | |||
guis/underwater/underwater_bluegrey_midmurk.gui | |||
guis/underwater/underwater_bluegrey_thickmurk.gui | |||
guis/underwater/underwater_bluegrey_thinmurk.gui | |||
guis/underwater/underwater_greengrey_midmurk.gui | |||
guis/underwater/underwater_greengrey_thickmurk.gui | |||
guis/underwater/underwater_greengrey_thinmurk.gui | |||
Now with the water entity still selected: | |||
* Choose Top view in Dark Radiant's orthoview | |||
* Create a simple patch from the patch menu. | |||
* Move this up flush with the surface of the water. | |||
* Give it the texture that matches the gui you chose above. For example, if you chose '' guis/underwater/underwater_bluegrey_thinmurk.gui'' from the above then give the overlay the texture: ''textures/water_source/bluegrey_plain_flat_thinmurk'' | |||
Using the above method you should find the surface opacity and colour matches how it looks when the players goes underwater. | |||
== Underwater Fog == | |||
Your water looks much more believable if it has an underwater fog. Create a light, select as texture "fog/basicfog", give it a very dark color and resize the light so it covers the entire underwater area. This will make your water darker the deeper it is, just like in real-life! | |||
== Test your | == Test your Water == | ||
[[Image:Watertutorial3.jpg]] | [[Image:Watertutorial3.jpg]] | ||
| Line 43: | Line 83: | ||
And there it is! | And there it is! | ||
== Swim Transitions in Murky Water == | |||
''By Geep, 2020'' | |||
As the player begins to go underwater, the water "flashes" as it momentarily becomes clear and murk-free. Conceptually, the player's eyeballs go beneath the surface patch (a clipping effect), but the underwater_gui doesn't switch on until the eyes/forehead are fully immersed. Often, this is not worth worrying about, because the lighting is dim, or the player swims mainly with head above water, or enters the water at speed or surrounded by splash particle fx. | |||
But when it is a problem, you can minimize - though not eliminate - such flashing by moving the surface patch down 3 units. However, that leaves the top layer of the water uncoloured wherever it laps. An imperfect workaround is to duplicate the horizontal patch, and move it back to where the original patch used to be, coplanar with the volume top. But change its murk level to "thin", no matter what the lower patch is. | |||
==Current Flow== | ==Current Flow== | ||
TDM has a few flowing stream surface textures, such as textures/water_source/water_stream. If you want to create your own variations then just examine that material shader, copy and modify it. Probably it can be used with other existing surface texture images or you can create new ones. | |||
==Flow Force== | ==Flow Force== | ||
| Line 57: | Line 104: | ||
You can set the frequency of the surface waves from tiny undulations to large slow ones just by changing the surface texture scale in Surface Inspector. Flowing surfaces such as stream textures can of course be rotated to get the direction you want. | You can set the frequency of the surface waves from tiny undulations to large slow ones just by changing the surface texture scale in Surface Inspector. Flowing surfaces such as stream textures can of course be rotated to get the direction you want. | ||
A better way to influence the wave speed and wave hight is via [[List_of_shaderParm_variables|shaderParms]]. Set the following spawnargs on your water entity: | |||
<pre> | |||
shaderParm5 0.05 | |||
shaderParm6 0.75 | |||
</pre> | |||
parm5 controls the wave speed, parm6 the wave height. The defaults are 0.1 and 1.5, respectively. Experiment a bit, values lower than the defaults look more believable for still waterbodies, higher values for when you have a lot of wind. | |||
==Sound== | |||
If the water level is less than 1, you get normal footsteps. | |||
Between 1 and 34, you get splash sounds. | |||
Between 34 and 77, you get wading sounds. | |||
If 77 or more, you get swimming sounds. | |||
== AI Characters in Your Water - Wading vs. Swimming == | |||
''By Geep, 2020'' | |||
For wading, you don't have to do anything special. The standard humanoid AI animations, and their accompanying in-water sounds, will do nicely. | |||
But TDM has no AI swimming animation. If you place your AI in deep water, it drowns. The closest you can come is have the AI wade through the water at shoulder height or less. It will still look and sound like it’s wading. | |||
To do so nevertheless, create a monsterclip box to contain the AI. Locate its floor to support the AI, assuming the water’s too deep otherwise. In DR, adjust the floor to position the AI body model around butt-deep. (If you set the body shoulder-deep in DR, then the game AI will be underwater, in pain, and soon die. After which the ragdoll will fall through the monsterclip floor to the sea bed.) Complete the box, typically with no lid but with walls too high to climb over, e.g, about double body height. Populate with AI path objects as desired. | |||
==Troubleshooting Problems== | ==Troubleshooting Problems== | ||
| Line 66: | Line 141: | ||
NOTE: If you want to use the NoDraw Solid texture, be sure NOT to use it between water entities, otherwise you won't be able to swim between them. | NOTE: If you want to use the NoDraw Solid texture, be sure NOT to use it between water entities, otherwise you won't be able to swim between them. | ||
==See Also== | |||
[[Objects_Floating_in_Water]] | |||
[[Ragdoll Corpses in Water]] | |||
{{tutorial-water}} | {{tutorial-water}} | ||
[[Category:Mapping Tutorials]] | |||
{{GUI}} | |||
Latest revision as of 18:14, 4 November 2022
written by angua
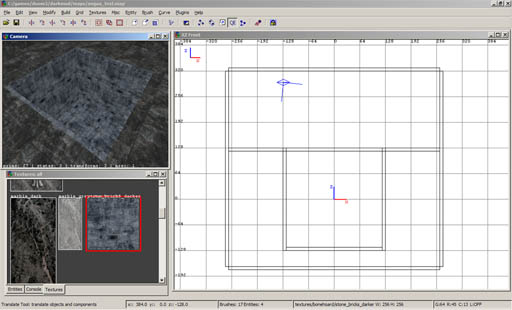
Create Some Walls
In this example, I made this little rectangular pool, but you can also use differently shaped structures.
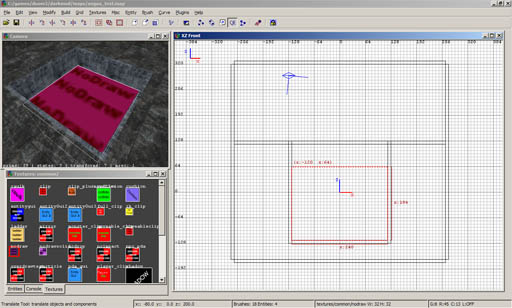
Fill in Your Water
Draw a brush that is going to be your water volume and texture it with common/nodraw
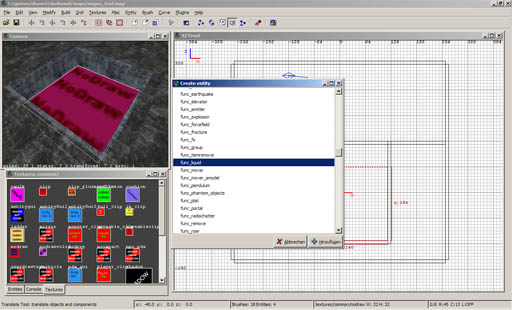
Create the Entity
In DarkRadiant: Select your brush, ![]() -> Create Entity -> atdm:liquid_water
-> Create Entity -> atdm:liquid_water
In the Entity Inspector you can see that the classname is now atdm:liquid_water, and the name atdm:liquid_water_1 (or similiar). It should also have a blue outline in the orthographic view (The XZ Front in this case).
Note: If you use "func_liquid" instead of "atdm:liquid_water", your water will not function correctly. It will f.i. not extinguish flames.
Texture the Surface
Select the face that is going to be the surface (CTRL + SHIFT + ![]() ) and texture it with a nice water texture, for example water_source/water_clear.
) and texture it with a nice water texture, for example water_source/water_clear.
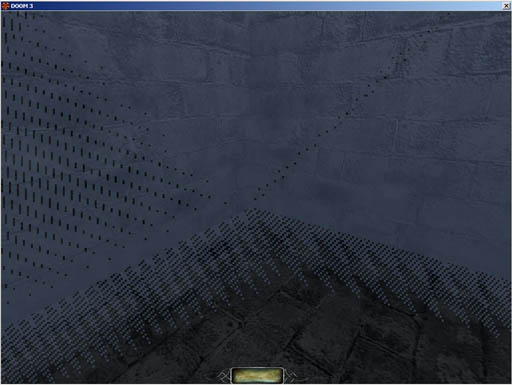
Do not assign the water texture to the whole brush, or you will see this: (You can also get rid of that z-fighting by dragging the brush into the wall so that it intersects with it.)
Light Coloured, Crystal-Clear Water
Instead of water_clear, choose another surface, say water_green or water_colored. The latter is by default clear, but takes a "_color" spawnarg. The colour won't darken the water, i.e., its gray component is treated as 'clear'. And it affects only the external appearance, not underwater; so by itself, this works best for shallow, non-swimmable liquid.
Coloured, Murky Water
Want a water volume that looks coloured and murky underwater, with a surface that matches? Begin with the usual surface choice, textures/water_source/water_clear. Then, to the water entity, add a special gui spawnarg to set the underwater colour and murkiness. Finally, create a separate, matching horizontal patch, coplanar with the volume's top surface. More specifically, to your water entity give the property:
underwater_gui
Now give the property the name of one of the overlay guis. The names are fairly descriptive so you can choose which type you want suitable for a river, a cave pool, or a sewer, etc.:
guis/underwater/underwater_green_midmurk.gui
guis/underwater/underwater_green_thickmurk.gui
guis/underwater/underwater_green_thinmurk.gui
guis/underwater/underwater_blue_midmurk.gui
guis/underwater/underwater_blue_thickmurk.gui
guis/underwater/underwater_blue_thinmurk.gui
guis/underwater/underwater_bluegrey_midmurk.gui
guis/underwater/underwater_bluegrey_thickmurk.gui
guis/underwater/underwater_bluegrey_thinmurk.gui
guis/underwater/underwater_greengrey_midmurk.gui
guis/underwater/underwater_greengrey_thickmurk.gui
guis/underwater/underwater_greengrey_thinmurk.gui
Now with the water entity still selected:
- Choose Top view in Dark Radiant's orthoview
- Create a simple patch from the patch menu.
- Move this up flush with the surface of the water.
- Give it the texture that matches the gui you chose above. For example, if you chose guis/underwater/underwater_bluegrey_thinmurk.gui from the above then give the overlay the texture: textures/water_source/bluegrey_plain_flat_thinmurk
Using the above method you should find the surface opacity and colour matches how it looks when the players goes underwater.
Underwater Fog
Your water looks much more believable if it has an underwater fog. Create a light, select as texture "fog/basicfog", give it a very dark color and resize the light so it covers the entire underwater area. This will make your water darker the deeper it is, just like in real-life!
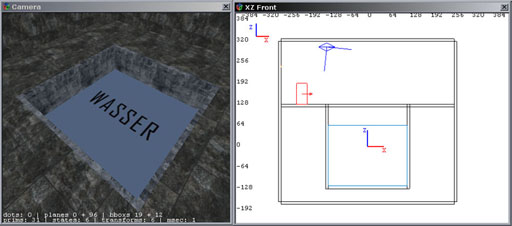
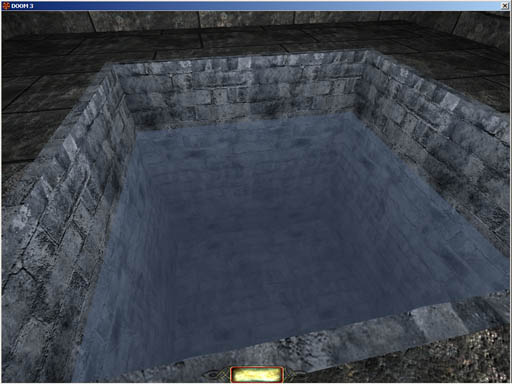
Test your Water
And there it is!
Swim Transitions in Murky Water
By Geep, 2020
As the player begins to go underwater, the water "flashes" as it momentarily becomes clear and murk-free. Conceptually, the player's eyeballs go beneath the surface patch (a clipping effect), but the underwater_gui doesn't switch on until the eyes/forehead are fully immersed. Often, this is not worth worrying about, because the lighting is dim, or the player swims mainly with head above water, or enters the water at speed or surrounded by splash particle fx.
But when it is a problem, you can minimize - though not eliminate - such flashing by moving the surface patch down 3 units. However, that leaves the top layer of the water uncoloured wherever it laps. An imperfect workaround is to duplicate the horizontal patch, and move it back to where the original patch used to be, coplanar with the volume top. But change its murk level to "thin", no matter what the lower patch is.
Current Flow
TDM has a few flowing stream surface textures, such as textures/water_source/water_stream. If you want to create your own variations then just examine that material shader, copy and modify it. Probably it can be used with other existing surface texture images or you can create new ones.
Flow Force
A force field can be placed in water to apply a tangible flow, eg, to push the player and/or other objects along.
See Func Forcefields
Wave Frequency and Direction
You can set the frequency of the surface waves from tiny undulations to large slow ones just by changing the surface texture scale in Surface Inspector. Flowing surfaces such as stream textures can of course be rotated to get the direction you want.
A better way to influence the wave speed and wave hight is via shaderParms. Set the following spawnargs on your water entity:
shaderParm5 0.05
shaderParm6 0.75
parm5 controls the wave speed, parm6 the wave height. The defaults are 0.1 and 1.5, respectively. Experiment a bit, values lower than the defaults look more believable for still waterbodies, higher values for when you have a lot of wind.
Sound
If the water level is less than 1, you get normal footsteps.
Between 1 and 34, you get splash sounds.
Between 34 and 77, you get wading sounds.
If 77 or more, you get swimming sounds.
AI Characters in Your Water - Wading vs. Swimming
By Geep, 2020
For wading, you don't have to do anything special. The standard humanoid AI animations, and their accompanying in-water sounds, will do nicely.
But TDM has no AI swimming animation. If you place your AI in deep water, it drowns. The closest you can come is have the AI wade through the water at shoulder height or less. It will still look and sound like it’s wading.
To do so nevertheless, create a monsterclip box to contain the AI. Locate its floor to support the AI, assuming the water’s too deep otherwise. In DR, adjust the floor to position the AI body model around butt-deep. (If you set the body shoulder-deep in DR, then the game AI will be underwater, in pain, and soon die. After which the ragdoll will fall through the monsterclip floor to the sea bed.) Complete the box, typically with no lid but with walls too high to climb over, e.g, about double body height. Populate with AI path objects as desired.
Troubleshooting Problems
Visible Joints Between Water Brushes
If you place brushes of water against one another, eg, along a channel, round corners, to form a canal, etc. and you can 'see the joins' then the most likely cause of the problem is that the surface textures do not align. We are used to aligning static textures but it is not so obvious with the dynamic translucent surface of water that we might not think of it. Just copy and paste shader one of the surface textures to all the others to get the same scroll and scale alignment and it should be OK.
NOTE: If you want to use the NoDraw Solid texture, be sure NOT to use it between water entities, otherwise you won't be able to swim between them.
