Readables: Difference between revisions
m Change category tag to {{GUI}}, that includes Editing |
|||
| (5 intermediate revisions by 2 users not shown) | |||
| Line 1: | Line 1: | ||
''following written by Springheel'' | ''following written mostly by Springheel'' | ||
== | ==Introduction to Readables== | ||
''by Geep'' | |||
Readables are document entities that the player can consult for clues, storyline details, or just atmospheric entertainment. They consist of | |||
* a physical form (e.g., book, loose pages, scroll) | |||
* text content, in TDM fonts | |||
* standardized UI manipulations, e.g., zoom to full page and page flips. | |||
They can be further categorized as either "Movable" (aka Moveable or Mobile) or "Immobile" (aka Static). | |||
===Movable=== | |||
This will go into inventory when frobbed. The player can read it at the time and place of choosing, and refer to it later as needed. An accumulation of such documents potentially "clogs up" inventory. But the mapper can choose to make a document droppable, so that the player can drop it when no longer needed. The mapper can also arrange that an AI will notice a missing readable, and alert. | |||
===Immobile=== | |||
These must be read in place. In TDM - unlike some other games - time doesn't stop while reading. This exposes the player to some risk; the mapper can craft the risk by the degree of lighting/shadows/cover, AI presence, audio warning, and so on. If the readable content is complex and important, the player may have to revisit it; or the gamer may instead choose to write an in-real-life note as a memory aid. | |||
===For More=== | |||
The "startmap" FM provides a thorough sampling of available Readables. | |||
Mappers have different philosophies of when to use movable versus immobile readables, discussed [https://forums.thedarkmod.com/index.php?/topic/16367-movable-vs-immobile-readables/&tab=comments#comment-348785 in this forum thread]. | |||
Other alternatives to Readables include: | |||
* maps, that are also mobile and go in their own section of inventory; | |||
* stock and custom textures, that can contain text and graphics with appropriate background. Typically, these are applied to surfaces that are immobile, non-frobbable, and must be read either close-up or through a spyglass. | |||
== Adding Readables to your Map - From Prefabs == | |||
For a really easy way to add readables to your maps, use Fidcal's [[Readables Prefabs]]. | |||
== Adding Readables to your Map - From Model-Based Entities == | |||
On your map, right click and select "Create Entity...". In the left pane of the Create Entity dialog, look for: | |||
* Movable Readables under either ...Moveables/Readables/ or .../Readables/atdm:readable_mobile_... | |||
* Immobile Readables under .../Readables/atdm:readable_immobile_.... For example, you could select readable_immobile_paper01, readable_immobile_scroll01, or readable_immobile_open_book01. | |||
Position the entity wherever you want it in your map. | Position the entity wherever you want it in your map. | ||
| Line 21: | Line 48: | ||
http://www.mindplaces.com/save/paper2.jpg | http://www.mindplaces.com/save/paper2.jpg | ||
== Adding Readables to your Map - from Scratch, Made from Brushes == | |||
It is possible to make readables without using a model. This is probably more useful for rectangular plaques. | |||
''following written by greebo'' | ''following written by greebo'' | ||
For this tutorial, I made a small test room and placed an info_player_start entity and a light in it. I also put a barebone | For this tutorial, I made a small test room and placed an info_player_start entity and a light in it. I also put a barebone block in front of the player, to put the readable onto. | ||
First, you'll need to create two brushes like shown below. One brush (the larger one) will be the readable's background (like a parchment), the other one will show the text of the readable. To avoid Z-fighting, the smaller brush must be a tad thicker than the larger one, as indicated in the screenshot. Just activate the smallest grid size (0.125) and drag it one grid unit larger. (The smaller one is narrower and ''inside'' the bigger one but protruding slightly above it.) | First, you'll need to create two brushes like shown below. One brush (the larger one) will be the readable's background (like a parchment), the other one will show the text of the readable. To avoid Z-fighting, the smaller brush must be a tad thicker than the larger one, as indicated in the screenshot. Just activate the smallest grid size (0.125) and drag it one grid unit larger. (The smaller one is narrower and ''inside'' the bigger one but protruding slightly above it.) | ||
[[Image:readables_brushes.jpg]] | [[Image:readables_brushes.jpg]] | ||
== Apply the | === Apply the Right Textures === | ||
It is important to apply the '''textures/common/nodrawsolid''' shader onto the brushes (not just the "nodraw" one) to prevent the player clipping into the readable. | It is important to apply the '''textures/common/nodrawsolid''' shader onto the brushes (not just the "nodraw" one) to prevent the player clipping into the readable. | ||
| Line 42: | Line 69: | ||
[[Image:Readables_tut_textures.jpg]] | [[Image:Readables_tut_textures.jpg]] | ||
== Create the Entity == | === Create the Entity === | ||
Press ESC and select '''both''' brushes with Shift-LMB. | Press ESC and select '''both''' brushes with Shift-LMB. | ||
| Line 51: | Line 78: | ||
[[Image:readables_tut_entity.jpg]] | [[Image:readables_tut_entity.jpg]] | ||
== Create your | === Create your Custom Text === | ||
Create your xdata file containing your readable text. | Create your xdata file containing your readable text. Ways to do this are discussed in: | ||
* [[XData File Creation]] | |||
* Method 2 of [[Readables Prefabs]] | |||
* [[Readable Editor]] | |||
== Entity Keys/Values == | You can of course skip that step and use the '''readables_test.xd''' file, which is already prefabricated in the darkmod repository. Alternatively, you can also define the text data on the entity itself (see below). | ||
=== Entity Keys/Values === | |||
Once you have your custom xdata-File, you are ready to set the entity keys. | Once you have your custom xdata-File, you are ready to set the entity keys. | ||
| Line 61: | Line 93: | ||
[[Image:readables_tut_keyvalues.jpg]] | [[Image:readables_tut_keyvalues.jpg]] | ||
=== readable_face === | ==== readable_face ==== | ||
These three values form the normal vector of the face holding the text. In this example the readable text is facing upwards, its normal vector is pointing upwards too. Therefore we type in the value "0 0 1", which represents a vector pointing straight upwards (x=0, y=0, z=1). | These three values form the normal vector of the face holding the text. In this example the readable text is facing upwards, its normal vector is pointing upwards too. Therefore we type in the value "0 0 1", which represents a vector pointing straight upwards (x=0, y=0, z=1). | ||
=== readable_face_tolerance === | ==== readable_face_tolerance ==== | ||
This value defines how "far" the player has to look away from the readable to leave the "reading mode" and let the on-screen readable disappear. The value "90" is just fine, so we leave it as it is. | This value defines how "far" the player has to look away from the readable to leave the "reading mode" and let the on-screen readable disappear. The value "90" is just fine, so we leave it as it is. | ||
=== xdata_contents === | ==== xdata_contents ==== | ||
This key holds the name of the readable text as defined in your .xd File. See [[XData File Creation]]. This is NOT the name of the .xd file itself, but the definition inside it. The example readables_test.xd file contains the definition '''readables/readables_test/tdm_desc''', use it for now. Press OK and save the map. | This key holds the name of the readable text as defined in your .xd File. See [[XData File Creation]]. This is NOT the name of the .xd file itself, but the definition inside it. The example readables_test.xd file contains the definition '''readables/readables_test/tdm_desc''', use it for now. Press OK and save the map. | ||
=== page1_title & page1_body === | ==== page1_title & page1_body ==== | ||
Note that it's not exactly required to create an xdata file, you can also add the appropriate keys directly to the entity itself. However, for large maps this should not be the way to go, as maintaining and translating the texts could become more complicated. | Note that it's not exactly required to create an xdata file, you can also add the appropriate keys directly to the entity itself. However, for large maps this should not be the way to go, as maintaining and translating the texts could become more complicated. | ||
| Line 103: | Line 135: | ||
* The xd file isn't loaded (reload Doom/TDM - see previous section.) | * The xd file isn't loaded (reload Doom/TDM - see previous section.) | ||
* The xd file is wrongly named or in the wrong path. The file can be any legal prefix but must be suffixed .xd and it must be in either darkmod/xdata folder or mymap/xdata folder (if you have a current game folder.) | * The xd file is wrongly named or in the wrong path. The file can be any legal prefix but must be suffixed .xd and it must be in either darkmod/xdata folder or mymap/xdata folder (if you have a current game folder.) | ||
* There may be an error in another xdata declaration earlier in the same file which prevents the code reading this one. | |||
===num_pages not defined=== | ===num_pages not defined=== | ||
| Line 143: | Line 176: | ||
==Readables | ==Readables Values in Entity without Xdata File== | ||
| Line 154: | Line 187: | ||
** page1_body <text to go here> | ** page1_body <text to go here> | ||
It is likely all the variables you see in an xd file could be used this way so | It is likely all the variables you see in an xd file could be used this way so e.g., num_pages etc. | ||
== Triggering Something After Being Read == | |||
''From 2021 forum discussion [https://forums.thedarkmod.com/index.php?/topic/9082-newbie-darkradiant-questions/&do=findComment&comment=462151 here]'' | |||
There are two methods. | |||
=== Direct Method === | |||
Select your readable. In the Entity Viewer, add the spawnarg "trigger_on_close" and give it the name of the desired target object. (You can have multiple of these, with the usual numerical suffixes.) | |||
How it works: an atdm:readable_immobile entity (for instance) has a "frob_action_script" with default "readable_immobile_frob" (found in tdm_readables.script). One of the member functions there is handleCloseEvent(). This function calls another function that triggers the entitiy specified in the spawnarg "trigger_on_close", every time it's closed. Although the invocation is different with an atdm:readable_mobile entity, in your inventory, it likewise ends up with handleCloseEvent(). | |||
=== Using a Hidden Objective === | |||
This is the approach to use if you want to specify reading to a particular page. | |||
In the Objective Editor, create a new objective that is non-mandatory and non-visible (and if desired as a one-shot, irreversible). This is not really an objective for the player, but merely an implementation mechanism. Fill in the Completion Script and/or Completion Target field. | |||
Next, add a component, either of type: | |||
* "Readable is closed", or | |||
* "A certain page of the readable is reached" (in which case you will specify the "Page" number) | |||
It both cases, in the "Readable:" dialog group, select "Name of single entity" and enter the name of your readable. | |||
[[Category:Tutorial]] | [[Category:Tutorial]] | ||
{{GUI}} | |||
Latest revision as of 18:11, 4 November 2022
following written mostly by Springheel
Introduction to Readables
by Geep
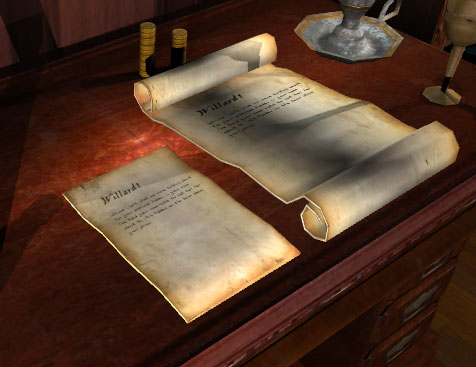
Readables are document entities that the player can consult for clues, storyline details, or just atmospheric entertainment. They consist of
- a physical form (e.g., book, loose pages, scroll)
- text content, in TDM fonts
- standardized UI manipulations, e.g., zoom to full page and page flips.
They can be further categorized as either "Movable" (aka Moveable or Mobile) or "Immobile" (aka Static).
Movable
This will go into inventory when frobbed. The player can read it at the time and place of choosing, and refer to it later as needed. An accumulation of such documents potentially "clogs up" inventory. But the mapper can choose to make a document droppable, so that the player can drop it when no longer needed. The mapper can also arrange that an AI will notice a missing readable, and alert.
Immobile
These must be read in place. In TDM - unlike some other games - time doesn't stop while reading. This exposes the player to some risk; the mapper can craft the risk by the degree of lighting/shadows/cover, AI presence, audio warning, and so on. If the readable content is complex and important, the player may have to revisit it; or the gamer may instead choose to write an in-real-life note as a memory aid.
For More
The "startmap" FM provides a thorough sampling of available Readables.
Mappers have different philosophies of when to use movable versus immobile readables, discussed in this forum thread.
Other alternatives to Readables include:
- maps, that are also mobile and go in their own section of inventory;
- stock and custom textures, that can contain text and graphics with appropriate background. Typically, these are applied to surfaces that are immobile, non-frobbable, and must be read either close-up or through a spyglass.
Adding Readables to your Map - From Prefabs
For a really easy way to add readables to your maps, use Fidcal's Readables Prefabs.
Adding Readables to your Map - From Model-Based Entities
On your map, right click and select "Create Entity...". In the left pane of the Create Entity dialog, look for:
- Movable Readables under either ...Moveables/Readables/ or .../Readables/atdm:readable_mobile_...
- Immobile Readables under .../Readables/atdm:readable_immobile_.... For example, you could select readable_immobile_paper01, readable_immobile_scroll01, or readable_immobile_open_book01.
Position the entity wherever you want it in your map.
You need to set one key/value on your entity:
"xdata_contents" "[readable text shader name]"
This key holds the name of the readable text as defined in your .xd File. See XData File Creation. This last step is not necessary if you use the Readable Editor for creating your texts.
That's it. Later you will be able to select skins to match the parchment of your model to your gui, but that's another day.
Adding Readables to your Map - from Scratch, Made from Brushes
It is possible to make readables without using a model. This is probably more useful for rectangular plaques.
following written by greebo
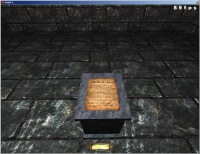
For this tutorial, I made a small test room and placed an info_player_start entity and a light in it. I also put a barebone block in front of the player, to put the readable onto.
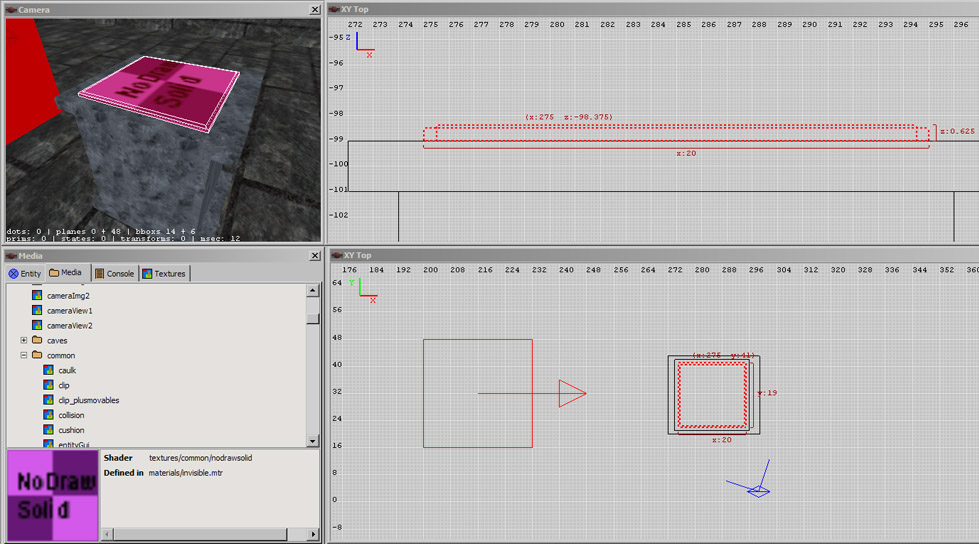
First, you'll need to create two brushes like shown below. One brush (the larger one) will be the readable's background (like a parchment), the other one will show the text of the readable. To avoid Z-fighting, the smaller brush must be a tad thicker than the larger one, as indicated in the screenshot. Just activate the smallest grid size (0.125) and drag it one grid unit larger. (The smaller one is narrower and inside the bigger one but protruding slightly above it.)
Apply the Right Textures
It is important to apply the textures/common/nodrawsolid shader onto the brushes (not just the "nodraw" one) to prevent the player clipping into the readable.
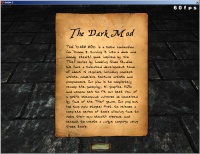
Press ESC and select the top face of the smaller brush by selecting it with Ctrl-Shift-LMB. Apply the textures/common/entitygui texture onto it, rotate and fit it (1x1).
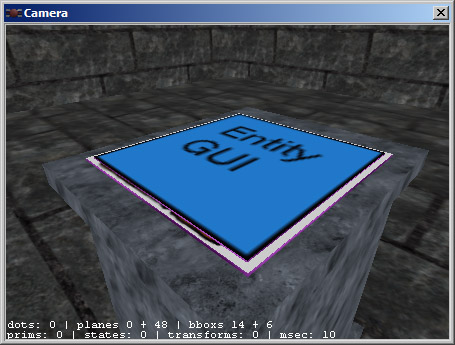
Press ESC and select the top face of the larger brush. Select the textures/readables/page/oldparchment (or any other texture you like from that folder) texture from the texture browser, rotate and fit the texture to your needs (1x1). It should now look something like this:
Create the Entity
Press ESC and select both brushes with Shift-LMB.
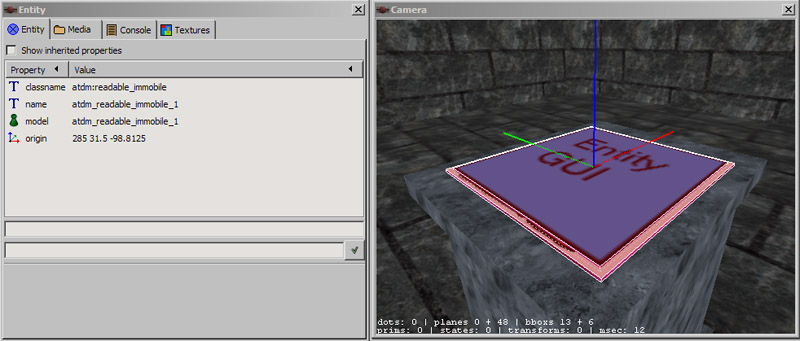
DarkRadiant: Just right-click into the orthogonal view, select "Create Entity" and choose the atdm:readable_immobile one (it's located in the darkmod/Readables folder). (DoomEdit: Select the atdm:readable_immobile entity and click on "Create")
Voilà, the entity is created:
Create your Custom Text
Create your xdata file containing your readable text. Ways to do this are discussed in:
- XData File Creation
- Method 2 of Readables Prefabs
- Readable Editor
You can of course skip that step and use the readables_test.xd file, which is already prefabricated in the darkmod repository. Alternatively, you can also define the text data on the entity itself (see below).
Entity Keys/Values
Once you have your custom xdata-File, you are ready to set the entity keys.
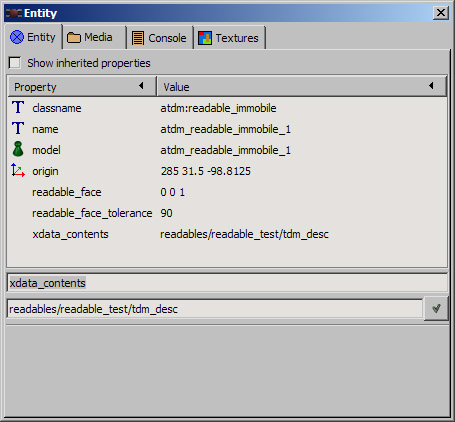
Press ESC to deselect everything (if you haven't already) and select one of your readable brushes (Shift-LMB). As they both belong to the same entity, the other brush is selected as well, which is good. Select the Entity Inspector and add the values shown below.
readable_face
These three values form the normal vector of the face holding the text. In this example the readable text is facing upwards, its normal vector is pointing upwards too. Therefore we type in the value "0 0 1", which represents a vector pointing straight upwards (x=0, y=0, z=1).
readable_face_tolerance
This value defines how "far" the player has to look away from the readable to leave the "reading mode" and let the on-screen readable disappear. The value "90" is just fine, so we leave it as it is.
xdata_contents
This key holds the name of the readable text as defined in your .xd File. See XData File Creation. This is NOT the name of the .xd file itself, but the definition inside it. The example readables_test.xd file contains the definition readables/readables_test/tdm_desc, use it for now. Press OK and save the map.
page1_title & page1_body
Note that it's not exactly required to create an xdata file, you can also add the appropriate keys directly to the entity itself. However, for large maps this should not be the way to go, as maintaining and translating the texts could become more complicated.
Just drop the xdata_contents key and add the following key/value pairs in the Entity Inspector like this:
page1_title    Your Title Here
page1_body     Your Body Text here
gui_page1      guis/readables/page_test.gui (or any other GUI you may have created)
Now compile your map.
Test your Readable!
Reloading xdata
When testing readable text you can use reloadXData in the console to reload changed xdata definitions in-game. A small test map with the player start right in front of the readable and you can review changes in seconds just by pressing the up key and Enter in the console to repeat the command or even faster, bind reloadXData to a key so you just hit a key to refresh the readable.
Troubleshooting
If the readable does not show at all in game or you get other errors then check the console for errors.
TIP: If a console error gives a line number then switch off wordwrap in your text editor, at least while finding the line and error.
Non_existant xdata declaration
Non_existant xdata declaration can mean...
- The xdata name against the xdata_contents property on the readable entity in the map does not agree with that in the xd file (eg, typo or wrong name either in the xd file or in the entity property.)
- The xdata name was put in the wrong place eg, below the first curly bracket.
- The xd file isn't loaded (reload Doom/TDM - see previous section.)
- The xd file is wrongly named or in the wrong path. The file can be any legal prefix but must be suffixed .xd and it must be in either darkmod/xdata folder or mymap/xdata folder (if you have a current game folder.)
- There may be an error in another xdata declaration earlier in the same file which prevents the code reading this one.
num_pages not defined
num_pages not defined is the most common and can mean almost any of the following:
- number of pages is not defined
- missing double-quote mark
- double-quote inside those quotes (eg, for speech.) Escape your double quote with a backslash \" or use two single quote marks (apostrophes) instead.
- missing curly bracket
- cannot load the xdata definition. See previous section.
non-existant gui handle
The console error : non-existant gui handle is most likely caused by the following:
In the xdata definition there is either a path or name error to the gui file. For example:
"gui_page1" : "guis/readables/sheet_paper_gothic_bamberg.gui"
should be...
"gui_page1" : "guis/readables/sheets/sheet_paper_gothic_bamberg.gui"
newline inside string
newline inside string might be several things...
- Possibly you pressed the Enter(Return) key to start a new line while typing text within quote marks. Delete backwards from the new line and let it wordwrap in your text editor. If you want a new line either include \n inside the quotes or start new quotes.
- Another possibility is simply omitting the double quotes at the end of some text. The code then does not know the text has ended and tries to continue to process it but finds instead a new line.
- It might also not be a fault in the xdata at all but a newline in the xdata_contents property in the map file. I've done this more than once when copying and pasting the name from the xd file and accidentally copying two lines. Even deleting the property didn't seem to clear it so in the end I deleted the entity and started again. (Update note: I got this error when I accidentally copy/pasted two lines into the "classname" property. So it's not unique to xdata_contents/readables.)
Other errors
- Make sure you do not copy any xd file eg, as a backup and save it in the xdata folder with an .xd suffix, eg, mymapBAK.xd as it will still be read in the game. While you are editing the current version the old one is still affecting the game and producing errors. Save it with a suffix other than .xd eg, mymapXD.BAK
- The same is also true if you have made a pk4 for your mission and there is a copy of the xdata inside. Rename the .pk4 to .zip will prevent its files being read (must not have Doom/TDM/Dark Radiant open as they lock it.)
- No gui text on readable and it wouldn't display at all when frobbed yet no error in xdata. Possible reason : sheet upside down so player frobbing it from back!
Readables Values in Entity without Xdata File
This is just to emphasise this possibility and make this easier to find see above
It is possible to directly include text in the readable entity but this is rarely used and I include it here for reference:
- Add to the readable entity the properties/values as in this example:
- gui_page1 guis/readables/oldparchment.gui
- page1_body <text to go here>
It is likely all the variables you see in an xd file could be used this way so e.g., num_pages etc.
Triggering Something After Being Read
From 2021 forum discussion here There are two methods.
Direct Method
Select your readable. In the Entity Viewer, add the spawnarg "trigger_on_close" and give it the name of the desired target object. (You can have multiple of these, with the usual numerical suffixes.)
How it works: an atdm:readable_immobile entity (for instance) has a "frob_action_script" with default "readable_immobile_frob" (found in tdm_readables.script). One of the member functions there is handleCloseEvent(). This function calls another function that triggers the entitiy specified in the spawnarg "trigger_on_close", every time it's closed. Although the invocation is different with an atdm:readable_mobile entity, in your inventory, it likewise ends up with handleCloseEvent().
Using a Hidden Objective
This is the approach to use if you want to specify reading to a particular page.
In the Objective Editor, create a new objective that is non-mandatory and non-visible (and if desired as a one-shot, irreversible). This is not really an objective for the player, but merely an implementation mechanism. Fill in the Completion Script and/or Completion Target field.
Next, add a component, either of type:
- "Readable is closed", or
- "A certain page of the readable is reached" (in which case you will specify the "Page" number)
It both cases, in the "Readable:" dialog group, select "Name of single entity" and enter the name of your readable.
