Photoshop 1: Tiling With Alpha Masks: Difference between revisions
m →Primer |
|||
| (3 intermediate revisions by the same user not shown) | |||
| Line 1: | Line 1: | ||
{{photoshop-tutorials}} | |||
==Primer== | ==Primer== | ||
| Line 6: | Line 8: | ||
{{clear}} | {{clear}} | ||
To pull up your brush menu. Then, | To pull up your brush menu. Then, {{LMB}} the almost obscenely small icon along the right side of said box, select load brushes, and lead it to the .abr file. | ||
[[File:Tile_Tex_Add_2.jpg|500px|thumb|left]] | [[File:Tile_Tex_Add_2.jpg|500px|thumb|left]] | ||
| Line 83: | Line 85: | ||
And that should do it. In the next tutorial, I'll cover adjustment layers, tweaking the colors and details in your textures, and go a little more indepth with the alpha mask sublayers. | And that should do it. In the next tutorial, I'll cover adjustment layers, tweaking the colors and details in your textures, and go a little more indepth with the alpha mask sublayers. | ||
[http://wiki.thedarkmod.com/index.php?title=Photoshop_2:_Tweaking_With_Adjustment_Layers Photoshop 2: Tweaking With Adjustment Layers] | |||
{{Photoshop-tutorials-footer}} | |||
Latest revision as of 07:17, 4 April 2012
Photoshop tutorial series:
Other photoshop tutorials:
Primer
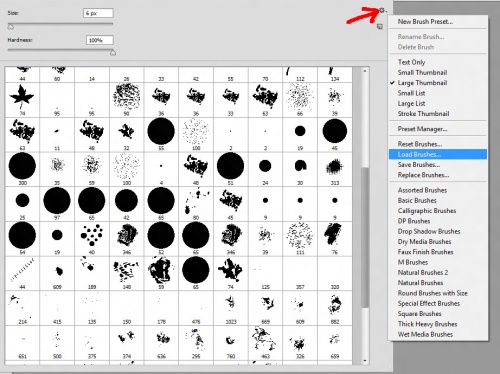
Before we begin getting into the meat of the tutorial, we'll need some common files to work with as you follow along with the steps below. We'll begin by grabbing this collection of PS brushes I find myself using these constantly for blending and painting. If you end up taking to this whole texturing thing, you'll eventually find these indispensable. To install them, ![]() on the paintbrush tool on the toolbar, go to the brush pallette at the top left of the screen...
on the paintbrush tool on the toolbar, go to the brush pallette at the top left of the screen...
To pull up your brush menu. Then, ![]() the almost obscenely small icon along the right side of said box, select load brushes, and lead it to the .abr file.
the almost obscenely small icon along the right side of said box, select load brushes, and lead it to the .abr file.
You are now brushed up. Now need a common texture to work with. Go to CGTextures and sign up for an account. The free account works fine, and gives you a goodly 15 meg of downloads a day. Unless you're insistent on getting the absolute highest resolution at all times, you shouldn't have any problems grabbing what you need per day. Once you've got your new account squared away, hit up this link and grab the 1600x1037 res texture.
Prepping The Texture
Now that we've got that out of the way, lets open up the texture in PS. I know, the dirt texture I picked isn't too exciting, but it'll do its job for this most basic of primers. It's got enough surface detail and variation to make it just interesting enough for our purposes. Pick a square section from the base you'll want to use as your texture. You don't have to worry about every edge matching exactly, this is a tiling tutorial after all, but try to select an area that that has a similar surface all around. Nothing like flat dirt on the left, super deep grooves on the right. Try to get your selection as close to a square as possible. Don't expect to get it exact...that'd take about forever, and be annoying as hell to attempt, but get it close so it doesn't distort too much when you go to resize it later.
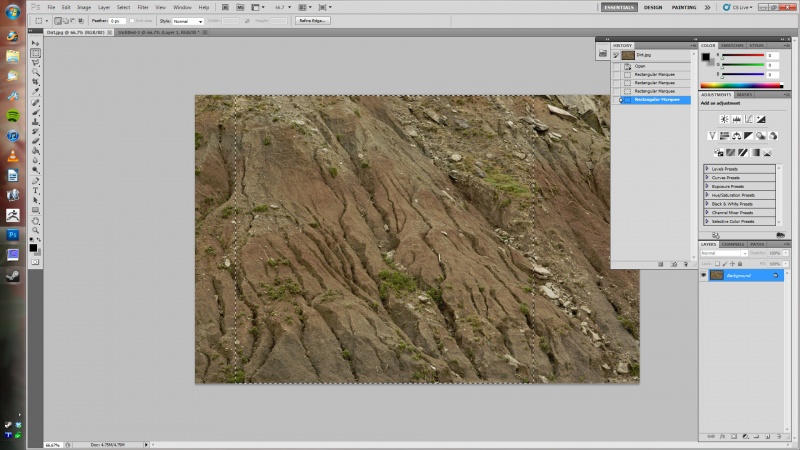
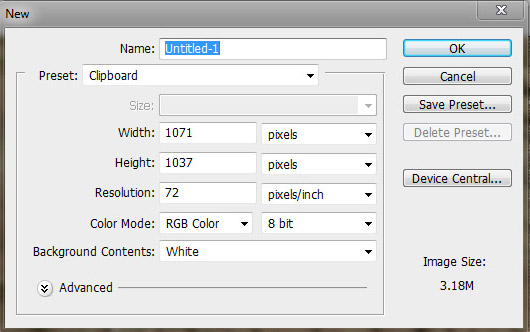
Once you grab it, hit CTRL+C to copy, then hit CTRL+N to open up a new PS doc (or go to file/new from the dropdown menu). The resolutions set in the box that pops up tells you res of your copied section off the texture. It'll look like this...
Once you've got your new document, hit CTRL+V to paste your copied selection into the canvas. Next, you'll want to resize the image to 1024x by going to image/image size from the dropdown menu, turn off constrain proportions, and setting your width and height to 1024x1024 After you do all that, you should have a texture that looks like this...
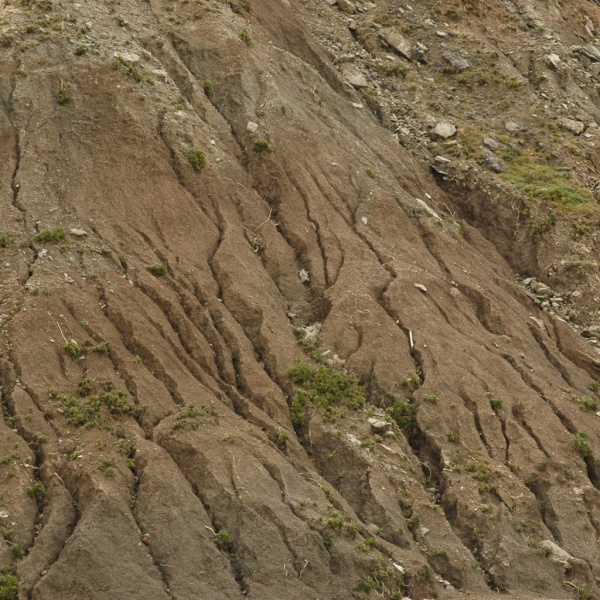
Now you have a new perfectly square texture, and it's just flat out begging to be edited. First, lets collapse your layer into the background by hitting CTRL+E (FYI, this collapses the selected layer to the next lower, not the whole stack). Double-![]() the little picture on your new background layer tab, and make it "layer 0". We are now primed, prepped, and ready to go.
the little picture on your new background layer tab, and make it "layer 0". We are now primed, prepped, and ready to go.
Making Your New Texture Tileable
Hit CTRL+A to select everything in your current layer (or draw a marquee around it, whichever you prefer), hit CTRL+C to copy, and CTRL+V to paste your selection into a new layer. Yeah, I'm big on keyboard shortcuts. You should be, too. It'll save you a ton of time in the long run.
Okay, now you have your two duplicate layers, which should look like this...
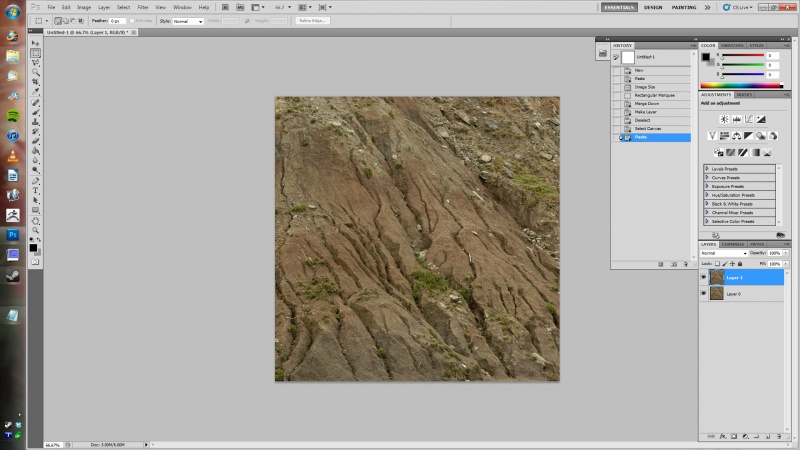
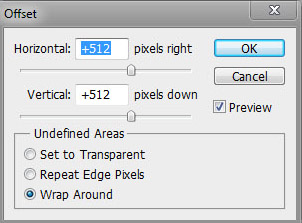
Now, we're going to use the offset filter to your texture. Do this by going to filter/other/offset. Offset it by 512 on X, and 512 on Y (half coordinates of your texture resolution) with wraparound enabled. Like so...
A perfect cross center of your currently untiled texture.
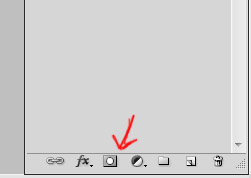
Now we're getting to the fun part. At the bottom of your layer tab column, you should see a little square with a circle in it, that looks like...
This is your Layer Mask button. Study it. Stare at it. Remember it. Make love to it if you have to. You'll be using this little button quite a bit during your texture making endeavors. With layer 1 selected, hit this button, and you'll see a smaller white box appear in your layer tab. That's your alpha mask sublayer. Your new best friend.
Before we get to tiling our texture, I'll give you a quick primer on alpha masks. They're pretty much alphas as you expect them to be, but applied per layer, instead of encompassing the entire image. It works exactly how you'd expect. White is completely transparent, black opaque, and all the shades of grey represent different strengths of transparency.
So you've got your offset texture, and your alpha mask applied, lets make this texture tileable. If you installed the brush set I linked above, then go into your brush palette, and look for this brush...
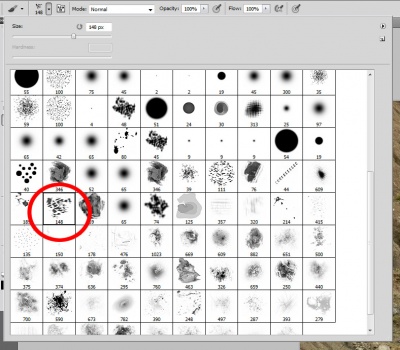
It has a nice feathered grey edge, so blends with it's surroundings nice and smoothly. I almost use this brush exclusively for blending, which is exactly what you're about to do. Select it, and ![]() on your new alpha mask sublayer box on your layers menu. Now, choose black from your color swapper (which will default to black and white after selecting your alpha mask sublayer), and start painting along the seams. Play with the size of the brush to work in finer details, hit X to switch to white and back again if you want to undo a part of your mask, and just...paint away. You'll immediately notice it blending in with it's surroundings. All you have to do is keep an eye out for any odd terminations, and make sure it's all blended nicely. In about 30-45 seconds, you will have a nice, tileable dirt texture.
on your new alpha mask sublayer box on your layers menu. Now, choose black from your color swapper (which will default to black and white after selecting your alpha mask sublayer), and start painting along the seams. Play with the size of the brush to work in finer details, hit X to switch to white and back again if you want to undo a part of your mask, and just...paint away. You'll immediately notice it blending in with it's surroundings. All you have to do is keep an eye out for any odd terminations, and make sure it's all blended nicely. In about 30-45 seconds, you will have a nice, tileable dirt texture.
Yes. It really is as simple as that.
Your finished product should look something like...
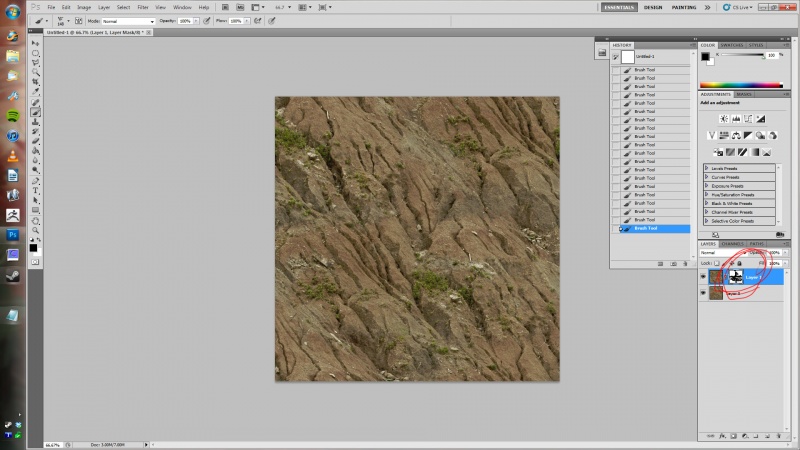
Notice I didn't stick exclusively to the seams. I blended in some of the surroundings, too.
Now collapse layer 1 to layer 0 by hitting CTRL+E, use the offset filter again, and look for any tiling issues that might've arisen from your initial go. If everything looks good, then there you go. Your new dirt texture is born.
There are a few problems with this particular texture. Namely that it contains a few obvious patterns. Throw in a few iterations within a game engine, and you'll really notice the repetition. This is just a quick and dirty example, though. Good for the sake of this tutorial. You'll obviously want to spend some extra time on your textures. The good news is that you could use this exact same technique to fix up any problem you have. You can even go in and blend other textures together on different layers to achieve just about any result you could possibly think of. Hence the reason why it's your new best friend.
One small word of advice before we move on. Even if your ultimate intention is on making, say, a 256x256 texture, starting larger than what you need and downscaling it is no problem. You'll lose some definition obviously, but you've always got the original to fall back on if you need to edit in more detail, or decide to use the higher res version later. Upscaling a texture, on the other hand, obviously won't gain you any extra definition. Most you'll get is a blurry version of the same texture alongside a few blown up JPEG artifacts.
And that should do it. In the next tutorial, I'll cover adjustment layers, tweaking the colors and details in your textures, and go a little more indepth with the alpha mask sublayers.
Photoshop 2: Tweaking With Adjustment Layers
Photoshop tutorial series:
Tiling with alpha masks • Tweaking with adjustment layers • Stonewall phase 1 • Stonewall phase 2
Other photoshop tutorials:
The Toolbar explained

