Advanced TDM Visuals Tweaking: Difference between revisions
→So why is it called "HDR-Lite" anyway?: one 'the' is enough |
Nbohr1more (talk | contribs) No edit summary |
||
| Line 107: | Line 107: | ||
{{installation}} | {{installation}} | ||
{{general}} | {{general}} | ||
[[Category:Lighting]] | |||
Revision as of 21:02, 13 April 2011
The scope of this article is to explain the new visual features of TDM 1.03, specifically the Enhanced Interaction Shader and the HDR-Lite Post-Processing, in a little more detail and to point out how they can be tweaked to the user's desires.
Important note: Designers of all sorts (e.g. textureartists, mappers, modellers) should always work with a default setup, to make sure that common users can enjoy a FM the way it's intended.
Altering the Enhanced Interaction Shader
The new interaction shader is responsible for the edge amplification effect of objects and normalmaps, or in layman's terms "the edge detection", how it's more commonly called around the forums. There are no cvars to tweak this effect, instead you will have to edit the actual shader. This can be done as follows:
- Go to your darkmod directory
- Create a folder called glprogs
- Open the file tdm_base01.pk4 in the darkmod directory (To those who don't know: pk4 is simply a renamed zip, so you can open it with pretty much any archiving program of your choice)
- Inside the archive, browse the glprogs-folder and grab a file called test.vfp
- Extract the file to the previously created glprogs-folder inside the darkmod directory
- Open the extracted file with a simple text-editor (e.g. notepad, vim)
- Search for the term "lightParms"
You should see the following now:
#---------------------------------------------------------
# Pramaeters are, respectively:		ambient rim scale, diffuse rim scale, min. spec exp, max spec exp;
#---------------------------------------------------------
PARAM   lightParms			= { .7, 1.8, 10.0, 30.0 }; ## rim 4.4, 0.8
The values of interest are of course those inside the curly brackets, which are from left to right as the comment in the above lines suggests: The ambient rim scale, the diffuse rim scale and the general minimum and maximum specularity of surfaces. The latter two parameters are not that interesting, but the rim scale parameters are those responsible for the edge amplification. The first one defines the strength of this effect due to ambient lighting and the diffuse rim scale is used for highlights induced by direct lighting. Raise those values in order to amplify edges more, but please note, that the ambient rim scale is only accounted for when the default ambient rendering method is used and raising that value too high will lead to low contrast images and awkward highlights in almost darkness.
You can apply the changes you made to the shader while playing TDM and directly see the effect:
- Load up the FM of your choice in windowed mode (so that you can switch between TDM and the test.vfp file)
- Make your alterations to the shader and save the file
- Finally issue the command reloadARBprograms to the console or even better, bind this command to a key, e.g. bind backspace reloadARBprograms
Note to Designers: If you want to have a tweaked version of the interaction shader just for playing (and if you don't have a separate install of TDM for working), you'll have to make sure the custom version of the file is not used while working. You could simply rename the file or the folder then.
Tweaking HDR-Lite Post-Processing
The term "Post-Processing" describes the alteration of rendered images and those techniques are for that reason independent of the complexity of a scene. With TDM 1.03 some point operators and a new implementation of bloom have been introduced to the community that will be explained now. If you type "r_postprocess" in the console and press tab, you'll receive a list of all the post-processing cvars and if you enter a cvar without assigning a new value, you will receive a description of it in the console.
Please note that in TDM 1.03 not all of the cvars below are stored in the DoomConfig.cfg. Once you are done tweaking, add the respective cvars to the autoexec.cfg, to have them applied on each start of TDM.
Note to Designers: Since you will probably spend most time working instead of playing, put the default config into the autoexec.cfg and have a separate file that alters the cvars, e.g. postPro.cfg. Ingame, you then issue the command exec postPro.cfg to the console to apply the tweaked values.
Bloom
List of related cvars and their explanations as of the console:
"r_postprocess_bloomIntensity" is:"0.0" default:"0"
 Adjusts the Bloom intensity. 0.0 disables the bloom but other postprocessing effects remain unaffected.
"r_postprocess_bloomKernelSize" is:"2" default:"2"
 Sets Bloom's Kernel size. Smaller is faster, takes less memory. Also, smaller kernel means larger bloom spread.
 1. Large (2x smaller than current resolution)
 2. Small (4x smaller than current resolution)
"r_postprocess_brightPassThreshold" is:"0.2" default:"0.2"
 Intensities of this value are subtracted from scene render to extract bloom image
"r_postprocess_brightPassOffset" is:"2" default:"2"
 Bloom image receives smooth fade along a curve from bright to very bright are as based on this variable's value
Recommendations and further information:

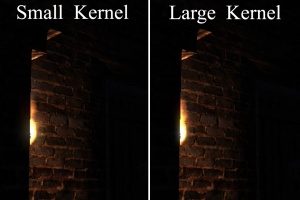
The bloomIntensity is self-explanatory, whereas the other cvars shall be explained. Imagine the bloomKernel as a bloomimage that has been computed from the renderimage, downscaled by a factor defined by the bloomKernelSize cvar. To apply the bloom to the renderimage, it needs to be scaled up again, so bilinear interpolation is applied. This directly means, that a smaller bloomKernel will lead to a wider spread of the resulting bloom, but it is also more likely that alias-like artifacts occur, as shown on the images on the right. The best quality bloom can therefor be achieved by setting r_postprocess_bloomKernelSize 1.
The brightPassThreshold defines how strong a pixel must be lit so that it receives bloom. Use a higher value if you don't want lightreflections on walls to have bloom. The brightPassOffset cvar is sort of a tone-mapping operator, that is applied to the bloom image. A smaller value will result in stronger and more saturated bloom.
Point Operators: Lightness Correction and Tone-Mapping
While the computation of a bloomimage is dependent of regions in the renderimage, the results of point operators are solely dependent of the information stored in a single pixel. In the HDR-Lite Post-Processing there are operators for lightness correction and tone-mapping.
Linear and Gamma Lightness Correction
List of related cvars and their explanations as of the console:
"r_postprocess_sceneExposure" is:"0.9" default:"0.9"
 Scene render is linearly scaled up. Try values lower or greater than 1.0
"r_postprocess_sceneGamma" is:"0.82" default:"0.82"
 Gamma Correction.
Recommendations and further information:
Everybody has probably at least heard of the term Gamma Correction. Lightness values are scaled exponentially according to the gamma value. In layman's terms, a gamma greater than 1 will usually make dark pixels even darker and a value lower than 1 will make dark pixels brighter (Note that the exact opposite is true for r_gamma). So, if you raise the sceneGamma cvar, you'll end up with stronger highlights. To account for the darkening of dark areas, you should raise the sceneExposure cvar as well, in order to maintain a constant brightness-level in pure ambient-lit areas.
Tone-Mapping / Color alteration
List of related cvars and their explanations as of the console:
"r_postprocess_desaturation" is:"0.05" default:"0.05"
 Desaturates the scene
"r_postprocess_colorCurveBias" is:"0.8" default:"0.8"
 Applies Exponential Color Curve to final pass (range 0 to 1), 1 = color curve fully applied , 0= No color curve
"r_postprocess_colorCorrection" is:"5" default:"5"
 Applies an exponential color correction function to final scene
"r_postprocess_colorCorrectBias" is:"0.1" default:"0.1"
 Applies an exponential color correction function to final scene with this bias.
 E.g. value ranges between 0-1. A blend is performed between scene render and color corrected image based on this value
Recommendations and further information:

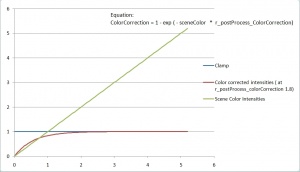
desaturation is basically self-explanatory. With a value of one, the scene is grayscale, and with zero, the image remains unaltered. But from this point on, it all starts getting pretty complex and confusing. A colorcorrected image is retrieved from the renderimage, according to the principle visualized on the right. colorCorrection is the parameter that defines the color correction curve, whereas colorCurveBias and colorCorrectBias define how strong that curve is supposed to be applied and how the renderimage and the color corrected image are blended respectively.
So why is it called "HDR-Lite" anyway?
During development the team of developers ran into several problems with the original HDR implementation, including performance issues and some visual artifacts, that were hard to circumvent given the fact that the source of idTech 4 is still closed. It was then decided not to work on the basis of an actual "High Dynamic Range", but to still maintain most of the resulting effects. The HDR implementation was altered and split up into the new Enhanced Interaction Shader and the HDR-Lite Post-Processing.