Creating textures from Ornate Photos: Difference between revisions
Nbohr1more (talk | contribs) |
Nbohr1more (talk | contribs) |
||
| Line 58: | Line 58: | ||
# If the contrast needed for the overall image destroys too much shadow detail in specific parts of the image, <br>use another layer from the original image and cut out the desired section then tune it's contrast and paint until only shading is visible. | # If the contrast needed for the overall image destroys too much shadow detail in specific parts of the image, <br>use another layer from the original image and cut out the desired section then tune it's contrast and paint until only shading is visible. | ||
# Use the opacity sliders to adjust the relative strength of each layer then flatten the image | # Use the opacity sliders to adjust the relative strength of each layer then flatten the image | ||
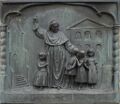
Result: | |||
[[File:Pere_girard_edited_sm.png]] | |||
== Tuning the Heightmap for Normal Map conversion == | == Tuning the Heightmap for Normal Map conversion == | ||
Revision as of 17:56, 14 June 2024
DRAFT
There are a number of texture creation articles in the darkmod wiki with valuable advise regarding texture design.
This article serves to cover a few areas that aren't really discussed either due to mappers presuming "a priori" knowledge
or due to lack of knowledge regarding these areas.
The Ornate Photo
starting image

This tutorial presumes that we are concerned about creating a texture that illustrates detailed carving or engraving.
The subject will typically be a single physical material such as stone or wood. The techniques can be extended
to complex multi-material sources but will be far more labor intensive.
As best as possible, try to ensure that the photo of the ornate carving is flat with respect to view perspective.
You can correct this a little via the use of rotation and shear translation operations but it is best to start
with a texture that is close to orthographic as possible with as little vanishing point distortion as possible.
Also, it is strongly recommended that the photo source be illuminated by a single light source.
Ideally it would be lit with uniform diffuse lighting but a moderate strength single
directional light also works as long as large portions aren't completely cast by black shadows.
That said, depending on the source photo one could possibly use the lit portions to reconstruct the shaded
areas on a larger scale than the technique offered later in this tutorial.
Tuning the photo for Height Map conversion
The dominant tool for generating normal maps from photo sources in the darkmod community is "njob" but other tools such as
"Crazy Bump", "Awesome Bump", "Materialize" all seem to use the same design where the heightmap extracted from a texture
is inferred by directional shading around features and overall brightness ( AO ) and some percentage of the shading
from the original source photo mixed in. There are plenty of ways that this heuristic can go wrong and decide to invert, flatten,
or emboss the wrong geometry in the texture. To reduce the chance of these issues, you can tune the image prior to feeding it
to njob for conversion to heightmap.
The tuning is done by selectively brightening or darkening areas of the photo so that protrusions are brighter and recesses are darker.
There are a number of ways this can be achieved ranging from painting \ airbrushing a transparent bright layer over the image and blurring
it, to painstakingly selecting small sections of the image and using the brightness \ contrast color tool to brighten or darken.
In my experience, for GIMP the easiest way to achieve good clean results is as follows.
( Remember to keep an unaltered version of the original photo source. )
Denoise the Image
The carved stone or wood will normally have natural color and brightness variations that have nothing to do with
the depth of the 3D structure. We need to create a new image that has as little of that "noise" as possible
so that the depth-map \ normal-map program doesn't try to turn those shades into 3D structures.
- Open the original image in GIMP
- Use the Layers "From Visible" to make 2 or more copies of the image into various layers
- Convert all the layers to grayscale
- Make the top layer a multiple layer ( make sure all layers except the bottom have an alpha channel)
- Use Brightness \ Contrast or Levels (etc) on the top layer to make the image mostly white with a few dark recesses
- Paint areas that are shaded incorrectly ( due to surface color rather than shadows ) white or gray depending on the proximity to shadows
- Make another low contrast using the Levels tool and reduce the contrast range ( less deep blacks and bright brights )
- Again paint away or airbrush shade variations that aren't due to shadowing
- If the contrast needed for the overall image destroys too much shadow detail in specific parts of the image,
use another layer from the original image and cut out the desired section then tune it's contrast and paint until only shading is visible. - Use the opacity sliders to adjust the relative strength of each layer then flatten the image
Result:

Tuning the Heightmap for Normal Map conversion
The process of converting from photo to heightmap will usually wash out some of the fine details. One way to better preserve the details is to generate an alternate heightmap from the original source image then convert to normal map then heightmap all using the highest detail settings and then blend this high detail AO map over the original heightmap with a layer using color to alpha ( white )
Finally use GIMP again to selectively brighten or darken parts of the image. This time you can be much more aggressive in exaggerating the brightness of protrusions.