Skybox Tutorial
This is a WIP tutorial for skybox creation by Sotha. This is my first wiki contribution so I hope I will not mess things up terribly badly.
And now to the topic:
Skybox Tutorial
Motivation
Why bother creating a custom skybox? The standard starry prefab is just fine!
It indeed is, but everyone has seen it so many times. Creating a specific sky just for your mission gives your mission personality. With the sky, you can relate atmosphere and information on the location where the mission takes place. In the plains just outside the City? In the top of a high mountain, in the eternal snow?
With a some hours invested in sky creation you can make your mission seem real as it seems to be located somewhere. It does not exist alone in the world, you can see the world around it.
Introduction
In this tutorial you will learn
- how to create a sky texture using Terragen.
- how to build a skybox using the landscape texture you created.
- how to add details (buildings) to the skybox.
Preparing
- Get aquainted with the basic idea what we are going to do. http://www.modwiki.net/wiki/Cube_maps
- Download and install Terragen. http://www.planetside.co.uk/content/view/16/28/
Scenery Building
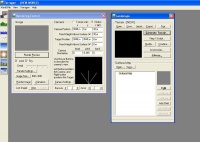
The program window is shown in the picture 1.
Click the Generate Terrain -button. Since we are doing a skybox, we need the camera to be located near the middle of the map, so we are surrounded by the scene. Click left mouse button on the topology map on the Rendering Control -window to place camera in the middle of the scene. You can change the direction with the right mouse button. The grayscale topography image may not give much information on the resulting scene, so you can use the 3D preview button on the left. You can also use Rendering Preview and the actual Render Image -buttons to check what the camera sees.
Now that you know how to see what you've created, you need to try to select the parameters so that you'll get close the kind of scenery you want (plains with distant mountains or barren mountain range). Hold your mouse above the settings (Realism, Smootinh, etc) to see what each parameters does. Experiment until you get something close what you want. The closer you get with the parameters, the easier the sculpting phase is.
When you're close with the scenery you want, save it so you can start from where you were is something goes wrong. Lanscape Window -> Terrain -> Save. Now we will sculpt the map. Click the topology map on the Landscape window. Now you can sculpt the scene with the Basic Sculpting Tool. Raise a mountain, remove a mountain, smoothen the plains and add a pit with smooth edges for a lake, or make a river.
Next we set the water level. Click the water-button on the left. Set the water level and press update maps. You'll see light blue colors in areas with water. Set the levels so that you've realistic looking sea. Sculpt shores to be gently sloping.
Then we set the surface. In the landscape window there is Surface Map -section. Select open and try to pick up the kind of terrain textures you need. For plains "grass and sand" is just fine. For others you probably need to create your own surface map.
You can edit the skies clouds by selecting the Clouds button on the left. And set the ambience haze from the atmosphere button on the left.
Finally we set the lighting conditions with the button on the left. Since TDM is a sneaking game you probably want to set the sun below the horizon. Maybe the mission occurs at midnight? Or just after sunset? Set the sun appropriately. Check the rendering preview. It probably looks too bright with the sun gone, so decrease Shadow Lightness (located in Lighting Conditions -> Background Light). If you end up in pitch black scenery, increase the Exposure time in Rendering Control -> Camera Settings.
When you have everything the way you want we can proceed to the image capture phase. DOUBLE CHECK your work with the Render Image -button in every direction with low detail settings so everything looks good. Once the images have been captured you need to capture everything again if you notice something unpleasing in the resulting work.
Set all detail knobs you can find to maximum (Rendering Control -> Render Settings, Rendering Control -> Detail). Set image size to 960x960. This is the maximum resolution you'll get from the free version. Double check your camera settings. Is the camera in the correct position? Height from the surface? Check the camera ZOOM in Camera Settings: if this is any other than 1.0 your skybox will not align correctly (it defaults to 1.4 so change it!) Then capture the images.
- Set Camera orientation: head 0, pitch 0, bank 0
- Render image and save it as yoursky_forward.bmp
- Set Camera orientation: head 90, pitch 0, bank 0
- Render image and save it as yoursky_right.bmp
- Set Camera orientation: head 180, pitch 0, bank 0
- Render image and save it as yoursky_back.bmp
- Set Camera orientation: head 270, pitch 0, bank 0
- Render image and save it as yoursky_left.bmp
- Set Camera orientation: head 0, pitch 90, bank 0
- Render image and save it as yoursky_up.bmp
- Set Camera orientation: head 0, pitch -90, bank 0
- Render image and save it as yoursky_down.bmp
