Photoshop: The Toolbar Explained
Photoshop tutorial series:
Other photoshop tutorials:
The Toolbar Explained

Notice that some of the tools have a little black notch along the bottom right of the icon? That means there are multiple subtools under this selection. You access them by ![]() on the icon to bring up its submenu.
on the icon to bring up its submenu.
 - The Move Tool
Fairly Self Explanatory. With nothing selected, it'll move whatever you have in a selected layer, up to an including your entire image. If you marquee select something, it'll move that. Yeah, I know. No crap. But hey, I said I was going indepth here.
You can also do precise moves using your arrow keys. Hitting the right arrow key will move your selection one pixel to the right. Holding down SHIFT and the arrow keys speeds it up, jumping about 5-10 pixels per step.
 - Marquee Selection Tools
![]() gives you 4 subtools. Rectangular, Elliptical, Horizontal Row, Vertical Row. These are all pretty self evident here. Playing with them for 5 seconds will give you a better idea of what they do than any wordy explanation I can give.
gives you 4 subtools. Rectangular, Elliptical, Horizontal Row, Vertical Row. These are all pretty self evident here. Playing with them for 5 seconds will give you a better idea of what they do than any wordy explanation I can give.
But there are some handy tricks that aren't very obvious, such as being able to tailor your selection. So, breakdown time.
Without an active marquee up, holding down ALT will grow out a uniform selection from the middle of your mouse pointer. Not too handy with the rectangle, but almost necessary with the elliptical marquee.
With an active marquee up, holding down SHIFT while you draw out another marquee adds to the selection, and ALT subtracts from it. This is good for selecting difficult objects, or making weird shapes to fill in, such as...

So handy! Also, you can grow, shrink, feather, or invert selections by going to the select dropdown menu at the top of the PS window. You have quite a few tools available to fine tune your marquee selections...and you will use em.
Holding down CTRL while the marquee tool is active temporarily enables the move tool, so you don't have to switch back and forth constantly.
Lastly, if you want to move the marquee itself. Like, for instance, you want to grab another object and keep the same pixel selection size, just hit the arrow keys to adjust it. Same as with the Move tool, hitting SHIFT along with the arrow keys will speed it along at 5-10 pixels per keystroke.
 - Lasso Tools
Yet another selection tool, but more freeform than the marquees. Lasso lets you draw a selection, polygonal lets you block one in one point at a time for more precision, and magnetic tries to follow shapes and patterns.
FYI, the magnetic lasso is annoying as hell to use. You have to draw along your intended selection sllllooooowwwwly for it to align to your intended target. But what if you sneeze? TOO BAD! You're screwed. Start over again from the beginning. Don't use it unless you hate yourself, really love tedious BS, or have an inhumanly steady hand.
 - Quick Selection Tools
The much ballyhooed magic wand, and the namesake quick selection tool. I've never much used the quick selection tool, but the magic wand is handy for any number of situations. Want to select a range of colors across your texture? Want to grab the white space surrounding a tree limb so you can cut it out? With a few tweaks to sensitivity, you can use the magic wand to do just that. Though don't think of it as a one-shot solution to grabbing a specific object in a picture. It's better used on flat colors or grabbing shapes than it is, say, a blade of grass or a leaf. Any image with too much noise can and will confuse it. Sometimes, your only option is to create an alpha mask around your intended object and collapse the layer, or use your pen tools to isolate the shape.
 - Crop and Slice Tools
Another self explanatory set of tools. More useful for photo editing than texturing. Mostly, I just marquee and CTRL+x to cut, or CTRL+c to copy and CTRL+v to paste.
 - Color Selection Tools
This would be more aptly titled the Miscellaneous Stuff Tools. The one you'll use the most here is the eyedropper tool, which lets you grab a color from your picture and applies it to the color swapper for later use. As for the other tools?
- Color Sample Tool – for those moments when you absolutely need to know the exact RGB specifications of the targetted color. There's probably more to this tool than I realize, but for now, it seems more a tool for the tragically anal retentive among us.
- Ruler Tool – Measures stuff. How many pixels wide is this? ...oh.
- Note Tools – lets you write love letters to yourself so you can find them later and cheer yourself up.
 - Quick Fix Tools
For when you need something fixed quickly.
- Spot Healing Brush Tool – Lets you paint over a section of your picture, and blends it in with the surrounding pixels. Good for blending when used in small doses.
- Healing Brush Tool – Like the spot healing brush mixed with the clone tool. You alt-click to define a point elsewhere on your picture, then paint somewhere else. It'll take that point of reference, and blend it with the underlying area of your picture. It's useful for some things, I guess. Truthfully, I rarely ever use any of the tools here.
- Patch Tool – Does this neat looking thing that I can find absolutely no use for. Sort of like a lasso selection mixed with the healing brush tools.
- Red Eye Tool – Just like Visine. It gets the red out.
 - Painting/Drawing Tools
- Brush Tool – Wot you paint with.
- Pencil Tool – Almost exactly like the brush tool, but it seems...I dunno...more precise somehow. Falloff on the brushes seems more subtle when using the pencil tool.
Interesting little aside on the brush and pencil. If you want to paint a straight vertical or horizontal line, hold down shift, and start painting. As long as you hold down SHIFT, you won't be able to paint in any other direction. Alternately, you can hold down SHIFT, click a dot on one point, and click in another, and PS will draw a line directly to the second dot.
- Color Replacement Tool – Normalizes the color of your picture to whatever color is selected in your color swapper. Like say you have a blue section you want to paint red, but still keep your shading, and variation of colors. You'll use this tool to do just that. I honestly don't think I've never found a use for this tool. Your mileage may vary.
- Mixer Brush Tool – Takes the color on your swapper, and blurbs it in with the pixels you're painting on. Like painting with wet oils. Good for smearing stuff.
 – Stamp Tools
- Clone Tool – Alt-click to select a point of reference, and lets you paint that reference elsewhere on your picture. A very very very VERY handy tool for texturing. Use it with a soft brush, and you can blend and add variance to a lot of stuff.
- Pattern Tool – Lets you select a pattern from the pattern palette, then paint it in. Good for something, I'm sure. For what, I have no idea.
 – History Brushes
- History Brush – Say you did a lot of work on your texture or photo, but you don't like one specific change in one specific area. Use the History Brush to paint in that specific area to go back to earlier changes without affecting all your changes. If you've ever seen a photo that's mostly in black and white, but has a color subject, this is the tool they used to achieve that effect. Now you know.
- Art History Brush – Same as History, but I believe only applied to changes made with brushes, pencil, and maybe the paintbucket. I don't think I've ever used this tool even a single time, so I can't claim to know exactly what it does.
 – Eraser Tools
- Eraser Tool – Self explanatory. Erases what you paint over, and leaves a trail of whatever your subcolor is on your color swapper.
- Background Eraser – Same as the eraser, but it cuts through the image, and leaves a swatch down to the layer below.
- Magic Eraser Tool – Like the eraser mixed with the magic wand. If you need to delete large swaths of colors, then this is your tool.
 – Paintbucket/Gradient Tool
- Paintbucket – Everyone knows what this is. Dumps color all over your picture. Fills along a limited range of colors if you've got the tolerace set tight, or whole areas if it's loose.
- Gradient Tool – This tool is easy to understand, hard to explain. You select a gradient pattern, and draw out a line of whatever length. PS will apply the gradient to the length of the line you drew. Good for painting some shadows, or adding curvature to a flat object.
 – Sharpen/Blur/Smudge
- Sharpen – Like applying the sharpen filter to whereever you paint. The more you paint, the more you sharpen. Good for bringing out details and highlights on specific areas. Use in moderation.
- Blur – Like applying the blur filter to whever you paint. The more you paint, the more you blur. Good for blending harsh edges together. As with sharpen, you want to use this in moderation.
- Smudge – Takes the pixels whereever you paint, and pushes them into each other. Think of it as sorta like pushing your finger through a wet painting.
 – Dodge/Burn/Sponge
"Art" tools. They most definitely have their purposes, though I try to keep myself from using them too much, because they're destructive. They don't work on blank layers, can't sample the layer below. You'll have to use them directly on your image to get an effect.
- Dodge – Lightens where you paint. Why they call it dodge, I have no idea. Good for painting highlights directly onto your texture
- Burn – Opposite of dodge. Darkens where you paint. Good for painting shadows.
- Sponge - Desaturates where you paint. The more you paint, the more color you subtract.
 – Pen Tools
Think of these as a small selection of vector tools from Adobe Illustrator. These are good defining a mask to make fine selections. If you find yourself wanting to cut a blade or tuft of grass away from a source photo for an alpha, these tools can help you along with the process.
- Pen Tool – Lets you define edges with Bezier Curves.
- Freeform Pen Tool – Same as the Pen Tool, but you don't draw point to point. You just draw, and it makes a vector.
- Add Anchor Point – For the Pen Tool. If you need another curve point in there, use this
- Subtract Anchor Point – Deletes an anchor point if you don't need it.
- Convert Point Tool - Adds an extra manipulator handle, so you can have more Bezier on your curves.
 – Text Tools
You need to type words on your texture? Want to type horizontal or vertical? Add a text mask? Then these are the tools for you!
 - Vector Editor
Tools that allow you to select the shapes drawn with the pen tool in their entirety, or reedit the anchors at a later point.
- Path Selection - Selects the entire path. A path, in this instance, being a standalone object drawn with the pen tool.
- Direct Selection - Allows you to select and reedit an anchor point on one of your paths.
 – Marquee Fills
MS Paint in Photoshop. You get a bunch of shapes, you draw them, and they either make a line drawing of varying thickness, or a solid shape.
 – Grab/Rotate Canvas
Grab is good for freeform navigation through your picture while zoomed in. Just click and drag to move about. It's the default left-click application when you're using a pen tablet. Rotate Canvas lets you...wait for it,,,rotate your canvas around. If you find yourself wanting to paint something, but find it more comfortable to paint in a certain angle, then use this to...wait for it...rotate your canvas around.
 – Zoom Tool
ZOOOOOOM! Want to get up close to do some tight editing? ZOOOOOOOM! Want to move out so you can see your picture in it's entirety? ZOOOOOOOOM! Remember to ![]() with the Zoom Tool active for a quick way to zoom to actual pixels or fit to screen.
with the Zoom Tool active for a quick way to zoom to actual pixels or fit to screen.
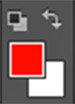 - Color Swapper

Allows you to pick two colors to quickly swap between. The overlapping topmost box is your active color, what you'll paint when you use a brush tool, fill when you use the paintbucket, ect. The box behind it doubles as your quick secondary color, and the background color of a basic, nonlayered object. For instance, if you had red set to the secondary color, and used the eraser tool on a background layer, the swath it'd leave behind would be red.
The small icon along the top is the actual color swap button, what you hit to switch between the two. Alternately (and preferably), you can hit x to do the same thing. To change the color on the swapper palettes, either select the boxes directly with a single ![]() to enter the pallet, or use the eyedrop tool, which will change the active color box to whatever color it happens to suck up.
to enter the pallet, or use the eyedrop tool, which will change the active color box to whatever color it happens to suck up.
Photoshop tutorial series:
Tiling with alpha masks • Tweaking with adjustment layers • Stonewall phase 1 • Stonewall phase 2
Other photoshop tutorials:
The Toolbar explained