How to Make Your AI Unique
written by Springheel
Running into clones of the same AI over and over again can ruin the illusion of being in a realistic environment. Beyond that, it's just plain boring. Luckily, there are some fairly easy ways to make your AI look a little different from each other.
Skins
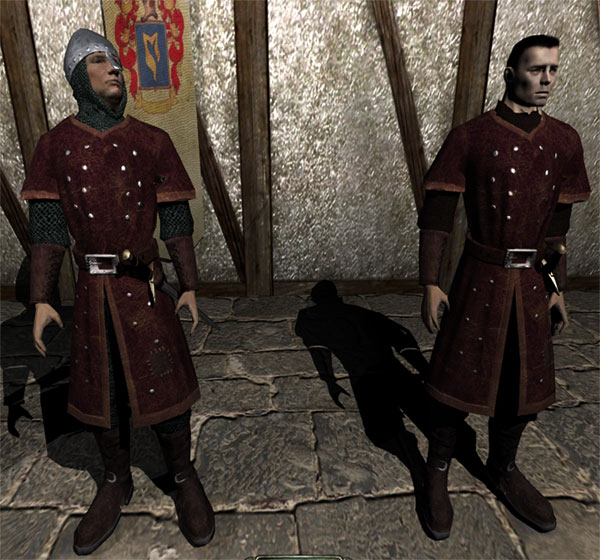
An easy--and quite effective--way to make your AI quite different from each other is to use an alternate skin. A skin is basically a different texture from the default. It could be as simple as changing the colour of an AI's tunic from blue to green, or a totally new texture that changes the clothing entirely (though obviously the basic shape of the model remains the same). See Creating Multiple Skins For A Model for more information on how this process works.
At the moment, not very many of The Dark Mod's AI actually have alternate skins to choose from, but things will improve slowly. See AI Skins--List of Available Choices to see what skins exist for various AI models.
To use a different skin, you need to add the key/var "skin" "[skin name]" to the AI in the entity window. You can browse for skins in D3ed, but existing skins will not show up in the "Matching Model" section, so you would have to scroll through the existing skins to find them (they should be under "characters") (look this up).
Adding AI Skins in Dark Radiant
In Dark Radiant these character skins are very difficult to find at present...
- To the AI entity add a spawnarg named skin with any temporary value eg, x and click the check button.
- Select the skin spawnarg and a button should appear at the bottom of the entity inspector called skins, click it.
- The list is mostly out of order so there is a large number of skins out of order mixed with folders out of order.
- Open All skins and you should then see the list but do NOT then open the skins folder near the top because inside it is a characters folder that is NOT the one you want!
- Instead, keep the skins folder closed and scroll down about half way in the 'all skins'; you are looking for another characters folder, not the one in the skins folder.
- The characters folder you want is (at the time I am looking) between the lights folder and the gen folder (plus there is a host of unordered skins not in any subfolder just there.
- If you can find that characters folder then the tdm ones are inside.
- Select one that is under your particular AI.
Alternatively, instead of using the skin selector in Dark Radiant you can...
- use Windows Explorer or your favourite file manager to look in dark mod's skins folder and open the file characters.skin in any plain text editor or viewer. (or just look on the page AI Skins--List of Available Choices for the name of the skin)
- Search down for your AI, eg, // Townsfolk skins then below that are the definitions that should fit.
- Copy and paste the whole definition path after the keyword skin, eg, characters/townsfolk/townsfolk_male1/green_tunic
- In Dark Radiant, to the AI entity add a spawnarg named skin
- Paste in the skin definition you copied from the skin file
- Click the check button.
Attaching A Different Head
Another option is choosing a different head. Most human AI have at least six alternate heads to choose from. See Swapping Heads on AI Models for instructions about how to do this.

Not every head looks good on every body. Some heads are too large or too small, or have necks that don't match up very well. Even on good heads, the necks can clip into the body in a somewhat displeasing way sometimes. Unfortunately we can't do much about that. Luckily it's usually only a problem when the AI looks up or turns in an odd way.
Be aware that not all heads have the same animations. The default D3 heads don't have lipsynching and don't close their eyes when they're KO'd, for example. So if you're choosing a head for an AI that is an important NPC or has a scripted conversation, you may want to avoid those heads. Also, some heads come with headgear permanently attached, so be aware--you wouldn't want a townsfolk walking around with a city watch helmet on.
Def_Attaching Prop Items
Another way to add more variety to your AI is to attach different objects to them. With a little creativity, you can get some surprising variation by attaching different models.
One easy way to add some character to your AI is to attach some kind of headgear. There are hats, hoods, hair extensions, (like pony-tails), and oddities like eyepatches which can all give your AI a unique flavour.

What an AI wears can also be modified by attaching armour pieces, (like pauldrons), belt buckles, brooches and other jewellery.
Finally, AI can be carrying numerous things on their belt to add a little character. Game objects like weapons, purses, keys, or potions are obvious choices, but other objects like a spoon, a coil of rope, or a workman's hammer can also be used.
In order to be attached to an AI, an object needs to have an entity definition that sets what 'joint' it should be attached to (head, spine, etc. see next section) and how it should be positioned and rotated relative to that joint. The object will move with the joint it is attached to, so if you attach something to the head joint, it will move whenever the AI moves its head.
Currently, all our 'attachable' entities (with the possible exception of weapons--check that) are found in tdm_prop_wearable_items.def and tdm_prop_items.def. You attach one of them by selecting the AI in the editor, and typing in the key/var "def_attach" "[prop entity name]". If you want to attach something that doesn't already have a 'prop' entity, then you'll need to make one. See Making 'Prop' Entities.
Note that an attached object will not show up in the editor. You have to run the game in order to see it.
Prop objects can be 'tweaked' for each AI (the values that position a key perfectly on the belt of one model may be too low for another) but most are currently only set for a single AI. See Adding Offset Values for Specific AI for more info. This will be improved as time goes on.
Joints Names
The name of joints for use with def_attach can vary with the AI. They are listed in the .md5mesh files for each AI. These are in the darkmod/models/md5/chars folder and can be viewed in a plain text editor.
There is a cvar to enter in the console that shows the skeleton of the AI with joints names in-game. This is the cvar to show joint names is r_showskel 1 to show and 0 to hide.
For most purposes, here is a list of commonly used humanoid joints names for use with def_attach:
origin
Head
Neck
Spine, Spine1, Spine2 (chest), Spine_Dummy, joint8 (Spine2) joint9 (Spine2), leftpad (Spine2), rightpad (Spine2)
LeftShoulder
RightShoulder
LeftArm, LeftArmRoll,LeftArm_Dummy, LeftForeArm
RightArm, RightForeArm
LeftHand, LeftHandIndex1, LeftHandIndex2, LeftHandIndex3, LeftHandRing1, LeftHandRing2, LeftHandRing3, LeftHandThumb1, LeftHandThumb2, LeftHandThumb3
RightHand, RightHandIndex1, RightHandIndex2, RightHandIndex3, RightHandMiddle1, RightHandMiddle2, RightHandMiddle3, RightHandThumb1, RightHandThumb2, RightHandThumb3
Hips, LeftHips_Dummy (belt), RightHips_Dummy (belt), sword (Hips)
LeftLeg, LeftUpLeg, LeftUpLegRoll, LeftLegRoll, joint3 (LeftUpLegRoll), joint4 (LeftUpLegRoll)
RightLeg, RightUpLeg, RightUpLegRoll, joint5(RightUpLegRoll), joint6(RightUpLegRoll)
LeftFoot, LeftToeBase
RightFoot, RightToeBase
Attaching 'Alternate Animation' Objects
Some attached objects change the way your character moves. For example, if you attach a torch to your AI's hand, then the AI will play the 'carrying torch' animations, which keep his hand stuck out in front of him. See Overriding animations via attached objects for more information on how this works.
There are lots of ways to use this to make AI more interesting. AI can carry lots of regular things in their hands and use the 'carry torch' animation--candles, cups, brooms, etc. You could also create unique animation replacements, like attaching a wine bottle to a guard, and replacing the regular attack animations with the 'blind' attack animations to make him swing wildly when attacking (as if drunk).
There's also a sneakier way to use this system, by creating invisible entities that change the animations an AI uses.
For example, you could attach an entity that has no visual model, but causes the AI to replace the normal walk animation with a 'limp' animation. Or you could attach an invisible entity that makes an AI shake his fist whenever he senses someone around (replacing 'alert' animation with 'shaking fist' animation), etc. Or more simply, you could just choose an alternate walk cycle so two similar AI don't walk identically.
This system has a lot of potential, though it can't really be used effectively until more code exists to call animations (currently, though AI have a lot of animations, only the basic animations are called by the code).
Making AI move faster or slower
You can tweak the speed of individual animations that are played by an AI; for example, to subtly increase or decrease a particular AI's walk speed, or their attack speed, or the speed at which they turn their head when looking around. See changing the animation playback speed for details.
Extra note: To make an AI run on patrol add the property/value : run 1 to a path_corner on the AI's patrol and the AI will run to it (then resume walking after it if the next path_corner does not have that property set.)
Changing Voices
There are various voices available for different AI types and you can set these on individual AI, see Voices
Conclusion
Combining these effects can make your AI look like totally different models, allowing all kinds of variety. Imagine a skin with a no-draw texture on an AI's leg, and then attaching a wooden torch as a peg-leg (with a 'limping' animation)? There are all kinds of creative possibilities if you want to experiment.